
You can edit a user account's information in your organization's database.
Note: You cannot change a user's password, including your own, on the User Accounts page. A user can only change their password by clickingtapping the Forgot Password? link on the login page and following the instructions given or, if the person is logged in, by changing the password on the My Account page > Change Password tab.
To edit a user account
How to get there
-
From the Settings menu, under Location, clicktap User Accounts.
The User Accounts page displays.
-
On the User Accounts page, select a user account.

Tip: If necessary, you can use the Search field to locate a user account.
The User Account Information page displays.

-
Edit the following tabs as necessary:
-
Basic Info
-
User Image - To attach a picture of the user, clicktap Select Image, browse for and select the image file, crop the image, and clicktap Apply.

Note: The picture displays online when you use the online booking feature.
-
First Name, M.I., Last Name - The user's first name, middle initial, and last name.
-
Username - The username the user must use to log in.
Note: Each user in your organization must have a unique user name. Only letters and numbers are allowed; spaces and special characters are not. The maximum allowed length is 56 characters. Also, the user name cannot be Admin or Administrator.
-
Email - The email address of the user. This is used for administrative purposes and is required for every user account.
Note: If you change a user's email address, Ascend Academic will send a verification email message to the user's original email address. That email will contain a link that the user must clicktap to verify that the new email address is correct.
-
Phone 1 - The primary contact phone number of the user (for example, a home phone number).
-
Phone 2 - The secondary contact phone number of the user (for example, a mobile phone number).
-
Is Provider - If the user performs dental procedures (such as a general dentist or a hygienist), set the toggle to Yes. Otherwise, set it to No.
Important: If you set the toggle from Yes to No, you will need to reassign any of their items, such as their upcoming appointments and charts, to a different provider. You can reassign the items when you clicktap Save. For more information on how you can reassign the items, read Step 3.
-
Uses time clock - Set the toggle to Yes to enable the time clock function for the user. To disable the function, set the toggle to No.
-
Inactivity Timeout - How long the system can be inactive before the user is logged out automatically. The recommended length is 10 Minutes, but there are also options for 30 Minutes, 1 Hour, 2 Hours, 4 Hours, 8 Hours, and 12 Hours.
Note: If you have the system open on multiple tabs of your browser, inactivity is monitored separately for each tab.
Example: If you open Ascend Academic on a tab and later on another tab, but do not continue working on the first tab, you are logged out of the system automatically on the first tab but may continue working on the second tab.
-
-
User Roles & Locations

Complete any of the following:
-
To change a user's role at a specific location, select a different role from the User role drop-down list that is aligned with the correct location.
-
To add a role to a location, clicktap Add New Role and set the generated Select Role and the Select Location drop-down lists.
-
To remove access to a specific location, clicktap the X button next to the location that you want to remove. Since each user must have access to at least one location, this button is available only if the user has access to multiple locations.
Important: Your organization's business owners, doctors, and office managers should be the only ones who have administrative security roles.
Notes:
-
A user can only have one role per location. They cannot have multiple roles at a single location.
-
Any changes on this tab comes into effect the next time the user logs into the system.
-
-
Provider Info

-
Short Name - An abbreviated name that will be used to identify the user throughout Ascend Academic.
-
Title - The user's title (for example, DMD or DDS).
-
Specialty - The user's specialty.
-
Provider appointment color - The appointment's color that will only display when this user is set as the rendering provider. You can clicktap the color swatch to select a different color.
-
Birthdate - The user's birthdate.
-
Is a Primary Provider - Set the toggle to Yes if the user can be selected as a patient's primary provider and as a billing and/or rendering provider for claims. Otherwise, set the toggle to No.
Tip: This option is not available if the user is assigned as the primary provider for at least one patient. To view a list of the patients who have this provider as their primary provider, clicktap the [number of] patient(s) link in the yellow notification message.

-
Signature On File - Set the toggle to Yes if you want this user's claims to state that there is a signature on file for this user. Otherwise, set the toggle to No.
-
Address 1, Address 2, City, State, ZIP Code - The user's work address.
-
Locum Tenens Treating Provider - If the provider is a treating provider who temporarily fills in for another provider and/or works at a practice other than their usual practice, set the toggle to Yes. This toggle sets the default state of the Locum Tenens Treating Provider toggle for a claim if this provider is the rendering provider on that claim; however, the locum tenens treating provider is not required on most claim form versions.
-
State ID # - The user's state license number.
-
TIN # - The user's TIN or SSN.
-
State ID # Expiration - The user's state license number expiration date.
-
NPI # - The user's NPI for electronic claims.
-
DEA # - The user's DEA number for prescriptions.
-
DEA # Expiration - The user's DEA number expiration date.
-
Medicaid ID # - The user's Medicaid ID number.
-
Provider # - The user's provider number.
-
BCBS # - The user's Blue Cross/Blue Shield number.
-
CS # - The user's Controlled Substance number for Washington D.C prescriptions.
-
BlueShield # - The user's Blue Shield number.
-
Provider # - The user's provider number.
-
-
Fees

-
Fee Schedules - The fee schedule that is used to bill patients for procedures performed by this user.
-
Contracted with - Insurance carriers the user is contracted with that receive the user's billed procedures. To set, expand a section that has the first letter of the insurance carrier's name, locate it, and then select its checkbox. Repeat if the user is contracted with multiple insurance carriers
Important: Each time you add an insurance carrier to your organization's database, for each provider (and location serving as a provider) that is contracted with that carrier, you must return to this Contracted with section and select the checkbox next to that carrier's name.
-
-
Working Hours
-
Review the displayed location's working hours.

The tab displays the following:
-
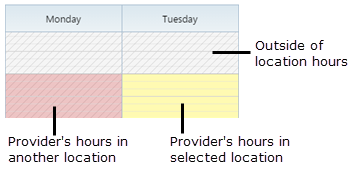
Gray time slots with gray hatched lines - A time slot outside of office's working hours; the office is closed.
-
Yellow time slots - The user is available for work during that specific time when the office is open.
-
White time slots - The user is not available for work even though the office is open.
If the user has access to multiple locations, working hours at other locations display in pink with gray hatched lines for your reference.
-
-
-
-
ClickTap Save.
Once you edit a user account, the user will receive an email message stating that information has been updated.
Important: If the user was a provider and you set them as a non-provider, the Inactivate Provider - [name of provider] window displays if they're set as the provider for anything in the system, including upcoming appointments and procedures.
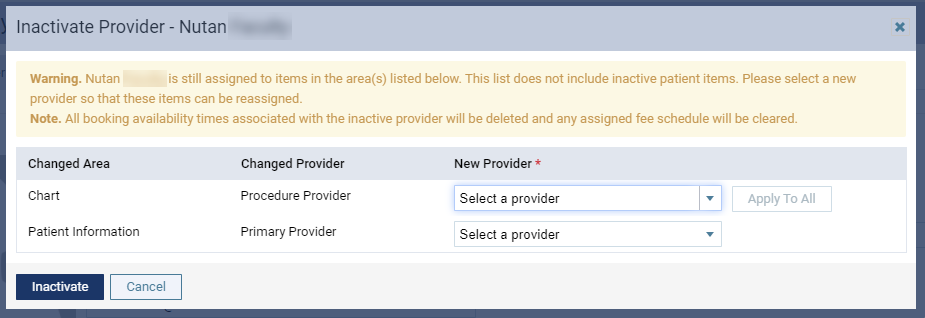
You need to reassign these items to a different provider to set the user as a non-provider. To reassign them to a new provider, you need to clicktap the Select a provider drop-down list and select a new provider. To apply the same provider to the rest of the items, you can clicktap Apply To All after it's been enabled. The button is enabled when you set a new provider to the first item. When ready, clicktap Inactivate to confirm you no longer want the user to be a provider.
Comments
1 comment
I need to change the primary provider to multiple patients but need to leave the Chart provider with the same provider.
Please sign in to leave a comment.