
Many new feature enhancements are included in the product update released in October 2025. The major enhancements in this release include the following:
Imaging
Scheduling
Financials
Reporting
Settings
A bug fix is also included in this release.
Imaging
Upgrade to RCI version 119.2
The RCI version has been updated to 119.2 to include a variety of new features. We recommend you update your acquisition agent.
Important: Some of the new features and enhancements will require you to update your acquisition agent.
Ability to hide Check For Updates option for acquisition agent
You can now hide the option that allows you to check for updates for the acquisition agent, providing flexibility for organizations that prefer to manage software updates manually.
To hide the option
Open the Acquisition Agent.ini file.
Note: The default installation location is C:\Program Files (x86)\Acquisition Agent.
In the [Debug] section, add a new line for the HideCheckForUpdatesLink parameter, and set it equal to True.

Save the change.
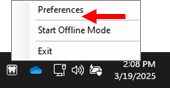
With the HideCheckForUpdatesLink parameter in the .ini file set to True, the Check For Updates option does not display on the right-click menu when you right-click the Acquisition Agent icon in the system tray.
HideCheckForUpdatesLink = False

HideCheckForUpdatesLink = True
Ability to view black and white levels in Image Details
The black and white levels now display in the Image Details window.
To view the black and white levels
While viewing an image, click the Edit  icon to display the Image Details window and review as necessary.
Note: If the image has tooth numbers, the Assign Tooth Numbers window displays, and you can click the Image Details link to view the image details.

Ability to show/hide AI findings during image comparison
A Show/Hide AI Findings icon is now available while you are comparing images.
To show or hide AI findings
While viewing an image, click Compare.
If AI findings are hidden, click the Show/Hide AI Findings icon.

The AI findings display, the Show/Hide AI Findings icon turns orange, and the Show/Hide Patient View icon displays.

Click the Show/Hide Patient View icon to show tooth anatomy.
The tooth anatomy displays and the Show/Hide Patient View icon turns orange.

New Launch VideaAI button
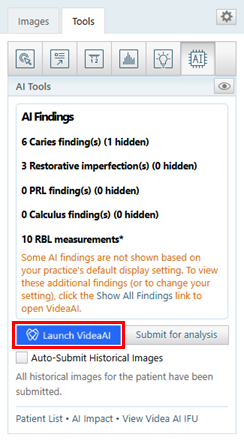
While viewing the AI tools for an image, you can now open the Videa AI website by clicking the (new) Launch VideaAI button.
Ability to filter custom procedures
Note: Users who create custom procedures are now recorded in the database. However, existing procedures are not linked to individual users—only the associated organization and location are retained.
On the Custom Procedures tab, you can now filter procedures according to the following options:
Organization – Displays all custom procedures that were created in your organization.
Location – Displays only the custom procedures that were created in the location that you are currently viewing.
User – Displays only the custom procedures that were created by the user whose account you are currently logged in with.

Note: By default, Location is selected the first time you access Imaging. Whichever option you select after that is saved for the next time you view the custom procedures list.
Ability to specify directory for 3D volumes
In the acquisition agent preferences, you can now specify the directory where you want 3D volumes to be saved.
To specify the directory
In the system tray, right-click the Acquisition Agent icon and select Preferences to display the Preferences window.
On the General tab, next to Download Path, click Browse and select the correct folder.

Click Done.
iRay – updated default filters
To improve iRay sensor image quality, the default filters for this device in the acquisition agent have been updated:
Gamma: 80
Pre-Smoothing: 4
To set filters
In the system tray, right-click the Acquisition Agent icon and select Preferences to display the Preferences window.
Click the Filters tab.
Under Acquisition Filters, select iRay Pluto from the Device drop-down list.

Click Done.
Support for Woodpecker and Eighteeth sensors
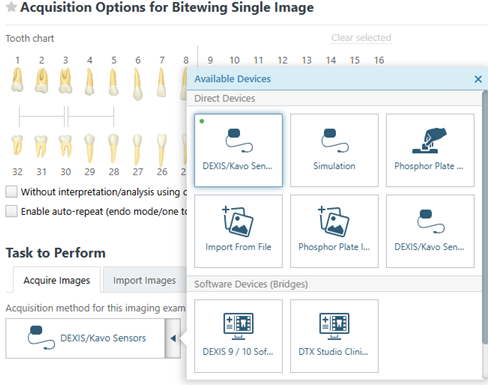
On the acquisition device menu, the iRay option has been changed to iRay / Woodpecker / Eighteeth to indicate that direct acquisition is now allowed for the Woodpecker and Eighteeth intraoral X-ray sensors through the iRay integration.

Ability to use only DEXIS devices
A (new) acquisition agent preference now allows you to filter the acquisition device menu to include only DEXIS-compatible devices and have the applicable device selected by default for intraoral or extraoral X-ray imaging procedures.
To set the preference
In the system tray, right-click the Acquisition Agent icon and select Preferences to display the Preferences window.

On the General tab, select the Filter device list to DEXIS devices checkbox and click Done.

With this preference enabled, the acquisition device menu has a limited number of devices and the applicable device is selected by default.
Ability to use endo mode for single-image procedures
The Enable auto-repeat checkbox is now available for acquiring any intraoral X-ray imaging procedure whose template has one image slot (such as a single bitewing or periapical image), enhancing the flexibility for endodontic imaging.

New default favorites
By default, certain imaging procedures now display under Favorites (if they are not already favorites), ensuring quick access to essential image acquisition options:
Bitewing Four Images
Bitewing Two Images
Intraoral Full Mouth Images
2D Oral/Facial Photo Images
Intraoral Periapical Image
Bitewing Single Image
Bitewing Seven Images
Panoramic Image
Cephalometric Image
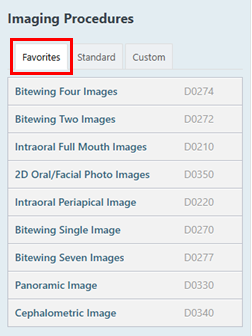
Note: Any favorite procedures you had prior to this update remain unchanged and newly added favorites can be easily removed if they are not needed.
New default filtering for image comparisons
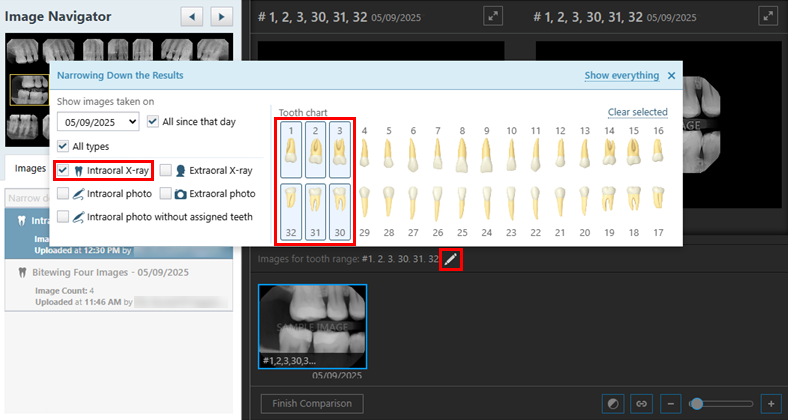
In previous versions, when you selected an image to compare, the tray at the bottom displayed thumbnail images that had tooth numbers in common with the original image by default. Now, the tray displays thumbnail images that have tooth numbers in common and that are of the type/modality (such as intraoral X-ray or intraoral photo) by default.
Ability to show AI findings for an entire series
When you view an intraoral X-ray series in the Exam view or Modality view, the Show/Hide AI Findings and Show/hide Patient View icons are now available so you can view AI findings and tooth anatomy for multiple images at once.

Note: Annotation and AI findings are only visible in the template/series view if the Load full size images in templates checkbox is selected in the imaging settings.
Miscellaneous imaging improvements
A variety of other changes have been made to improve imaging functionality.
Imaging improvements
AI & Telemetry Enhancements
The AI menu no longer opens unexpectedly when closing windows.
AI usage and telemetry events now trigger correctly in Compare and Exam views.
The No Findings Detected warning no longer displays incorrectly on extraoral X-rays.
The AI buttons display correctly for images with AI results in Exam view.
AI tooltips are no longer clipped behind images in Exam view or Modality view.
AI error messages now provide more detailed explanations and troubleshooting guidance.
When reviewing AI findings, the Patient View remains active across multiple images within the same exam. It remains active until you turn it off or switch to another exam.
Tool & View Stability
The Tools tab remains enabled when switching views or selecting 3D volumes.
Zoom and measurement tools now work reliably across Modality view and when comparing images.
Colorize and Emboss settings now reset appropriately between exams.
Annotations and measurements display correctly when comparing images and viewing 3D volumes.
Brightness/Contrast tooltip no longer hidden when viewing a series in Exam view.
The Pan Zoom window no longer opens unexpectedly when comparing images.
Text annotation size scales correctly in Modality view.
Incorrect tool no longer applied when dragging in Modality view.
The Tools tab is no longer selected by default for 3D volumes unless a thumbnail is clicked.
The correct tab is selected after canceling a 3D volume load.
The Modality view layout now positions elements relative to the x-axis instead of a fixed center point.
General Enhancements
The Show Deleted filter persists across views.
Deleted images no longer appear in Gallery view.
Errors resolved when undeleting or loading tiled exams with deleted images.
Last image in deleted stack no longer remains displayed.
Deleted image no longer remains displayed in tiled exams.
Undeleted images now appear correctly in Modality view.
Undeleted images are restored to their original positions in tiled exams.
The Show Deleted checkbox no longer becomes selected unexpectedly in Modality view.
3D Volume & CBCT Enhancements
Modality view loads 3D volumes and snapshots correctly.
3D volumes stay centered when collapsing side panels.
Recovery options now available for failed 3D/CAD/CAM uploads.
Errors no longer occur when canceling 3D volume loads or using Narrow Down the Results.
Assigning teeth to 3D volumes or CAD/CAM scans no longer causes errors.
You can now download 3D volumes even if the acquisition agent is not running.
Note: A warning message displays in the Share window if the acquisition agent is offline.
Performance & Memory Optimization
Memory leaks have been resolved when assigning teeth, switching views, or resetting FMX.
Offline sync errors and image deletions have been addressed.
Memory leak has been resolved in Modality view when switching tabs or modalities.
Database performance, health checks, and security have been improved.
UI & Data Accuracy Enhancements
Chairside dashboard images now sort chronologically.
The scrollbar and Settings button now behave correctly when comparing images.
The acquisition time for imported exams now displays accurately.
The Image Details window now displays N/A when the Base Pixel Size is unavailable.
An error now displays during acquisition the Carestream RVG sensor drivers are not installed.
Changing settings in the Modality View no longer triggers console errors.
Custom procedure text no longer overlaps adjacent fields.
The Without interpretation checkbox is now available during acquisition.
Incorrect image no longer loads in AIDE view when selecting from the Image Navigator.
Thumbnail images are now sorted correctly when comparing images.
Uncaught type errors have been resolved when scrolling in the Image Navigator.
Images acquired offline are no longer deleted during acquisition agent updates.
Ascend Academic Imaging now reads the DEXIS.ini file to apply ClearVu enhancements for intraoral X-ray imaging procedures.
19-micron pixel size metadata added for e2v direct acquisitions.
The PostgreSQL backup file extension changed from .bak to .pbk to avoid conflict with Microsoft SQL Server (MSSQL) backup files.
Acquisition & Annotation Behavior
Brightness no longer changes inadvertently while drawing annotations in Exam view.
The Proceed with Acquisition button is now disabled when no teeth are selected.
If the acquisition agent crashes during a single acquisition, it now restarts automatically and resumes the process.
New remote chairside image viewer
Dentists can now simultaneously view a patient’s images on a separate (secondary) monitor during an exam while an assistant charts procedures and conditions under Clinical > Chart or Quick Exam in a patient’s record.
To use the remote image viewer
With the Chart or Quick Exam tab of a patient’s clinical record selected, click the Imaging tab drop-down, and set the Remote Image Viewer toggle to On.

Note: The toggle remains on until you log out of Ascend Academic.
With the toggle on, click the (new) Viewer button that displays to the right of the tabs.

When the Image Viewer window displays, drag the window to another monitor’s display and resize or maximize the window as needed.

Complete one of the following:
If on the Chart tab, set the Chairside dashboard toggle to On (if not already), then, select an image on the vertical filmstrip panel on the right.

If on the Quick Exam tab, select an image on the vertical filmstrip panel on the right.

The selected image displays in the Image Viewer window.

Scheduling
New search field for ASAP, Broken/No Show, and Pinboard lists
In the Schedule > Calendar, the ASAP, Broken/No Show, and Pinboard lists can become quite long. To make it easier to locate a patient’s appointment on any of these lists, each now includes a (new) search field.
To view the Pinboard list, on the Calendar page, click Pinboard.
To search for an appointment, in the (new) Patient, Tx/Proc, Provider or Date Search field, enter a patient’s first and/or last name, a procedure’s office code (abbreviated description), or a date. As you type, the list narrows to include only appointments that match the search criteria.

The (new) search field functions the same way on the ASAP and Broken/No Show tabs.
New Unreachable appointment status
In the Schedule > Unconfirmed Appointments, a (new) Unreachable appointment status is now available. You can assign this status to an appointment that could not be verified due to the patient either not having sufficient contact information or not answering any calls, text messages, or email messages.

The (new) Unreachable appointment status is now visible in the following sections:
On the Unconfirmed Appts. page (Schedule > Unconfirmed Appointments), a (new) Unreachable button now displays at the top. Also, the Status column for an appointment on the page can display Unreachable.
.png)
On a patient’s Appointments page (Patient > Appointments), on the Future Appointments, Past Appointments, and Missed Appointments tabs, the appointment status can display as Unreachable.
.png)
In the Appointment History window for an appointment, the New Value column can display as Unreachable if the appointment status was changed to Unreachable.
.png)
In the Audit Log (Home > Audit Log), the Details column can display as Unreachable if an appointment status was changed to Unreachable.
.png)
For a Power Report that utilizes the Appt Status field, a row or column can display as Unreachable if the appointment status was changed to Unreachable.
.png)
New event colors
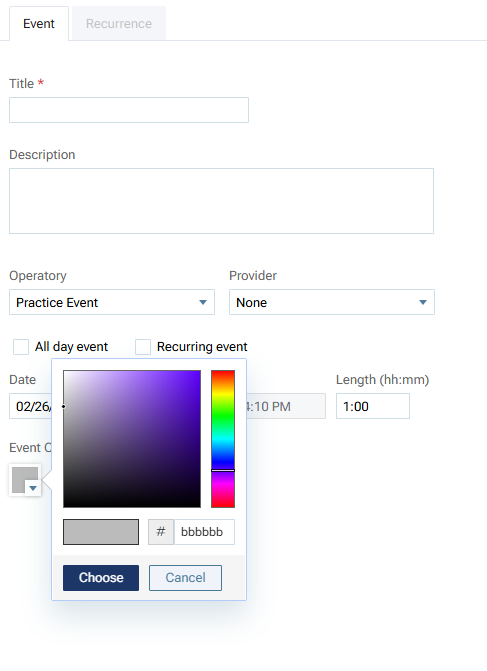
You can now add a color to an event (Schedule > Calendar). Adding colors to events can help people more easily identify events and differentiate one type of event from another. An event color can also help convey a message or that a certain action must be taken.
To add a color to an event, when you are adding or editing the event, click the Event Color box, select a color, and click Choose.
Financials
Ability to calculate estimates according to frequency limitations based on treatment areas
In the Clinical >Treatment Plan, Ascend Academic previously did not accurately calculate insurance estimates for treatment-planned procedures linked to a specific treatment area in the mouth (such as a tooth, quadrant, or arch) when a frequency limitation based on the treatment area applied.
Now, if procedure A for the UL quadrant was performed three months ago, and there is a yearly frequency limitation allowed by insurance for procedure A if it is performed on the same treatment area, if you treatment plan procedure A for the UR quadrant today, Ascend Academic recognizes that the previous posting of procedure A was rendered on a different treatment area from the treatment area for today’s planning of procedure A, so the correct estimated insurance portion is calculated instead of $0.00.
For a procedure on the Tx Planner tab of a patient’s clinical record, an orange warning icon now displays when this coverage exception is applicable. This icon can also display while you are presenting a treatment plan and while you are viewing the guarantor portion using the detailed view of the procedures being presented. You can click the icon to see a message that explains why the procedure is not covered.

The message displays the applicable treatment area and when the procedure for the same treatment area was performed previously (but only the most recent if there are multiple) within the frequency limitation period.
Improved filters for Aged Receivables Report
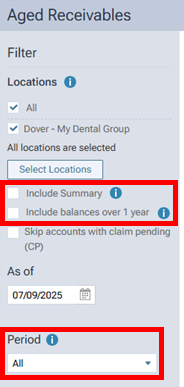
The filters for the Aged Receivables Report (Home > Reports > Aged Receivable Report) have been improved to allow a reduction in the amount of data for the report, which may speed up queries and provide a clearer report:
Include balances over 1 year – This is a (new) checkbox that allows older data to be included or excluded:
When selected, the report can include account balances over 365 days old, and the report is limited to no more than 10 locations.
When deselected, the report includes account balances up to 365 days old.
Include Summary – When selected, the report is now limited to the selected locations. (Previously, the summary included all locations that the user had access to, whether or not every one of those locations was selected.)
Period – The age of account balances to include on the report can now be limited:
All – Includes balances 0-365 days old; however, if the Include balances over 1 year checkbox is selected, balances of any age are included.
Over 30 – Includes balances 31-365 days old; however, if the Include balances over 1 year checkbox is selected, any balances 31 days and older are included.
Over 60 – Includes balances 61-365 days old; however, if the Include balances over 1 year checkbox is selected, any balances 61 days and older are included.
Over 90 – Includes balances 91-365 days old; however, if the Include balances over 1 year checkbox is selected, any balances 91 days and older are included.
Ability to see user who made ledger changes
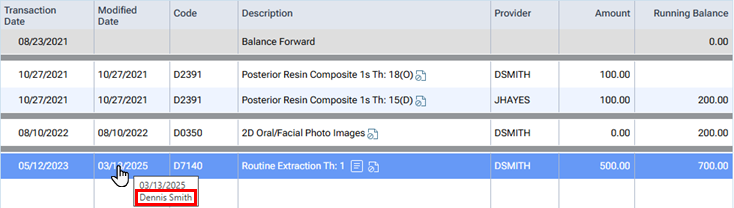
When you position your pointer over the Modified Date of a transaction in a patient’s ledger (Patient > Financials > Ledger), you now see the name of the user who made the change.
Note: A user name does not display in the following situations:
For a transaction that has not been changed since it was posted (the modified date and time are the same as the transaction date and time).
For a transaction that was modified automatically by a Ascend Academic process.
Ability to specify coverage Start Dates for dependents
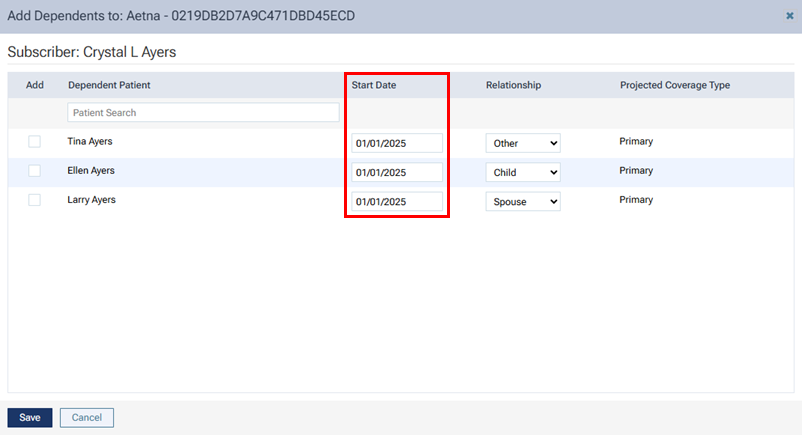
When adding dependents to a subscriber’s plan (Insurance > Insurance Information), you can now specify the coverage Start Date for those family members.
By default, the start date for a dependent is the same as the start date for the subscriber if that date is in the past; the coverage Start Date for a dependent is today’s date if the Coverage Start date for the subscriber is today or a future date.
You can change the Start Date as needed for each dependent, but the date cannot precede the Coverage Start date for the subscriber.
Reporting
Ability to filter Audit Log by multiple users
You can now filter the Audit Log (Reports > Audit Log) by multiple users. Previously, you could filter the report to include the changes that were made by only all users or one user.

To filter the report by specific users, select the checkbox of a user from the list, and click Apply Selected.
Tip: You can enter part of a username or a user’s first or last name in the search field at the top of the list to quickly locate that user in the list.
Note: You can select up to 2000 users.
Settings
Can merge duplicate referral sources
Referral sources (Settings > Patient Care) are sometimes duplicated or entered incorrectly. This can cause the process of data entry and reporting on referrals to become more complex and potentially confusing. You can now merge/combine referral sources in Ascend Academic.
As part of these changes, we have renamed the Manage referral sources security right to Create/edit referral sources. A (new) Merge referral sources security right now allows users to merge referral sources. It is available only if the user has the Create/edit referral sources security right and is not granted to users by default.
To merge referral sources
On the Referral Sources page (Settings > Referral Sources), click a referral to view the corresponding Referral Information. Then, click the (new) Merge button.

The Merge Referral Sources window displays with the Select Referral Source tab is selected by default so you can merge the selected referral source with another one.
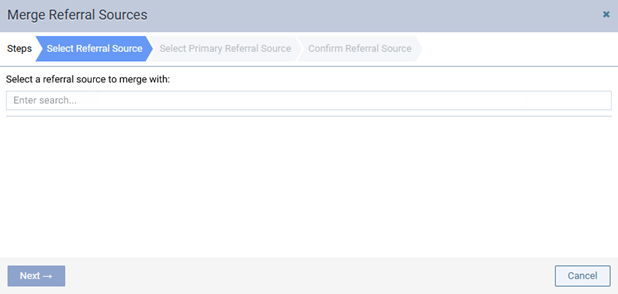
In the Select a referral source to merge with field, enter your search criteria, and continue as needed to narrow down the results list. If there are many results, the results lists may consist of multiple pages.
Note: You can specify how many results to display per page.
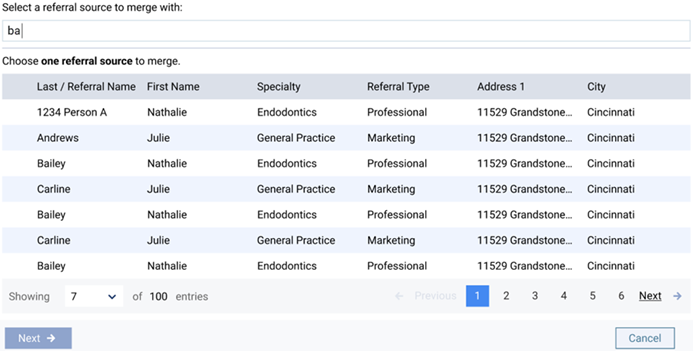
Select the correct referral source and click Next.
The Select Primary Referral Source tab is selected.
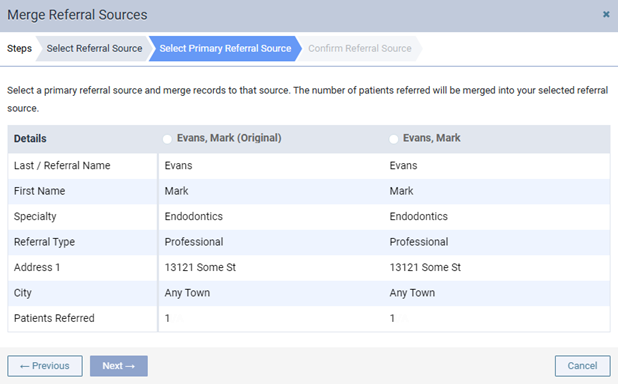
Select the referral source which will remain after the merge is complete.

Note: The number of patients referred by both referral sources will be combined into the selected referral source.
Click Next.
The Confirm Referral Source tab is selected so you can double-check what the results of the merge will look like after completion.

Warning: This action cannot be undone. When referral sources are merged, patients associated with them will be consolidated into the selected primary referral source.
Click Merge.
When the merge process is complete, a green Success message displays.
Notes:
When the merge process is complete, an entry is created in the Audit Log.
Reports will continue to pull referral data as they did previously, except now the data are more consolidated.
Improvement to referral information
Additional contact information now displays for a non-patient referral source (Professional, Marketing, or Other) that is attached to a patient’s record under Referred By on the Patient Information page > Referrals section.
An email address and up to three phone numbers can display.
To edit a referral source
Navigate to Settings > Referral Sources and select the referral source you want to update.
.png)
To view a referral source
On a patient's Patient Information page (Patient > Patient Information), click the Referrals tab.
.png)
The name and type of the referral source always display. However, a physical address, a phone number, or an email address display only if that information has been entered for the referral source.
Note: If a physical address has not been entered, the address does not display. However, if no phone numbers have been entered, or if an email address has not been entered, placeholder text appears, indicating that the information is missing.
.png)
New treatment plan templates
It is common to arrange certain types of treatment in specific sequenced visits (such as with a crown or implant), and the process of arranging the procedures for that work into the same visit sequence each time can be time-consuming and repetitive.
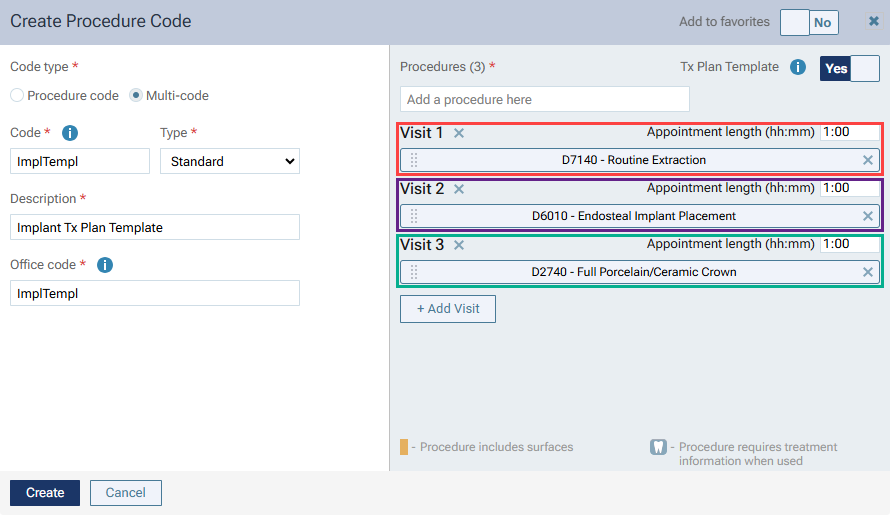
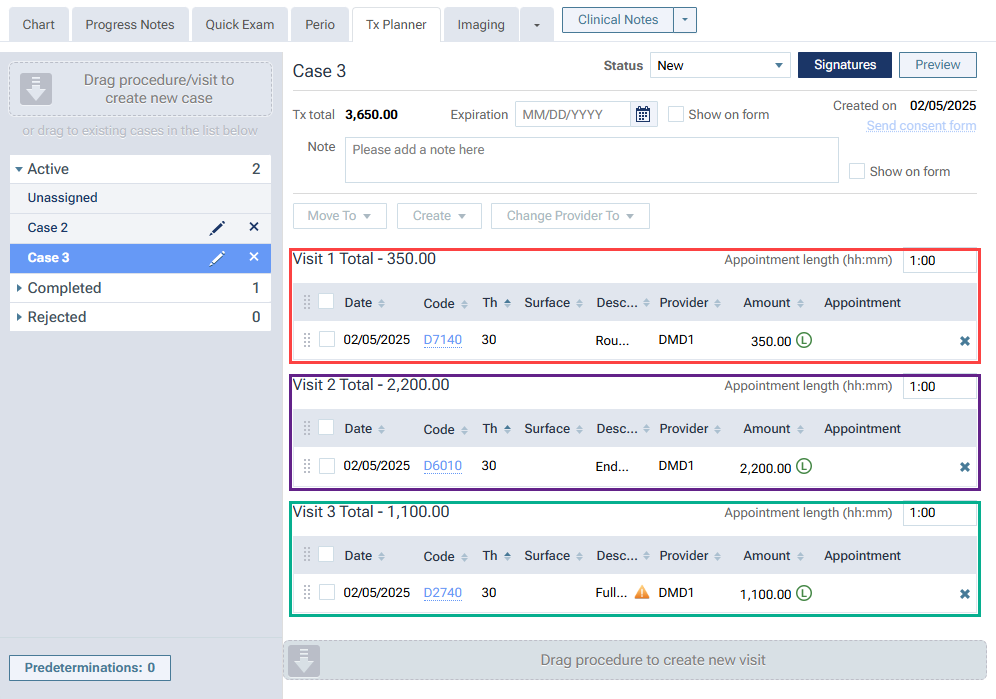
You can now flag a standard multi-code as a treatment plan (Settings > Production) template and add visits, add procedures to each visit, and change the order of the procedures in each visit. When you treatment plan that multi-code, the group of procedures are added to patient’s treatment plan by visit in the desired sequence automatically.
To create a treatment plan template
From the Settings menu, select Procedure Codes & Conditions to display the Procedure Codes & Conditions page.
Click Add Procedure Code to display the Create Procedure Code window.
Under Code type, select Multi-code.
Specify the Code, Type (must be Standard), Description, Office Code, and Category.
Add Procedures as needed.
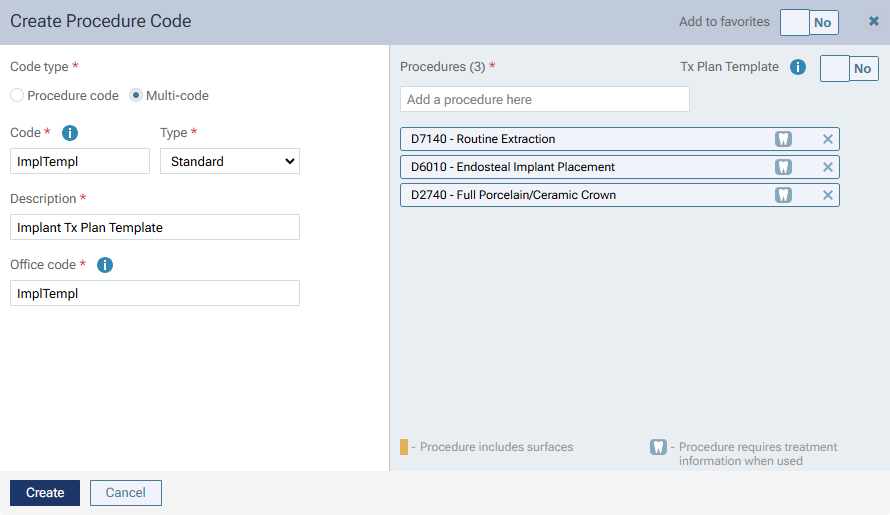
Set the new Tx Plan Template toggle to Yes. A visit is added to the template, and all procedures are added to that visit. Also, a default appointment length, which you can change, is associated with that visit.
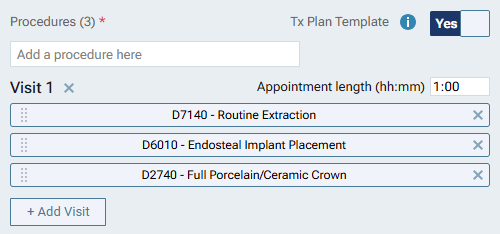
Note: You can reorder the procedures in a visit by dragging them.
To add another visit, click + Add Visit. The visit is empty by default.
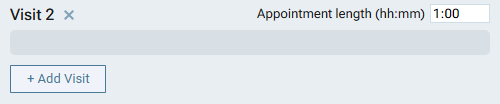
Notes:
You can add as many visits as needed to the template.
If you save the template with empty visits, those empty visits are removed, and the numbering of the remaining visits is updated accordingly if necessary.
To remove a visit, click the X to the right of the Visit. If you delete a visit that contains procedure, those procedures are removed from the multi-code, and the numbering of the other visits is updated accordingly if necessary.
To move procedures from one visit to another, drag them.
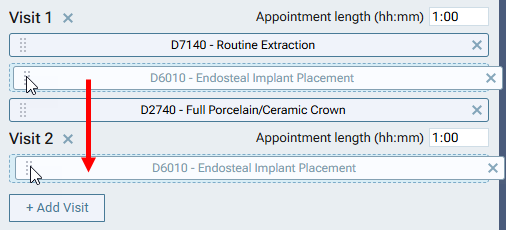
Note: If you add additional procedures to the multi-code, they are added to the first visit by default. You can move those procedures within that visit and to other visits as needed.
When you create a treatment plan using a multi-code flagged as a template, a new case is added to the patient’s treatment plan. The case is arranged exactly as defined by the template settings for that multi-code.
Bug Fix
Multi-location schedule displays incorrect location hours
Issue: In the Calendar, the multi-location view incorrectly displays both locations as open from 4 AM–12 PM on weekdays, instead of reflecting their configured hours.
Solution: Fixed to ensure each location’s hours display correctly based on Settings > Location Hours.
Comments
0 comments
Please sign in to leave a comment.