
Several new feature enhancements are included in the product update released in late July 2020. The major enhancements in this release include new ability to request appointments and manage these appointment requests, new ability to log procedures directly to the patient's chart, improvements to Progress Summary, and new Providers search in the schedule view settings.
New ability to request appointments and manage these appointment requests
Providers without the Manage Appointments user role permission set can now request appointments, rather than requesting a different user with the user role permission to create the appointment. Now, you can request an appointment by clickingtapping the (new) Request button on the patient's Overview page > Appointments widget (Patient > General > Overview).

Once clickedtapped, axiUm Ascend navigates you to the Calendar page > appointment's Appointment Information panel with few changes:
-
The appointment is already associated with the patient
-
The Status drop-down list is locked and set to Pending Approval
-
The Appointment Provider field is locked and you are set as the appointment provider
-
The (new) Request button displays instead of Save
Once requested, the appointment must be approved by a user that has the permission to manage appointments, such as front desk, from one of the following locations:
-
The Calendar page (Schedule > Calendar) - Appointment requests display with cross-hatching background.

-
The (new) Appointment Requests page (Schedule > Appointment Requests) - The page displays a complete list of pending, approved, and rejected appointment requests. By default, the page displays requests with appointment dates within the next 30 days.
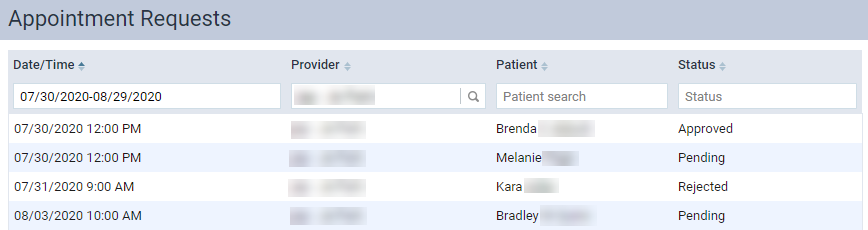
Note: If necessary, the page can be filtered to display a specific list of appointment requests based on appointment date and time, the requestor, the associated patient, or the request status.
To approve an appointment request, the user must select it from one of the two locations to display the request's Appointment Information panel, confirm the appointment information is correct, and then clicktap (new) Accept.
Note: To be approved, the appointment request must have a specified operatory.
If necessary, the appointment request can be edited before approval or rejection. Depending on your security rights, there are few differences in the modification process:
-
If you have the permission to manage appointments, you can edit any appointment requests.
-
If you don't have the permission to manage appointments, you can only edit your own appointment requests.
You can edit an appointment request like a regular appointment, but you can't change the appointment provider. Also, you can't edit rejected appointment requests as they're removed from the Calendar page. When ready, you can save the modifications by selecting one of the following buttons:
-
Request - This button only displays for providers without the permission to manage appointments. Select this button to update the appointment request.
-
Save - This button only displays for users with the permission to manage appointments. Select this button to save the modifications.
If the appointment request is incorrect, no longer required, or can't be accommodated, you can reject it by clickingtapping Delete on the request's Appointment Information panel, generating the (new) Delete Appointment window. Although it's not mandatory, it is recommended that you enter the reason for the rejection in the window. If necessary, the original requestor can make any adjustments based on the reason. If you're deleting your own appointment request, the reason is automatically set as "Request withdrawn by original requestor".
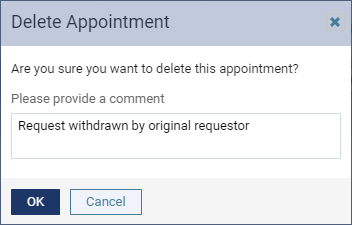
Note: If you have the permission to manage appointments, you can delete any appointment requests. If you don't have the proper permission, you can only delete your own.
Once deleted, the appointment request displays on the Appointment Requests page with the Rejected status and is removed from the Calendar page.
Users with the proper permission can also review these rejected appointment requests by selecting it on the Appointment Requests page and reviewing data on the displayed Request rejected window.

The window displays the following information:
-
Provider - Name of the provider that created the appointment request.
-
Request Date - Date the provider created the appointment request.
-
Rejected by - User that rejected the request by deleting the original appointment.
-
Comment - Date and time of the request, the requested procedure(s), and the reason for the rejection.
Note: The Appointments widget > Request button displays as Create if the logged in user has the Manage Appointments user role permission set.
New ability to log procedures directly to the patient's chart
Previously, users could only book an appointment for procedures that already existed in the patient's file as a treatment-planned procedure. For any procedures that weren't in the patient's file, they could only book an appointment by mentioning it on the appointment's note or the comment section. This method is not ideal for emergency appointments, especially when the procedures doesn't require a dental or medical background to deem it necessary.
To ensure consistency of information in the patient's chart, we have enhanced the Appointment Information panel > Procedure search field (Schedule > Calendar). Now, users can use the field add procedures to the patient's chart directly from the Appointment Information panel. When users create and save an appointment, the following occurs:
-
Any procedures entered through the appointment will have the procedure provider set as the appointment provider.
-
The procedure date it set to the current date.
-
Standard charges for the procedures apply.
-
The procedure's note field displays the "Automatically generated by [name of provider] who created or modified the appointment" message.
-
The added procedure displays on the appointment as if the procedure was added through the treatment planner, and will display on the patient's treatment planner and the progress notes.
Important: This is meant to allow non-clinical user, such as front desk, to log procedures to the patient's chart. Basic procedures, such as screenings and images, or those that don't require a specific treatment area, are supported for adding through this workflow.
Improvements to Progress Summary
We have made several changes to the Progress Summary page (Academic > Student Progress):
-
The Proc. Counts column and the Fail now displays the total counts in blue to visually indicate they can be clickedtapped.

-
The Proc. Counts window now displays the total required number of procedure codes and the required procedure codes that student provider needs to complete a category.

-
The Proc. Counts window > Date/Time has been renamed to Evaluation Date/Time
New Providers search in the schedule view settings
The view settings for the Calendar page (Schedule > Calendar) has been updated to include a (new) Providers search field that displays when set to display by provider.

Users can use the search engine to quickly locate specific providers by their first name, last name, and short name. You can also use it to narrow down the list of providers.
Pharmacy search feature of eRx now support address
Previously, searching a pharmacy by their address in the Electronic Prescription User Interface (Patient > General > Prescriptions) did not return a reliable or consistent search results. Now, we have improved the pharmacy search engine to return an exact match if it exists. For an accurate search results, we recommend users search by the phatmacy's name and city.
Comments
0 comments
Please sign in to leave a comment.