
Many new feature enhancements are included in the product update released in April 2025. The major enhancements in this release include the following:
-
Clinical
-
Imaging
-
Detect AI
-
Financials
-
Scheduling
-
Administrative
-
Settings
Clinical
Quick Links on Patient Information Ribbon
You can now quickly navigate to the Treatment Planner using a new link (Patient Search box > enter patient name > click the arrow button) on the Patient Information ribbon. This quick link allows you to quickly review and present a patient’s treatment plan without having to navigate first to the Chart tab in a patient’s clinical record and then select the Tx Planner tab.
Prior to this update, the quick links were text.
Now they are buttons. Also, prior to this update, some quick links would be hidden if the width of the viewing area didn’t allow all the quick links to fit on the ribbon. Now all the quick link buttons are available regardless of the width of the viewing area, but the buttons can become smaller and be displayed in two rows when necessary.
Normal presentation

Compact presentation

The buttons appear in this sequence: Chart, Progress Notes, Imaging, Tx Planner, Ledger, Document Manager, and Appointments.
Copying Patient Birth Dates
As you work with patients’ records each day, it is not unusual for you to constantly have to provide a date of birth (DOB), such as when working with insurance coverage. Let’s say you need to enter a patient’s birth date in a document, so you pull up the patient’s record and then type the date that is displayed on the patient ribbon. That type of manual data entry has two problems: it’s prone to human error, and it’s time consuming.
You can reduce data entry errors by navigating to the patient’s Patient Information page, selecting the DOB, copying it to the clipboard with the Ctrl + C (Windows) or Command + C (Mac) key combination, and then pasting it into the document with the Ctrl + V (Windows) or Command + V (Mac). However, that makes the process even more time consuming.
To help reduce errors and time with data entry, while you are viewing a patient’s record in Ascend Academic, you can now click the DOB on the patient ribbon (Patient Search box > enter patient name > click the arrow button) to quickly copy the birth date to the clipboard for pasting elsewhere.

Note: When you click the DOB, Ascend Academic displays a message that the birth date has been copied.

Deleting and Replacing Document Tags
With this release, you can now delete or replace a tag in the document manager (Patient Search box > enter patient name > select Document Manager from ribbon).
To Manage Document Tags
-
On any patient’s Document Manager page, click (or tap) Manage Tags.

The Manage Tags dialog box appears.

Note: By default, up to 40 of your organization most commonly used tags appear. The maximum number of tags that can be displayed at any given time is 40.
-
Search for the unwanted tag, and then click (or tap) its X.

Note: System tags have a lock icon. You cannot delete a system tag. -
Depending on if the tag is attached to any documents, do one of the following:
-
If the tag is not attached to any documents, the Delete Tag message appears. Click (or tap) Delete.

-
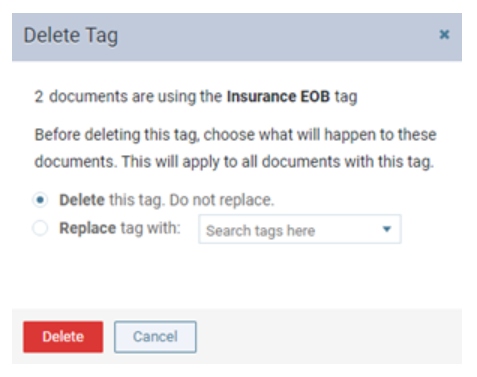
If the tag is attached to any documents, the Delete Tag message appears and displays the number of documents that will be affected. Do one of the following:
-
To delete the tag and remove it from the documents it is attached to, leave the Delete option selected, and then click (or tap) Delete.
-
-
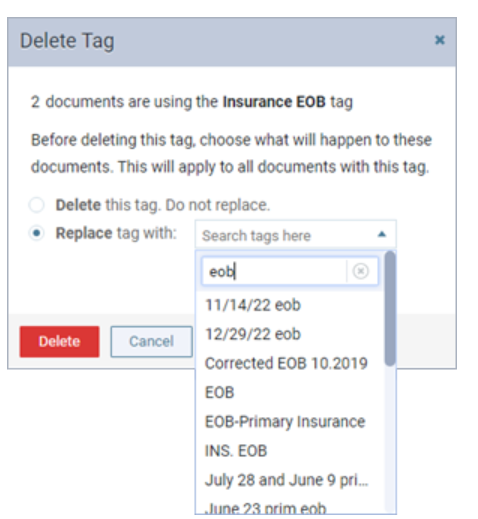
To delete the tag, replacing it for documents it is attached with a different tag, select the Replace option, click (or tap) in the Search tags here box to open a list, begin typing a tag name, continue typing until the desired tag is displayed in the search results list, select that tag, and then click (or tap) Delete.
-
-
Click (or tap) Done.
Operatory Management Changes
Prior to this update, operatories were displayed on your location’s Calendar page alphabetically by name, and the only way to control the display order of the operatories was to change their names. With this update, you can now customize the display order of the operatories regardless of their names.
To accommodate this change, the Operatories (Settings > Location > Operatories) page, where you manage operatories for a location, has been enhanced. The page is now divided into two sections - Active Operatories and Inactive Operatories
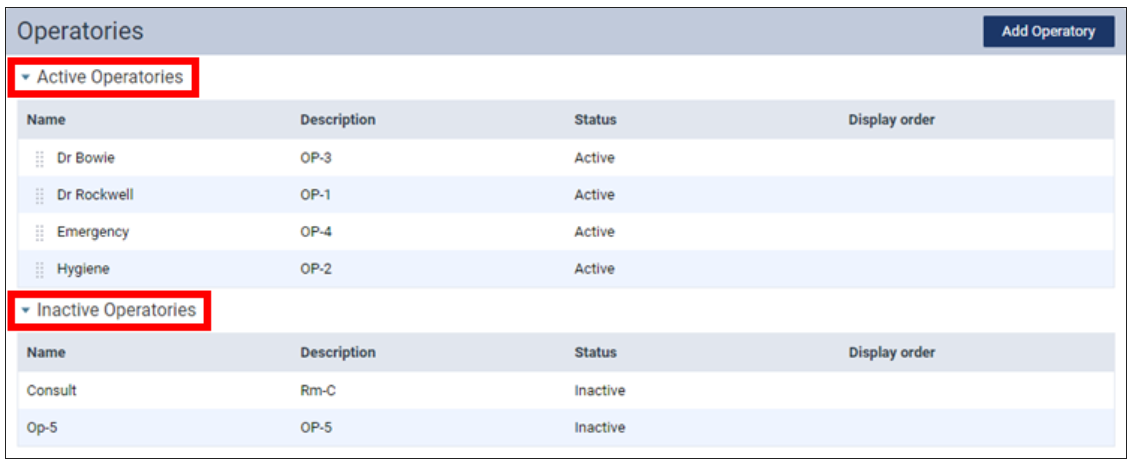
Note: You can collapse and expand these sections as needed.
When you initially access this page, the Display order column is blank for all operatories. The displayed order of the Active Operatories will continue to be the displayed order on the Calendar page unless you change the order. Once you edit an operatory or change the order, the applicable numbers appear in the Display order column for the Active Operatories, and dashes appear in the Display order column for the Inactive Operatories.

Changing the display order of operatories
You can customize the order in which operatories appear on the schedule.
-
Under Active Operatories, drag an operatory by the handle to the preferred position in the list.

Note: The change is saved automatically, and the other operatories’ display orders update automatically as needed.
-
For every other operatory that you want to rearrange, drag it by the handle to the preferred position in the list.
Editing operatories
You can edit the details of a location's operatories as needed.
-
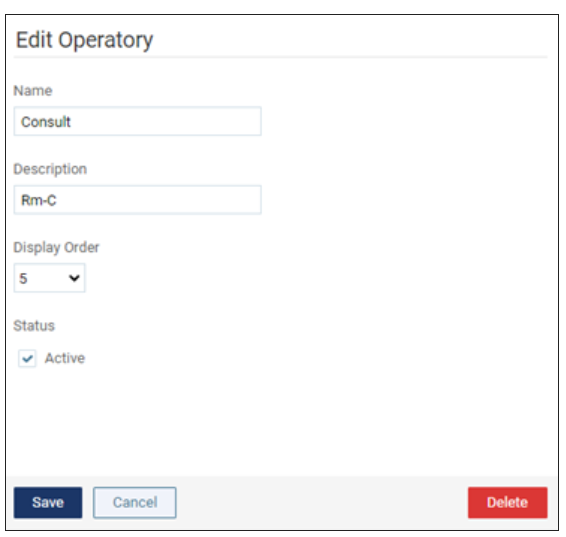
Under Active Operatories, click an operatory to open the Edit Operatory page.


-
If you had to use a less-than-ideal name prior to this update as a workaround to getting the operatories to be displayed in a particular order, go ahead and change the Name as needed to suit your preference.
-
Select the preferred Display Order.
Note: The other operatories’ display orders will update automatically as needed.
-
Click Save.
Inactivating operatories
You can inactivate operatories, which correspond to columns on your schedule, if those operatories do not have any future appointments scheduled in them. An inactive operatory does not show on the schedule and is unavailable as a view option for the schedule.
-
Under Active Operatories, click an operatory to open the Edit Operatory page.

-
Clear the Active checkbox.
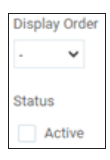
Note: The dash (–) is selected for Display Order automatically. The active operatories’ display orders will update automatically as needed.
-
Click Save.
Reactivating operatories
You can reactivate operatories, which correspond to columns on your schedule, that were previously inactivated. When you reactivate an operatory, it can again be displayed on the schedule.
-
Under Inactive Operatories, click an operatory to open the Edit Operatory page.


-
Select the Active checkbox.
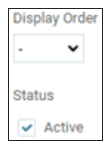
-
The dash (–) is selected for Display Order automatically. Do one of the following:
-
To insert the operatory as the last one in the display order, leave – selected for Display Order.
-
To insert the operatory somewhere in the existing order, select the preferred Display Order.
Note: The other active operatories’ display orders will update automatically as needed.

-
-
Click Save.
Adding operatories
You can add operatories as needed. Operatories appear on the schedule as columns where you can schedule appointments and events.
-
Click Add Operatory to open the Create Operatory page.

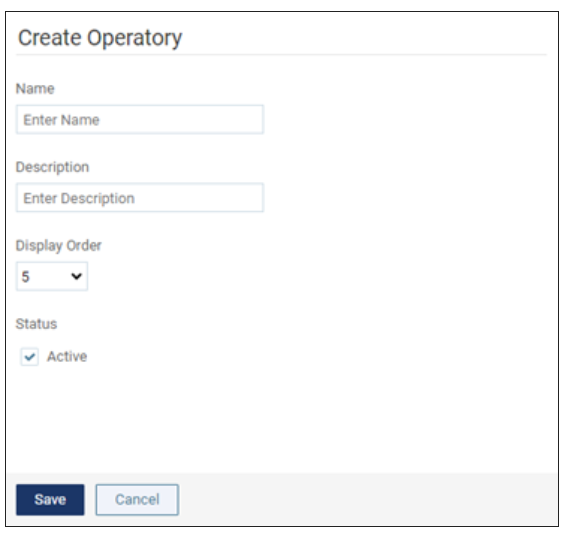
-
Enter a Name and Description.
-
The number of the next available position is selected for Display Order automatically. Do one of the following:
-
To insert the operatory as the last one in the display order, leave the number of the next available position selected for Display Order.
-
To insert the operatory somewhere in the existing order, select the preferred Display Order.
Note: The other operatories’ display orders will update automatically as needed.

-
-
Click Save.
Deleting operatories
You can delete any of a location's operatories that do not have any appointments scheduled in them, but you can delete operatories that have only events scheduled in them.
-
Under Active Operatories or Inactive Operatories, click an operatory to open the Edit Operatory page.
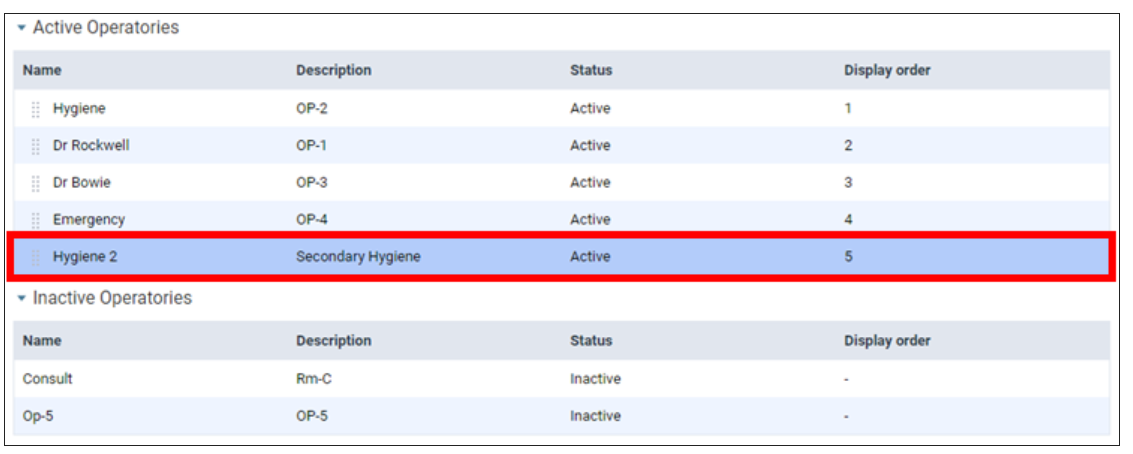

-
Click Delete.
Note: The Delete button is available only if the operatory does not have any appointments scheduled in it.
-
On the confirmation message that appears, click OK.
Optional Tooth Numbers for Periapical Imaging Procedures
Some payers may require tooth numbers as the treatment area for a periapical (PA) imaging procedure that is included on a claim. Prior to this release, the treatment area for a PA imaging procedure was always omitted on a claim. To help reduce rejected claims due to a missing treatment area, Ascend Academic now provides a way for you to post a PA imaging procedure with optional tooth numbers. You can also now edit a posted PA imaging procedure to specify the tooth numbers, which may be needed if, for example, you post the procedure as part of a multi-code. The procedure codes that are affected by this new functionality are D0220, D0230, and D0707.
Notice the following on the Progress Notes (Patient Search box > Enter patient name > click the arrow button) tab of a patient’s clinical record:
-
If you chart a PA imaging procedure with teeth selected on the Chart or Quick Exam tab, the tooth numbers are included.
-
If you acquire a PA image on the Imaging tab, when the procedure is posted, the assigned tooth numbers are included.
-
If no teeth are selected when you chart or acquire PA images, “Mouth” is used as the treatment area, so tooth numbers are not included.

Also, if you edit a PA imaging procedure, notice the following:
-
If teeth were selected for the procedure, the new Tooth Ranges box displays the tooth numbers.
-
If teeth were not selected for the procedure, the new Tooth Ranges box is empty.

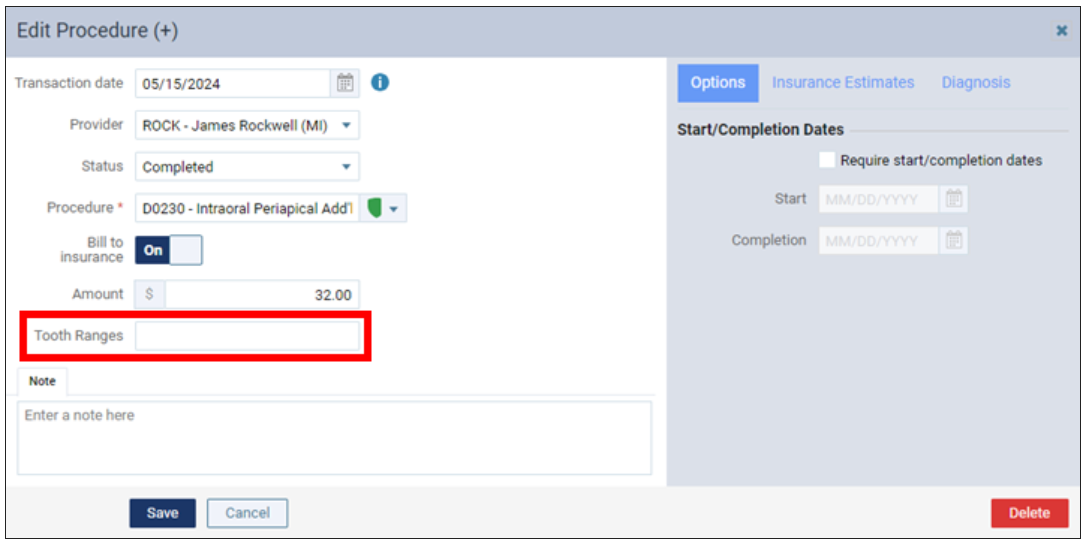
You can change the Tooth Ranges as needed:
-
You can enter the first and last tooth numbers of a range separated by a dash.
-
You can enter an individual tooth number.
-
You can enter a combination of ranges and/or individual tooth numbers, separating each with a comma.

-
Adjusting Tooth Filter for Progress Notes
You can now apply or change the tooth number for filtering the progress notes without having to navigate to the Chart or Quick Exam tab and then back to the Progress Notes (Patient Search box > Enter patient name > click the arrow button) tab.
In previous versions, the Th filter on the Progress Notes tab of a patient’s clinical record would appear only if teeth were selected on the Chart or Quick Exam tab. Now, the Th filter is always available even if no teeth are selected. And, whether or not teeth are selected, you can change which teeth the progress notes are being filtered by.
To adjust the tooth filter
-
Do one of the following:
-
If teeth are selected for the Th filter, to select different teeth, click the tooth number or range, which is now a link.

-
If no teeth are selected for the Th filter, to select teeth, click the Select Teeth link.

-
-
On the Select Teeth pop-up box that appears, clear and/or select teeth as needed, and then click the X.

Note: Changing the Th filter on the Progress Notes tab affects which teeth are selected on the Chart and Quick Exam tabs and for any new clinical note that you create.
Automatically Selecting the Premedicate Checkbox for an Appointment
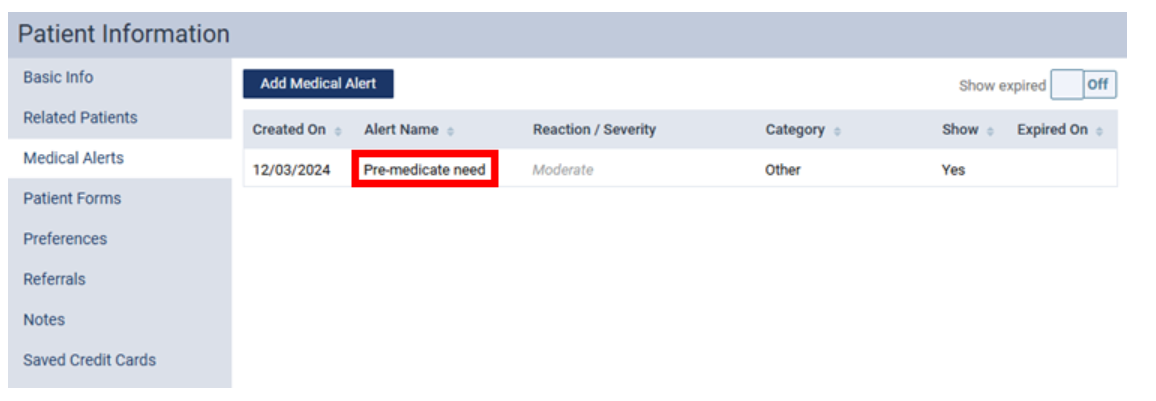
With this release, when you are scheduling an appointment for a patient with an active “Pre-medicate need” medical alert in his or her record, the Premedicate checkbox for the appointment is now selected automatically.
The “Pre-medicate need” medical alert in a patient’s record (select Medical Alerts on the Patient menu to open the Patient Information page with the Medical Alerts tab selected).
The “Premedicate” checkbox is selected on the Appointment Information panel by default for the patient’s appointment that you are scheduling (on the Calendar page, click an open time slot, and then select the patient).

Condition Code Set Updates
Summary of updates that were made to conditions:
-
190 new condition codes have been added.
-
The ICD-10 mapping has been adjusted for 72 existing condition codes to allow for more accurate billing on claims.
-
For four conditions, changes have been made to the SNODENT code number itself and/or its corresponding SNOMED code.
-
For three conditions, minor edits/corrections were made to the Description field.
-
For two conditions, a charting symbol was added.
-
Two duplicate conditions were merged together into one condition.
Managing & Merging Referral sources
Ascend Academic now provides highly-requested usability enhancements for managing and merging Referral Sources (Settings > Patient Care).
Managing Referral Sources
To help you quickly find referral sources, there is a new Search box at the top of the Referral Sources page that allows you to filter the list.
As you type, if any part of a referral source’s last/referral name, first name, specialty, or referral type matches your search criteria, that source is included in the search results.

Note:
-
The search results can only include up to 100 referral sources, so you may need to be more specific with your search criteria to narrow down the search results.
-
As in previous versions, you can choose to display up to 20 or 50 entries per page, and you can navigate between pages by clicking a page number, Previous, or Next.

Additionally, after you add or edit a referral source, your search criteria continues to appear in the Search box, you are returned to the page you were viewing (if the search results included multiple pages), the sorting of the list remains the same, and the maximum number of entries per page persists.
Merging Referral Sources
Referral sources are sometimes duplicated or entered incorrectly. This can cause the process of data entry and reporting on referrals to become more complex and potentially confusing. With this release, you can now merge/combine referral sources in Ascend Academic.
-
On the Referral Sources page (Settings > Referral Sources), click a referral to view the corresponding Referral Information. Then, click the new Merge button (in the lower-right corner).

Security Rights
-
The existing security right has been renamed from “Manage referral sources” to “Create/edit referral sources,” but that right still allows a user to create or edit a referral source.
-
A new security right, which is labeled “Merge referral sources,” allows a user to merge referral sources. This right is available only if the user has the “Create/edit referral sources” right. Also, this right is NOT granted to any users by default.
The Merge Referral Sources dialog box appears so you can merge the selected referral source with another one. The Select Referral Source tab is selected by default.

-
-
In the Select a referral source to merge with box, begin typing your search criteria, and then continue typing as needed to narrow down the results list. If there are many results, the results lists may consist of multiple pages.
Note: You can specify how many results to display per page.

-
Select the correct referral source.
-
Click Next.
The Select Primary Referral Source tab is selected.

-
Select the referral source which will remain after the merge is complete.

Note: The number of patients referred by both referral sources will be combined into the selected referral source.
-
Click Next.
The Confirm Referral Source tab is selected so you can double-check what the results of the merge will look like after completion.

Warning: This action cannot be undone. When referral sources are merged, patients associated with them will be consolidated into the selected primary referral source.
-
Click Merge.
When the merge process is complete, a green “Success” message appears.
Note:
-
When the merge process is complete, an entry is created in the Audit Log.
-
Reports will continue to pull referral data as they did previously, except now the data are more consolidated.
-
Imaging
Upgrade to 117.1
Some of the new features and enhancements will require an updated acquisition agent.
New Features and Enhancements
-
Exam View (Default) Updates - Enhancements have been made to the default Exam view for usability and for consistency with the new Modality view.
-
Enhanced Header Font and Color
Improved font size and color enhance visibility.
-
Visual Feedback for Selection
Selected images are highlighted with a distinctive yellow frame, improving clarity and interactivity.

-
Single-Image View
Double-clicking a yellow-highlighted image opens it in a focused Single-Image view for detailed examination.
-
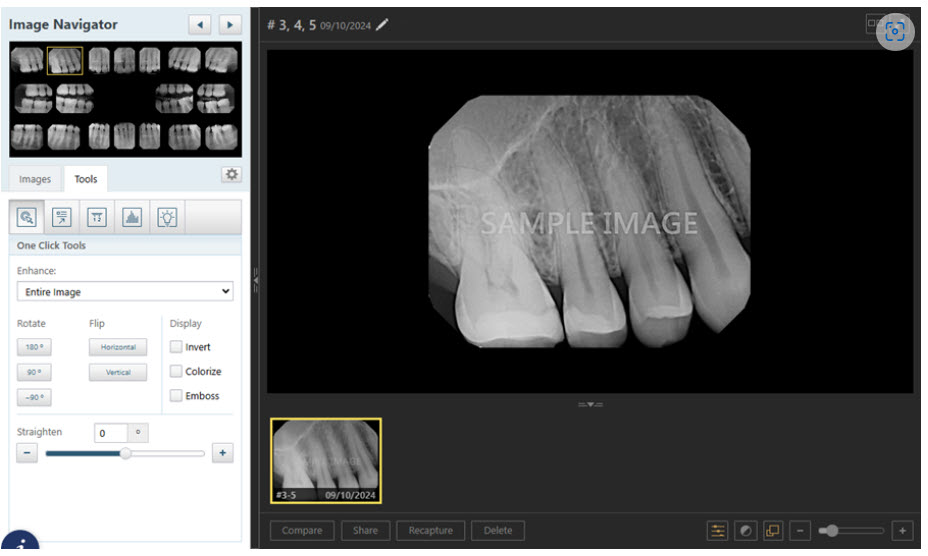
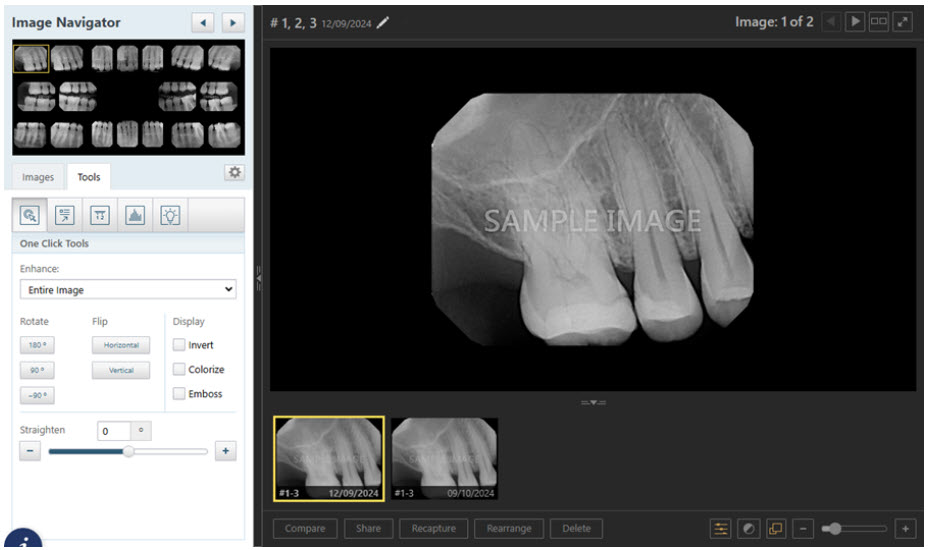
Filmstrip Navigator
Navigate through all images in a stack using the filmstrip view for streamlined navigation and image selection.
Single image in a stack (filmstrip view of stack is hidden by default; click the icon to expand the filmstrip view):

Two images in a stack (filmstrip view of stack is displayed by default):
-
Light Box Mode
The Show/Hide image information button has been relocated and renamed to “Light box mode.” This button is available while viewing images in Series mode (an entire template is displayed). The state of this button still controls whether the date and tooth numbers for each image in the series are available or not.
Previously, the button was at the top (orange icon indicated information was visible; gray icon indicated information was hidden):

Now, the button in on the left side of the lower toolbar (gray icon indicates information is visible; orange icon indicates information is hidden):


-
Zoom Functionality Is Temporarily Unavailable
The zoom feature is temporarily unavailable in the template/series view but is planned for reintroduction in a later version.
-
Settings Location and Options
The Settings button has been relocated, and additional options are now available.
Previously, the Settings button was located on the Tools tab; and the only option was Enable Video Acceleration.

Now, the Settings button is available whether the Images or Tools tab is selected; and the available options are as follows:
-
Enable Video Acceleration
-
Use Modality View
-
Load full size images in templates

Notes:
-
Enable Video Acceleration for Faster 2D Image Rendering. The Video Acceleration feature leverages WebGL (Web Graphics Library) to enhance the rendering speed of 2D images. WebGL is a JavaScript API based on OpenGL ES, which enables accelerated rendering by offloading processing tasks to the GPU (Graphics Processing Unit). While 3D images already use WebGL for rendering, this new feature extends the same technology to 2D images, significantly improving performance for filters and rendering tasks. By default, Video Acceleration is turned off to ensure compatibility with hardware that does not support WebGL. If the hardware is incompatible, enabling this feature could result in a black screen. With compatible hardware, enabling Video Acceleration provides a smoother, faster rendering experience for 2D images.
-
The Load full size images in templates checkbox is selected by default to ensure that annotations and AI findings are visible in the template/series view.
-
Ascend Academic Imaging remembers these user preferences for subsequent sessions./p
-
-
-
SuperFMX/Modality View (New) - An anatomical workflow, similar to what you experience with DEXIS, is now provided to help improve the functionality, user interface, and overall user experience. The SuperFMX/Modality view introduces a new level of flexibility and efficiency to imaging workflows. You can now choose between the traditional template or exam-based workflow (Exam view) and a newly-developed modality or anatomical workflow (SuperFMX/Modality View). This update accommodates diverse operational preferences and clinical needs, allowing you to select the workflow that best supports your diagnostic processes.
-
Switching to the Modality View
-
Click the Settings button to open the Settings dialog box.

-
Select the Use Modality View checkbox.
-
Click Confirm.
Note: Ascend Academic Imaging remembers these user preferences for subsequent sessions.
The Modality view is now active.
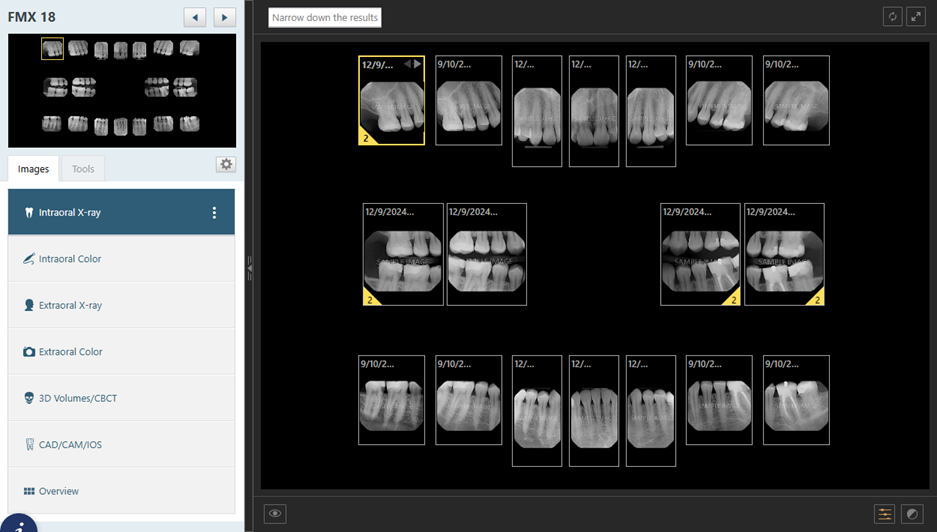
Notes:
-
The updated font size of image headers and the colors allow for enhanced visibility.
-
Yellow corner indicators on image stacks indicate that additional images are available.
-
The Narrow down the results field appears in the header so you can filter by date, tooth number, or deleted images.
-
The tabs on the left navigation panel provide dedicated views for specific imaging modalities:
-
Intraoral X-ray – Displays all intraoral X-rays for the patient. This modality is selected by default, and the FMX 18 anatomical view is displayed by default. There are options for switching to an FMX 21 anatomical view, using a tiled view, and flipping the view.
-
Intraoral Color – Displays all intraoral color images for the patient. The FMX 18 anatomical view is displayed by default. There are options for switching to an FMX 21 anatomical view, using a tiled view, and flipping the view.
-
Extraoral X-ray – Displays all extraoral x-rays for the patient in a chronological tiled view.
-
Extraoral Color – Display all extraoral color images for the patient in a chronological tiled view.
-
3D Volumes/CBCT – Displays all 3D Volumes/CBCT images for the patient in a chronological tiled view.
-
CAD/CAM/IOS – Displays all CAD/CAM/IOS images for the patient in a chronological tiled view.
-
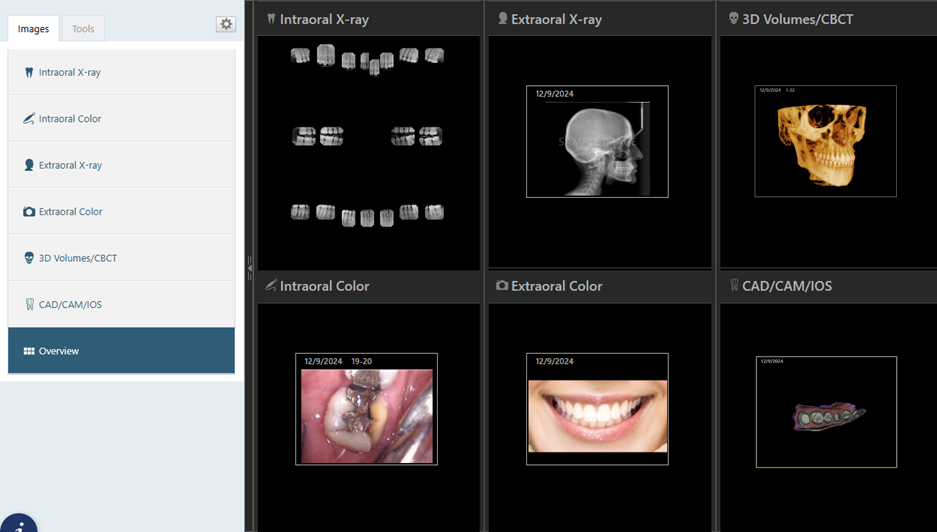
Overview – Shows a snapshot of all the different modalities for the patient.
-
-
-
-
Narrowing Down the Results
To filter images by specific criteria, do the following:
-
Click in the Narrow down the results field to view the available filters.

-
Set up any of the following filters:
-
Date – To view the images according to a different date, select the desired date in the list under Show images taken on. To view all images that have been acquired on and after the selected date, select the All since that day checkbox. To view the images that were acquired only on the selected date, clear the All since that day checkbox.
-
Show Deleted – To view deleted images so you can review or recover them, select this checkbox. To help you easily distinguish between deleted and normal images in the list of images, “Deleted – ” appears before the name of deleted images and series.
Note: Viewing or restoring deleted images is only possible with the use of this filter.
-
Teeth – To view images for specific teeth, select the desired teeth on the Tooth Chart. The tooth filter does not apply to intraoral photos that do not have tooth numbers assigned to them, extraoral X-rays (which apply to all teeth), and extraoral photos (which apply to all teeth). To clear all tooth selections, click (or tap) the Clear selected link.
-
Show everything – To set the filter options to their default states and display all the patient’s images, including deleted images, click (or tap) the Show everything link.
-
-
Click the X in the upper-right corner of or anywhere outside of the Narrowing Down the Results menu to close the menu.
-
-
Viewing the Intraoral X-ray Modality
With the Intraoral X-ray tab selected, the FMX 18 anatomical view is displayed by default, with images organized by tooth number, and it provides a comprehensive overview of the patient’s dental anatomy. There are options for switching to an FMX 21 anatomical view, using a tiled view, and flipping the view.

Note:
-
Each image is assigned a slot based on the tooth number.
-
For a slot with multiple images, the newest image is displayed at the top of each stack.
-
-
Changing the View Options for a Modality
With the Intraoral X-ray (or Intraoral Color) tab selected, to change the view preferences, do the following:
-
Click the More Options button (three vertical dots):

-
Select the following options as needed:
Anatomical – Displays images in an FMX 18 or FMX 21 layout, organized by tooth number. With this option selected, specify the following Preferences:
-
FMX 18 or FMX 21 – Select the layout type based on clinical needs.
-
Flipped – To flip the layout for an alternative viewing preference, select this checkbox.
Tiled – Displays all images for a patient in chronological order with pagination.
-
-
Click Confirm.
Anatomical view of intraoral X-rays for an FMX 18:

Anatomical view of intraoral X-rays for an FMX 21:

Tiled view of intraoral X-rays:

The Single-Image view provides an isolated, focused view of a selected image. The view includes a filmstrip navigator for scrolling through all images in the stack and enhanced navigation controls for quick image selection.

-
-
Viewing the Intraoral Color Modality
With the Intraoral Color tab selected, the FMX 18 anatomical view is displayed by default, with images organized by tooth number. There are options for switching to an FMX 21 anatomical view, using a tiled view, and flipping the view.

-
Viewing the Extraoral X-ray Modality
With the Extraoral X-ray tab selected, all extraoral radiographs for the patient appear in a chronological, tiled view.

The Single-Image view provides access to a variety of tools for detailed analysis and editing, allowing for precise examination of extraoral radiographic data.
-
Viewing the Extraoral Color Modality
With the Extraoral Color tab selected, all extraoral color images for the patient appear in a chronological, tiled view.

The Single-Image view provides access to a variety of tools for detailed analysis and editing, enhancing the examination of extraoral photographs.
-
Viewing the 3D Volumes/CBCT Modality
With the 3D Volumes/CBCT tab selected, all 3D volumetric and cone beam computed tomography (CBCT) images for the patient appear in a chronological, tiled view.

The Single-Image view provides access to a range of tools for detailed analysis and editing, allowing for precise examination of the volumetric data.
-
Viewing the CAD/CAM/IOS Modality
With the CAD/CAM/IOS tab selected, all CAD/CAM and intraoral scanner (IOS) images for the patient appear in a chronological, tiled view.

The Single-Image view provides access to a variety of tools for detailed analysis and editing.
-
Viewing the Overview
With the Overview tab selected, a snapshot of all imaging modalities for the patient appear. Each modality is represented visually, allowing you to quickly assess available imaging data. Selecting a modality redirects you to the corresponding tab, enabling seamless access to detailed views and further functionality.
-
-
Full-size Image from Vatech EzDenti Software Bridge
The handling of images that are acquired using the Vatech EzDenti SW Bridge has been improved. If the saved file is a DCM file, the system now checks if it contains a 2D image and ensures that the full-size image is pulled into the imaging software. Previously, only a thumbnail image was displayed.
-
AI Findings Button in AIDE View
In the AIDE view, the icon on the Show/hide AI findings button was replaced to be consistent with the rest of the imaging software. Previously, the button had an eye icon; now, it is a tooth.

-
Title for Brightness/Contrast Pop-up Box
The title of the pop-up box that appears when you click the Adjust brightness, contrast, and black/white levels button (two-tone circle icon) was updated to be “Brightness/Contrast/Levels.”

-
DEXIS Software Bridge Optimization
The efficiency of 3D volume acquisition using the DEXIS software bridge was optimized by prioritizing searches within the patient’s folder. This enhancement significantly reduces processing time while maintaining a full directory scan as a fallback option.
-
PSPIX and SOPIX Helper Apps for MacOS
The helper apps for PSPIX and SOPIX devices for the MacOS were updated to enhance compatibility and performance across various MacOS versions. The following version of the helper apps were updated:
-
SOPIX helper app v1.32
-
PSPIX helper app v1.0.31
-
-
GxPicture Option Selected Automatically for Existing Users
The new “GxPicture Sensor” is now automatically selected for relevant procedures.
-
Updated Athlos SDK for DC Air Sensors (Windows Only)
The latest version (2.16.1) of the Athlos SDK for DC Air sensors has been integrated. This update ensures compatibility and addresses breaking changes in prior SDK versions. The changes enhance sensor performance and reliability. This update affects the Windows OS only.
-
New Watchdog Utility (Windows Only)
A watchdog utility is now installed when you update the acquisition agent. This utility is designed to monitor the agent’s status, restart it as needed, and log incidents. A new icon appears in the notification area of the Windows taskbar when the watchdog utility is installed. The color of the icon indicates the status: green indicates it is enabled, yellow indicates it is disabled, and red indicates there is an error.

You can click the icon to display a menu with the following options:
-
Enable Watchdog – Initially there is a checkmark to indicate that it is enabled. To disable the utility, click this option to remove the checkmark (the icon will turn yellow). To enable the utility if it has been disabled, on the menu, click this option to add the checkmark (the icon will turn green).
-
Start Acquisition Agent – To manually start the acquisition agent, click this option.
-
Show Log Files – To open the folder that contains the log files, click this option.
-
Exit – To exit the utility, click this option (the Agent Watchdog.exe process is terminated).

Notes:
-
Agent Watchdog.exe and Agent Watchdog.ini are installed in the same folder as the acquisition agent (by default, this is C:\Program Files (x86)\Acquisition Agent).
-
You can change the interval and startup delay in Agent Watchdog.ini to configure the watchdog utility to suit your preferences.

-
-
-
Improved Acquisition Agent Silent Installation (Windows Only)
The silent installer for the acquisition agent has been improved to handle reboots, prevent unnecessary uninstalls/reinstalls, and ensure a smooth installation process.
-
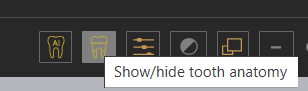
Showing/Hiding Tooth Anatomy (Detect AI)
With Detect AI enabled, you can show or hide tooth anatomy.
There is a new Show/hide tooth anatomy button on the lower toolbar. The icon is orange if tooth anatomy is visible or gray if tooth anatomy is being hidden. To view tooth anatomy, click the button.

Detect AI
New FDA-cleared detections in Detect AI
You can now use Ascend Academic Detect AI, powered by Videa Health, to help you diagnose these new FDA-cleared detections:
-
Caries improvements – In previous versions, Detect AI could provide caries detections only on bitewings (BWs) for patients 22 years and older. Now, Detect AI can provide caries detections on all primary and permanent teeth in patients 3 years and older.
-
Periapical radiolucency (PRL) – On X-ray images for patients 22 years and older, Detect AI can now provide PRL detections. PRLs are radiographic sign of inflammatory bone lesions around the root apices of teeth. PRLs can be due to infections, cysts, and other causes.
-
Calculus – On X-ray images for patients 12 years and older, Detect AI can now provide interproximal calculus detections. With calculus indicated on X-rays, providers can educate patients about the effects of calculus on their periodontal health and the importance of scaling and root planning. APA guidelines for the diagnosis of periodontal disease include radiographic bone levels (RBLs), calculus, and probing depths.
-
Restoration imperfections – On X-ray images for patients 3 years and older, Detect AI can now provide detections for restoration imperfections. With the help of AI, providers can identify possible decay and open margins under restorations (such as crowns and fillings).
Financials
Primary Insurance Payments on Secondary Claims
As part of the latest release, to help avoid claim delays, the details of the primary insurance payment will now automatically appear on a secondary claim (Patient > Insurance > Insurance Claims > Secondary Claim (payment status)) (printed or electronic) when you create one.
-
Box 24 – The transaction date of the payment(s)
-
Box 26 – The text “JP”
-
Box 30 – The text “Primary Insurance Payment”
-
Box 31 – The amount of the payment (including a zero dollar payment), or the total amount of payments made on the same transaction date

If multiple payments have been entered on separate days for the primary insurance claim, the original primary insurance payment and subsequent primary insurance payments will appear as separate line items on a secondary insurance claim (printed/electronic).
Changing the Coordination Order of a Patient’s Insurance Plans
You can change the coordination order of insurance plans (Patient > Insurance > Insurance Information) that are attached to a patient's record as needed.
Important: Changing the coordination order will create two responsibilities for each payer: the original insurance responsibility (such as primary) for the coverage period up to, but not including, a specified as-of date; and the new insurance responsibility (such as secondary) for the coverage period starting at the specified as-of date. The payer will be responsible for the insurance plan under both the original coordination order and the new order.
To change the coordination order of a patient's insurance plans
-
Do any of the following as needed:
-
Swap two existing plans' positions, and start new insurance responsibilities - You can swap the positions of two active insurance plans in the coordination order.
Use either of the following methods:
Method A: By dragging a plan
-
On a patient's Insurance Information page, click Swap Order.

The insurance plans are divided into sections by insurance responsibility. Any plan can be dragged to any section.

-
Drag a plan by the handle
 to another section.
The Change Insurance Coordination Order/Coverage Range dialog box appears. Proceed to the next step.

Method B: By editing a plan
-
Do one of the following:
-
On a patient's Overview page, in the Insurance box, click (or tap) the Plan link of an insurance plan.

-
On a patient's Insurance Information page, select an insurance plan.

The options for editing insurance information become available.

-
-
From the Insurance coordination order list, select an insurance responsibility in the coordination order that has an insurance plan.
Note: The insurance responsibilities that are available on the Insurance coordination order list are the ones that have active insurance plans and missing insurance plans in the coordination order.
-
Click (or tap) Save (the change will not be saved yet).
The Save Plan message box appears.

-
Click (or tap) Save (the change will not be saved yet).
The Change Insurance Coordination Order/Coverage Range dialog box appears. Proceed to the next step.

-
-
Add an existing plan to an empty position, and start new insurance responsibilities - If an insurance plan is missing at a given position in the coordination order (because the plan either expired or was removed), you can fill the empty position with any one of the patient's active insurance plans.
Use either of the following methods:
Method A: By dragging a plan
-
On a patient's Insurance Information page, click Swap Order.

The insurance plans are divided into sections by insurance responsibility. Any plan can be dragged to any section.

-
Drag a plan by the handle
 to another section.
The Change Insurance Coordination Order/Coverage Range dialog box appears. Proceed to the next step.

Method B: By editing a plan
-
Do one of the following:
-
On a patient's Overview page, in the Insurance box, click (or tap) the Plan link of an insurance plan.

-
On a patient's Insurance Information page, select an insurance plan.

The options for editing insurance information become available.

-
-
From the Insurance coordination order list, select an insurance responsibility in the coordination order that does not have an insurance plan.
Note: The insurance responsibilities that are available on the Insurance coordination order list are the ones that have active insurance plans and missing insurance plans in the coordination order.
-
Click (or tap) Save (the change will not be saved yet).
The Save Plan message box appears.

-
Click (or tap) Save (the change will not be saved yet).
The Change Insurance Coordination Order/Coverage Range dialog box appears. Proceed to the next step.

-
-
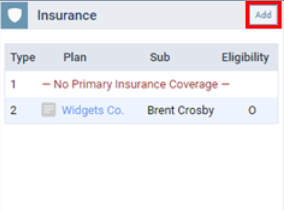
Add a new plan to an empty position, and start new insurance responsibilities - If an insurance plan is missing at a given position in the coordination order (because the plan either expired or was removed), you can fill the empty position with a new insurance plan. The positions of the existing plans in the coordination order are not affected.
Do the following:
-
Do one of the following:
-
On a patient's Overview page, in the Insurance box, click (or tap) Add.
-
On a patient's Insurance Information page, click (or tap) Add Plan.

The options for entering insurance information become available.

-
-
Set up the options for the plan as needed, making sure that the selected Insurance coordination order is an insurance responsibility in the coordination order that does not have an insurance plan.
Note: The insurance responsibilities that are available on the Insurance coordination order list are the ones that have active insurance plans and missing insurance plans in the coordination order.
-
Click (or tap) Save.
The empty insurance responsibility in the coordination order is now filled. Ignore the following steps.
-
-
Add a new plan to an existing plan's position, and start new insurance responsibilities - While attaching a new insurance plan to the patient's record, you can assign that plan to a position in the coordination order that already has an active insurance plan. Be aware that doing this causes the existing plan to be assigned to the first available position in the coordination order (a position that is missing a plan; or if there is not a gap, the last position).
Do the following:
-
Do one of the following:
-
On a patient's Overview page, in the Insurance box, click (or tap) Add.

-
On a patient's Insurance Information page, click (or tap) Add Plan.

The options for entering insurance information become available.

-
-
Set up the options for the plan as needed, and then click (or tap) Save.
You are returned to the list of insurance plans.
-
Click (or tap) the insurance plan that you just added.

The options for editing insurance information become available.

-
From the Insurance coordination order list, select an insurance responsibility in the coordination order that already has an active insurance plan.
Note: The insurance responsibilities that are available on the Insurance coordination order list are the ones that have active insurance plans and missing insurance plans in the coordination order.
-
Click (or tap) Save (the change will not be saved yet).
The Save Plan message box appears.

-
Click (or tap) Save (the change will not be saved yet).
The Change Insurance Coordination Order/Coverage Range dialog box appears. Proceed to the next step.

-
-
-
Review the Current Order and the New Order to make sure you understand how the coordination order will change and how claims will be affected.
Notes:
-
For each position in the current and new coordination orders, the following information appears where applicable: the coverage period, the plan name, and a list of corresponding claims within the coverage period.
-
For each claim, the service date, carrier name, status, and amount appear. To view more details regarding a claim, click (or tap) its Details link.
-
-
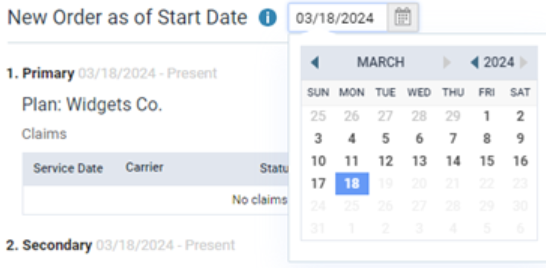
The as of Start Date box displays today's date as the effective date of the change in the coordination order. You can change this date only if you are swapping the positions of two active insurance plans in the coordination order. To change the date, do the following:
-
Click (or tap) in the box, and then select a different date on the calendar that appears. Only today's date and prior dates that are within the coverage period of the current plans are available.
-
Click (or tap) Update Preview.
-
-
Under New Order, do the following as needed:
-
Any claims with a service date before the start of the new coverage period for a given plan are not affected. No action is required for those claims.

-
If there are any unsent (or unprinted) claims with a service date on or after the start of the new coverage period for a given plan, by default, the checkboxes next to those claims are selected to flag them for deletion.

Do one of the following:
-
Leave the checkboxes selected next to the claims that must be deleted.
-
Click (or tap) in the as of Start Date box, select a later date from the calendar that appears, and then click (or tap) Update Preview.
-
-
If there are any sent or printed claims with a service date on or after the start of the new coverage period for a given plan, you must either change the as of Start Date to a later date or flag the claims for deletion.

Do one of the following:
-
Select the checkboxes next to the claims that must be deleted, including any Subsequent Claims, and then click (or tap) Update Preview.
-
Click (or tap) in the as of Start Date box, select a later date from the calendar that appears, and then click (or tap) Update Preview.
-
-
If there are any paid claims with a service date on or after the start of the new coverage period, you must change the as of Start Date to a later date.

Do one of the following:
-
To quickly change the date to the earliest possible date, click (or tap) the Earliest possible date link, and then click (or tap) Update Preview.
-
Click (or tap) in the as of Start Date box, select a later date from the calendar that appears, and then click (or tap) Update Preview.
-
-
If there are any claims with a service date on or after the start of the new coverage period that have locked credit adjustments associated with them, you must either change the as of Start Date to a later date or delete the adjustments.

Do one of the following:
-
To quickly change the date to the earliest possible date, click (or tap) the Earliest possible date link, and then click (or tap) Update Preview.
-
Click (or tap) in the as of Start Date box, select a later date from the calendar that appears, and then click (or tap) Update Preview.
-
For each adjustment that needs to be unlocked so it can be deleted along with the associated claim, click (or tap) the corresponding View credit adjustment link to open the View Credit Adjustment dialog box, click (or tap) the Unlock icon, enter credentials, and then click (or tap) Unlock. If the View Credit Adjustment dialog box does not close automatically, close it. In the Change Insurance Coordination Order dialog box, if the claim's checkbox is not selected automatically, select it.

-
-
-
For each sent or printed claim that must be deleted, you should notify the corresponding payer regarding the change:
-
For contacting the payer now, click (or tap) the phone icon
 next to the claim's status to view the carrier's phone number. Contact the payer. During your communication with the payer, you can click (or tap) the claim's Details link to reference additional details regarding the claim.
 -
For contacting the payer later, click (or tap) the phone icon
 next to the claim's status to view and make a note of the carrier's phone number. You can click (or tap) the claim's Details link to view and make a note of additional details regarding the claim that you may need to provide the payer with.
-
-
Click (or tap) Change.
Note: This button is available only if there are not any alerts and if all the claims that must be deleted are flagged for deletion.
-
If the Delete Claims message box appears, click (or tap) Delete to confirm that you want to delete the claims that are flagged for deletion.
Unlinking Fee Schedules From Insurance Plans
You can now quickly unlink a fee schedule (Settings > Production > Fee Schedules) from multiple insurance plans from one place so you don’t have to edit each insurance plan one at a time to remove the fee schedule association.
Important:
-
Unlinking a fee schedule from a plan will affect existing insurance estimates.
-
The only way to relink a fee schedule is to edit the applicable insurance plans, reselecting the fee schedule, one at a time.
To Unlink Fee Schedules from Insurance Plans
-
To view which insurance plans a fee schedule is linked to, select a fee schedule on the Fee Schedules page (go to Settings > Fee Schedules), select the Associations tab, and then expand Insurance Plans. The associated plans are grouped by carrier. The location that is associated with each plan appears next to the plan name. Also, an Unlink link appears after each plan.

Note:
-
Unlinking a fee schedule requires the “Edit Fee Schedules” and “Edit Insurance Plans” security rights.
-
The unlinking of a fee schedule is recorded in the audit log.
-
With this release, fee schedules can be unlinked only from insurance plans, but allowing fee schedules to unlinked from patients and providers is planned for future releases.
-
-
Click the Unlink link of each plan you no longer want this fee schedule to be associated with.
Note: If you want to undo the unlinking of any plan before you click Save, you may do so by clicking its Relink link.

-
Click Save.
-
On the confirmation message that appears, click Unlink & Save.
Inactivating/Reactivating Insurance Plans
Now you can also inactivate an insurance plan (Home > Insurance > Carriers), which removes it from search results without affecting patient records or claims, as it remains associated with past claims. If needed, you can reactivate the plan for future use without any data loss.
Inactivating Insurance Plans
Note: Changing the status of an insurance plan requires the “Edit Insurance Plans” and the new “Inactivate/Activate Insurance Plan” security rights (in the “Insurance” category).
To inactivate a plan, do the following:
-
On the Home menu, under Insurance, click (or tap) Carriers.
-
On the Insurance Carriers page, select an insurance carrier.
-
Under Plans/Employers, select an insurance plan.
-
From the Status list, select Inactive.

-
Click (or tap) Save.
Reactivating Insurance Plans
Note: You can reactivate an insurance plan if you need to use it again.
To reactivate an inactivate plan, do the following:
-
On the Home menu, under Insurance, click (or tap) Carriers.
-
On the Insurance Carriers page, select an insurance carrier.
-
Under Plans/Employers, only active plans appear in the list by default, so open the View menu, and then select Inactive to view only the inactive plans.

-
Select an insurance plan.
-
From the Status list, select Active.

-
Click Save.
Fee Schedule Procedure Search and Inactive Filter
While you are adding or modifying a fee schedule (Settings > Production> Fee Schedule) in Ascend Academic, you can now search for a procedure in the fee schedule, and you can show and hide inactive procedures.
.png)
To search for a procedure, begin typing a code or description in the Search by code/description box, and continue typing as needed to narrow down the list of procedures.
The Hide inactive procedures checkbox is selected by default, so only active procedures are shown. To temporarily show inactive procedures too, clear this checkbox (the checkbox reverts back to being selected the next time you access the Fee Schedules page and select a fee schedule).
Location ID for Claims
Ascend Academic provides a way for you to specify the correct location ID (Home > Insurance > Carriers) to use for electronic claims that you submit to a payer.
Important: To find out what location IDs the payer has assigned to your locations, you must contact the payer
Note: If a claim is rejected, you can find the reason in that claim's status
To update the location IDs for claims submitted to a payer
-
On the Home menu, select Carriers to view the Insurance Carriers page.

-
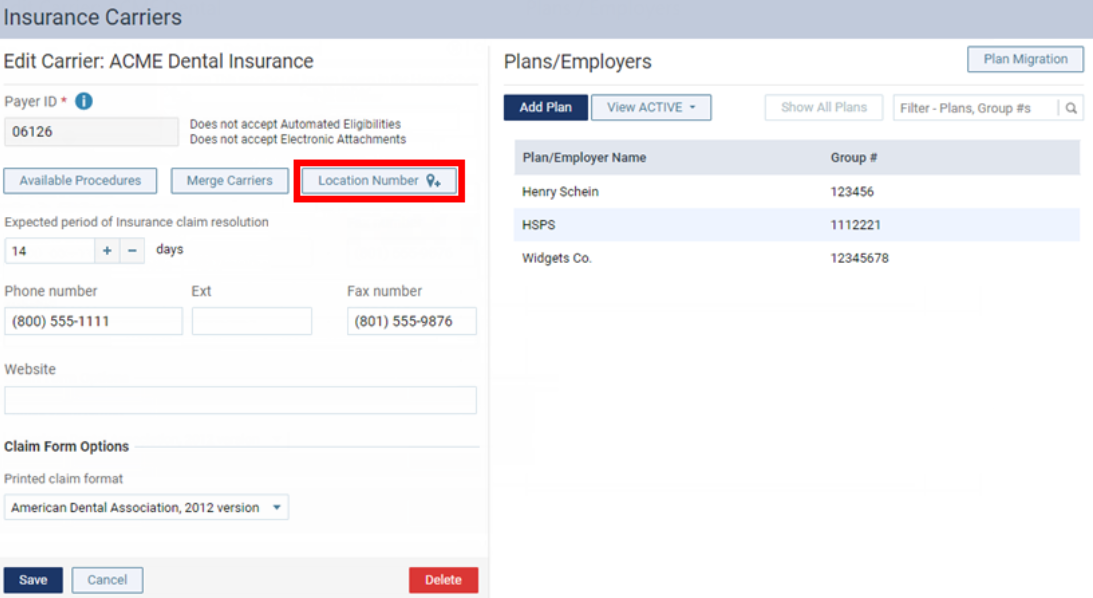
Click a carrier to open the Edit Carrier page.
-
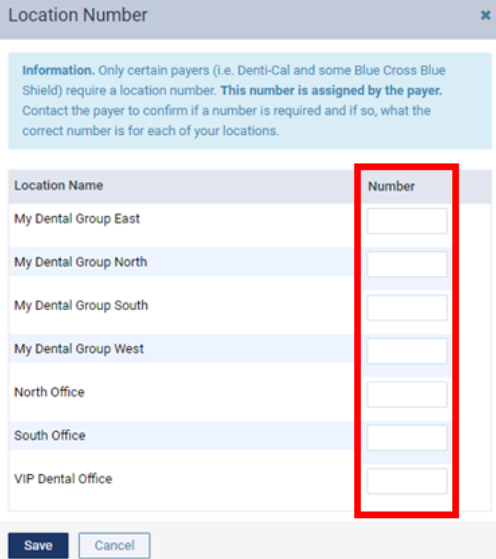
Click the new Location Number button to open the Location Number dialog box.
-
For each location, enter the correct ID in the corresponding Number box. The box accepts up to three characters (letters and/or numbers).

Note:
-
If a Number box is not available, your user account has not been granted the “Edit Carrier” security right for that location.
-
If you enter only one letter or number in the Number box, Ascend Academic will automatically insert a zero (0) before that character you entered.
-
-
Click Save.
-
On the Edit Carrier page of this insurance carrier, click (or tap) Save or Cancel.
Tx Planner - New Warning Messages
Users can now see two orange warning icon in the Tx Planner if there is a fee mismatch. When you open the patient’s planned treatment case (Patient Search box > enter patient name > select Tx Planner from ribbon), notice that the Amount of each affected treatment-planned procedure is orange, and an orange warning icon appears next to the amount to indicate that the fee does not match what is in the fee schedule.
Note: The image below illustrates an example of a mismatch in the location's fee schedule. However, the warning message appears if there is a mismatch in either the patient or provider fee.

Additionally, an orange warning icon next to Update Visit indicates the fee mismatch. Clicking on the icon will display a newly added tooltip warning.

Insurance Payment Tables and Estimates
New features have been added to the Insurance Payment Tables. An insurance payment table is a list of procedures and the amounts a payer pays for each procedure. You can add, edit, and remove procedures, and the fee listed in the payment table will override the coverage percentage in the coverage table for the same procedure (Home > Insurance> Carriers).
Note: There are certain situations when you would not want to allow the payment table to be used for a procedure: the patient’s deductible has not been met or the patient’s maximum benefits have been met.
To set up an insurance plan’s payment table, do the following:
-
On the Home menu, select Carriers.
-
Click a carrier to view the associated insurance plans.
-
Click an insurance plan to view the plan’s options.
-
Click Payment Table.

The Payment Table dialog box appears.

Note: Initially, the plan's payment table is empty.
-
To add procedures, do the following:
-
Click Add Procedure to add a line item at the top of the list.

-
In the Search box, begin typing part of a procedure code or description, and then select the correct procedure.

The Amount box is selected automatically.

-
Enter the amount that the payer pays for the selected procedure.

-
Repeat steps a-c as needed to add other procedures.

-
-
Click Save.
Note: As you add procedures, they are inserted before any existing procedures in the list. However, when you save the changes and then reopen the dialog box, the procedures are sorted by code.

Over time, the list will become long, but you can filter to list to show only procedures that match search criteria that you enter in the Search by code/description box located above the list.

-
To remove a procedure, click the corresponding X.

-
To edit a procedure's amount, click (or tap) in the corresponding Amount box, and then enter a new value.

-
With this new phase of the payment table features, you can enable or disable payment tables to respectively allow or prevent the amounts entered for procedures in payment tables to override coverage tables percentages. To allow payment tables to be used for calculating insurance estimates in your organization, you must turn on a new setting.
To allow payment tables to override coverage tables, do the following:
-
On the Settings menu, select Ledger Options to open the Ledger Options page.
-
Select the Ledger Rules tab.

-
Set the Payment Table amounts should supersede coverage tables switch to Yes.

Note:
-
If the option is set to No, payment tables do not affect estimates, and a message appears in the payment tables of insurance plans (go to Home > Carriers, select a carrier, select a plan, and click Payment Table) to indicate that.

-
If the option is set to Yes, payment tables can affect estimates:
-
If there is an override at the procedure level, that amount is used as the insurance portion instead of the amount in the payment table.
-
If the procedure exists in the payment table, that amount is used as the insurance portion.
-
The write-off for the remaining amount is based on the coverage table.
-
Whether or not payment tables are used, the insurance portion cannot exceed the procedure amount, the patient portion is equal to the procedure amount minus the sum of the insurance portion and the write-off amount, and estimates take used benefits and deductibles into account.
-
-
-
Click Save.
Note:
-
Viewing the ledger options, including the payment table setting, requires the existing “Review ledger options” security right.
-
Enabling/disabling payment tables requires the existing “Manage ledger options” security right.
-
Estimates appear in the following areas of Ascend Academic:
-
Calendar – Scheduled net (appointment, day, totals).
-
Ledgers.
-
Statements.
-
Treatment plans.
-
Estimate details.
-
-
When you are viewing estimate details, if a payment table is in use for a procedure, that procedure’s amount is orange, and if you click the amount, a Payment Table In Use pop-up message appears for your reference.

-
Updating Payment Tables While Entering Claim Payments
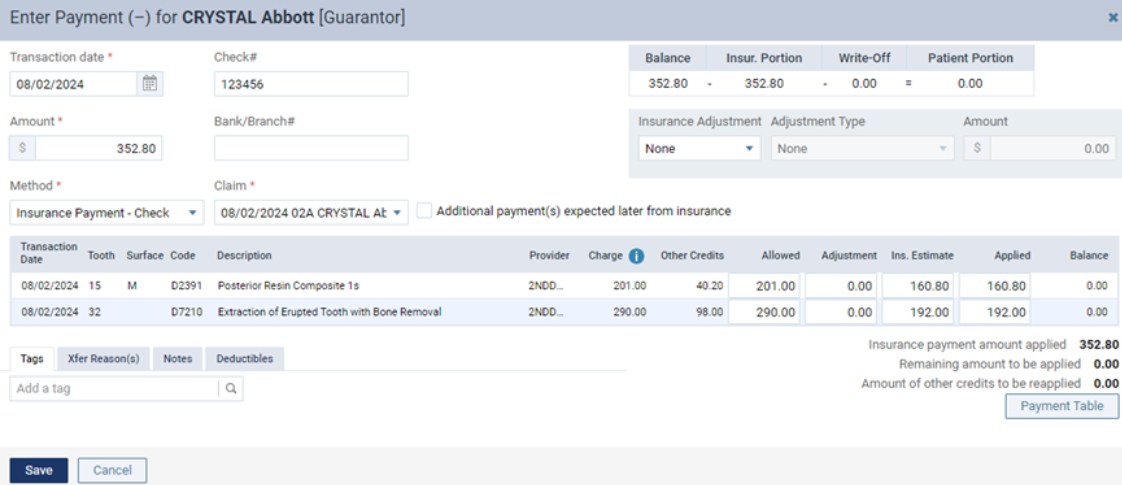
With this release, you can now quickly update an insurance plan’s payment table (Patient > Financial > Ledger) while you are entering an insurance payment. You can now easily save payment information from an explanation of benefits (EOB) without having to leave the patient’s ledger and edit the insurance plan’s payment table.
New Security Right
-
Updating payment tables while entering insurance payments requires the new security right “Claim Payment Table Updating.”
-
This right is located in the “Ledger” category and is dependent upon the “Create payment” right.
-
With the “Claim Payment Table Updating” right granted, a user does not need to be granted the right to manage entire payment tables.
-
By default, existing users who have been granted the “Manage Payment Tables” right, will be granted the new “Claim Payment Table Updating” right.
-
For new organizations, the Administrator, Billing Coordinator, and Receptionist role are granted the “Claim Payment Table Updating” right by default.
To update a payment table
-
In a patient’s ledger, click Payment (-).
-
Click (or tap) Payment Table.
-
Enter the Amount of the payment.
-
Select the Method of payment.
-
Enter payment details, such as the check number.
-
Select the correct Claim.
-
Change any of the following amounts for each procedure as needed: Allowed, Ins Estimate, and/or Applied.
-
If applicable, specify the adjustment details.
The Payment Table dialog box appears and displays the procedures for the selected claim.
-
-
Click Payment Table.
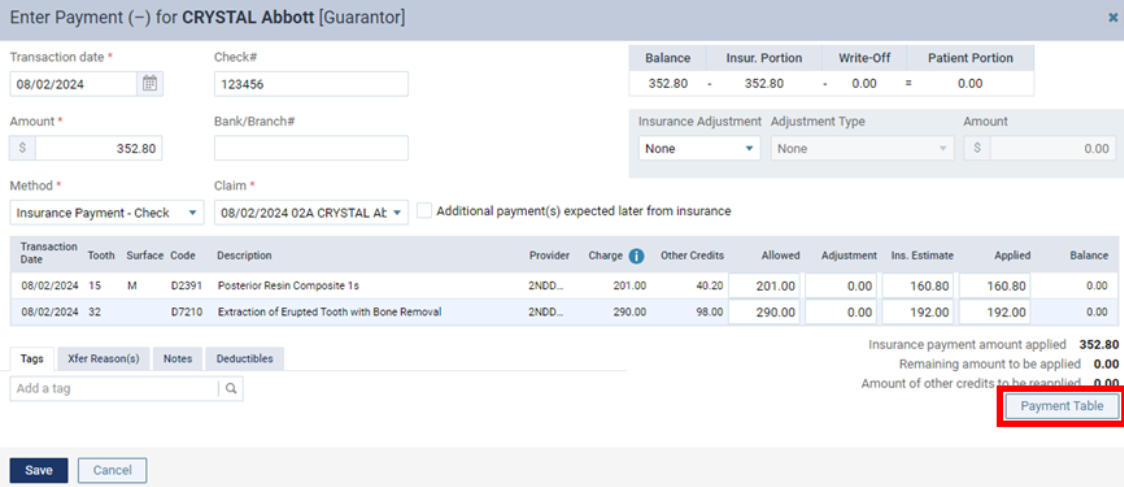
In the Payment Table dialog box that appears, the procedures for the selected claim appear.

Note:
-
If a procedure already exists in the payment table, an amount appears in the Current Amount column.
-
A procedure’s Amount corresponds to the Applied amount in the Enter Payment (-) dialog box. If necessary, you can change the amount to match the EOB by clicking in the Amount box and then entering the correct amount.
-
-
Select the Update checkbox of each procedure whose amount you want to add to or update in the payment table. To quickly select all checkboxes, you can select the checkbox in the column header.

Important: It is important that you only update the payment table when the payment amount applies to all patients covered by that plan. For example, if the estimated insurance portion is different from the payment amount because money is being withheld toward a deductible, do not update the payment table. Similarly, if a patient has exceeded their maximum benefit, do not update the payment table.
-
Click Update Values to update the payment table and close the dialog box.
A green “Saved Payment Table” message appears briefly, indicating that the payment table has been updated.

-
In the Enter Payment (-) dialog box, set up any other options as needed (such as tags and notes), and then click Save.
-
New A/R Detail Reports
A new Provider A/R Detail Report (Home > Reports > Power Reporting) has been created in Power Reporting to show each provider's production and collections by location, along with totals for each location and the organization. Similarly, the new Guarantor A/R Detail Report helps identify discrepancies by showing guarantor-level account activity, including the Primary Guarantor data field.
Provider A/R Detail Report

The report displays the total production and collection amounts for each location and for your organization. The report does not include unapplied credits.
The report uses the following settings:
-
Rows – The Location and Provider data fields
-
Columns – The Production or Collection and Category data fields. These are sorted in descending order.
-
Measures – The Amount data field.
-
Filters:
-
The Modified Date reflects when changes were last made to transactions.
-
For Provider, N/A is excluded.
-
-
For Production or Collection, Show Subtotals is used.
Guarantor A/R Detail Report

The Guarantor A/R Detail Report (a new Power Reporting report) may be useful for identifying discrepancies in reports. This new report represents guarantor-level account activity. The report is similar to the Provider A/R Detail Report; except, the Primary Guarantor data field is included in the Rows.
Day Sheet Performance Improvements
Recent database updates have improved day sheet performance (Home > Reports > Day Sheet). Report options have been adjusted for even better performance. You may have noticed shorter loading times for a day sheet with the back-end changes alone, but now a day sheet may load even faster by you choosing not to include the month-to-date (MTD), year-to-date (YTD), and previous month’s totals on the report.
To generate a day sheet without the previous month, MTD, and YTD totals
-
On the Home menu, select Day Sheet.
-
Make the sure following checkboxes under Comparison Totals are not selected:
-
Include Month-To-Date & Previous Month – The MTD and previous month’s totals are not calculated, and the Month-To-Date and Previous Month columns are not displayed (in the Location Totals, Summary Totals, and Provider Totals sections on the report).
-
Include Year-To-Date (may run slower) – The YTD totals are not calculated, and the Year-To-Date column is not displayed (in the Location Totals, Summary Totals, and Provider Totals sections on the report).
Note: The day sheet includes Location Totals sections only if you are running the report for all providers. The day sheet includes the Summary Totals section for the organization only if the Include Summary checkbox is selected for the report.
-
-
Set up other options as needed.
-
Click Search.
Below is the report with the options not selected.
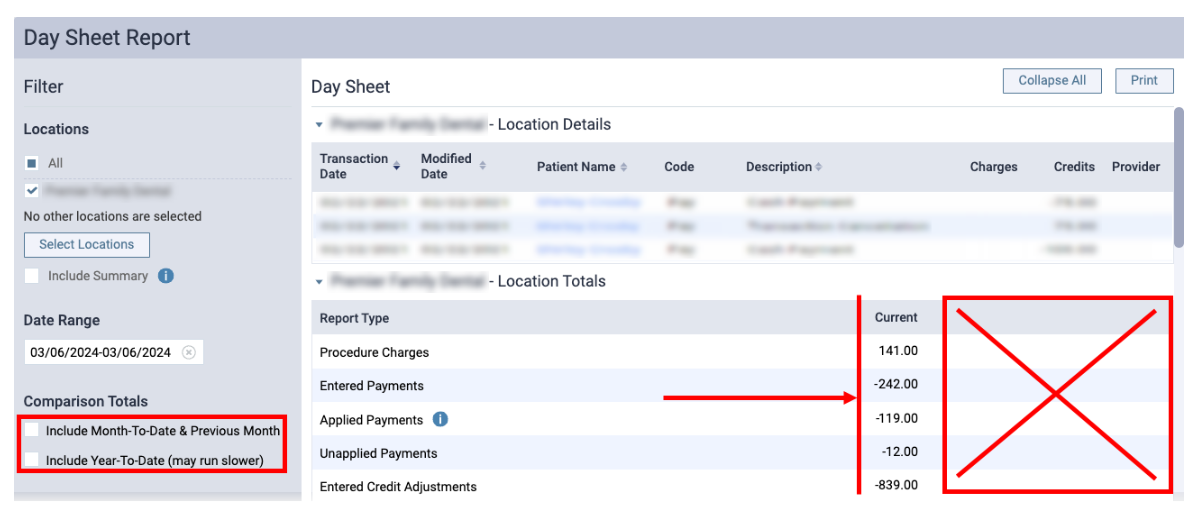
Below is the report with the options selected.

This release also includes a minor functional update: When All providers is not selected under the Provider field, the Include Summary checkbox is automatically unchecked/disabled.

Automatic Tooth Assignment for PAs
With a previous release of Ascend Academic, tooth numbers started being automatically assigned to procedures for periapical (PA) images to help prevent the rejection of claims with PA procedures by some payers that required tooth numbers. However, some payers reject claims with PA procedures that include tooth numbers, so you might have had to start removing tooth numbers from many or all PA procedures, and that might have equated to a significant increase in your workload compared to before the automatic numbering functionality was enabled. With this release, Ascend Academic lets you decide what would work better for your organization. Your organization can now specify whether to allow tooth numbers to be assigned automatically to PA procedures or not (Settings > PRODUCTION > Ledger Options).
To access the new setting that controls the automatic assignment of tooth numbers for PAs, do the following:
-
Navigate to Settings > Ledger Options.
Note: A user’s access to the Ledger Options page is determined by the existing security right “Manage Ledger Options.”
-
On the Ledger Options page, select the Ledger Rules tab. There is a new option labeled Allow auto assignment of tooth numbers for periapical imaging procedures. This switch is set to Yes by default.
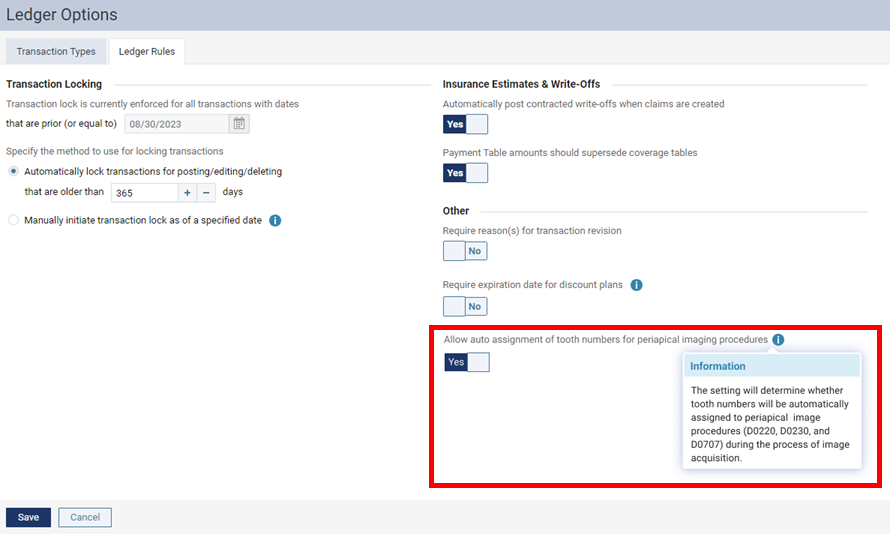
-
Do one of the following:
-
To keep allowing the automatic assignment of tooth numbers, leave the switch set to Yes. After you acquire a PA image in Ascend Academic Imaging, the tooth numbers are included automatically with the corresponding PA procedure that gets posted in Ascend Academic. This option is recommended if most or all of your payers reject PAs without tooth numbers on claims; you may still need to remove tooth numbers from some PA procedures to successfully submit claims with those procedures to some payers.
Note: With automatic tooth numbering enabled, you can manually remove tooth numbers from PA images as needed.
-
To start preventing the automatic assignment of tooth numbers, set the switch to No. With this switch set to No, after you acquire a PA image in Ascend Academic Imaging, the tooth numbers are not included with the corresponding PA procedure that gets posted in Ascend Academic. This option is recommended if most or all of your payers reject PAs with tooth numbers assigned on claims; you may still need to assign tooth numbers to some PA procedures to successfully submit claims with those procedures to some payers.
Note: With automatic tooth numbering disabled, you can manually assign tooth numbers to PA images as needed.
-
-
To save any changes, click Save.
Note:
-
This setting affects all locations in your organization.
-
This setting affects only the standard PA procedures that are used in Ascend Academic Imaging: D0220, D0230, and D0707.
-
The changing of this setting is recorded in the Audit Log.
-
The tooth range/number field for PA procedures is still optional.
-
Area of Oral Cavity on Claims
To help reduce rejected insurance claims due to an area of oral cavity missing for certain procedures, Ascend Academic now provides an option to include the area of oral cavity on electronic claims automatically. Having this option on for a procedure affects all claims that you submit electronically that include the procedure, regardless of the payer; however, the clearinghouse may remove the areas of oral cavity from claims sent to payers that do not allow that information on claims.
Based on ADA recommendations, Ascend Academic turns this option on by default for the following procedures: D0364, D0380, D0801, D1206, D1208, D1301, D1510, D1520, D1553, D1556, D1575, D4210, D4211, D4230, D4231, D4240, D4241, D4260, D4261, D4263, D4264, D4286, D4341, D4342, D4921, D5284, D5286, D5867, D5875, D5876, D5931, D5932, D5933, D5936, D5937, D5952, D5953, D5960, D5982, D5983, D5984, D5985, D5986, D5987, D5988, D5991, D5992, D5993, D5995, D5996, D6190, D6920, D6985, D7260, D7261, D7284, D7285, D7286, D7287, D7288, D7292, D7293, D7294, D7295, D7296, D7297, D7298, D7299, D7300, D7310, D7311, D7320, D7321, D7340, D7350, D7410, D7411, D7412, D7413, D7414, D7415, D7440, D7441, D7450, D7451, D7460, D7461, D7465, D7471, D7473, D7485, D7490, D7509, D7510, D7511, D7520, D7521, D7550, D7953, D7955, D7961, D7962, D7963, D7970, D7972, D7997, D8010, D8020, D8030, D8040, D8210, D8220, D8680, D9613, D9938, D9939, D9941, D9942, D9943, D9944, D9945, D9946, D9947, D9948, D9949, D9950, and D9954.
To view or change the area of oral cavity option for a procedure
-
On the Settings menu, select Procedure Codes & Conditions to view the Procedure Codes & Conditions page.
-
Click a procedure to open the Edit Procedure Code dialog box.

-
If the new Show area of oral cavity on eClaims switch is available, you can set it to Yes or No.
Note:
-
This switch is available only for a procedure code whose treatment area is mouth, tooth, tooth range, surface, or root.
-
You cannot turn this option off for a procedure code whose treatment area is quadrant, sextant, or arch.
-
If you need to bill a procedure without the area of oral cavity, you can use an alias code with this option off (unless the treatment area is quadrant, sextant, or arch).
-
-
Click Save.
For a posted procedure that is flagged to show to area of oral cavity, the code that will be used for the area of oral cavity on a claim is determined by where the teeth that are associated with the procedure are located in the patient’s mouth:
-
The entire mouth (maxillary and mandibular arches) – 00
-
Only in the maxillary arch – 01
-
Only in the mandibular arch – 02
-
Only in the upper-right quadrant – 10
-
Only in the upper-left quadrant – 20
-
Only in the lower-right quadrant – 30
-
Only in the lower-left quadrant – 40
-
Scheduling
ASAP, Broken/No Show, Pinboard Appointment Notes
As you use the ASAP, Broken/No Show, and Pinboard lists to contact patients, you can now add or edit notes for those appointments without having to leave the list you are working from (Schedule > Calendar).
Note: The “Manage Appointment” right is required to add or edit appointment notes.
Editing an existing note
If an appointment has a note, a note icon appears on that appointment tile. To edit the note, click the icon.

The Edit Note dialog box appears.
Make the necessary changes, and then click Save.
Adding a new note
If an appointment does not have a note, an add note icon appears on the lower-right corner of that appointment tile. To add a note, click the icon.

The Add Note dialog box appears.
Enter the note text, and then click Save.
Administrative
Changing your own password
There is a new security right that allows a user to change the password for his or her own user account. Prior to this, for users to be able to change their passwords, they had to be granted the “Edit User” right, which meant they had permission to modify any user’s account details. Now, users that should not have permission to edit all user accounts can be granted the new security right to allow them to change their own passwords.
The new security right is called Change Password and is under the Settings category on the User Roles page (go to Settings > User Roles). By default, this right is not selected for any user role, so each role must be updated manually:
-
If a given role has the Edit User checkbox selected but shouldn’t any longer, clear that checkbox, and select the Change Password checkbox.
-
If a given role does not have the Edit User checkbox selected and still shouldn’t, select the Change Password checkbox.

To save the change, click Save. The change will take effect the next time users log in to Ascend Academic.
Note: The user does not have to have the Change Password right selected if the Edit User right is selected. But if the user does not have access to modify other users’ accounts, the Change Password right is required to allow the user to change his or her own password.
With either of these rights granted, you can change your password by doing the following:
-
On the User menu, click (or tap) My Account.

The My Account page opens.
-
On the Change Password tab, enter your Current Password, and then enter a new password in the New Password and Confirm New Password boxes.

-
Click (or tap) Save.
Username Field on Power Reports
There is a new data field for Power Reporting reports. Any report that is based on the Analysis Ledger Report Builder (Home > Reports > Power Reporting), can now include the new “Username” field, which is in the “Location” category. The Username field displays the user name of the Ascend Academic user who posted a ledger transaction.

Note: The user name appears only for transactions that were entered after this field was made available in Power Reporting; otherwise, for transactions prior to this release, “n/a” appears.
Audit Logs - Improvements and Export
This release includes enhancements to the audit log, including the ability to export it.
The enhancements for the Audit Log (Home > Audit Log) that are included in this release:
-
Improved performance.
-
The report can display up to 500 entries at a time.

-
The User column now includes a user’s first and last name in addition to the username.

-
There is now a search box on the selection list for the User column filter. When you expand the list, you can begin typing part of a username or a user’s first or last name in the search box at the top of the list to quickly locate that user in the list.

-
There is now a search box on the selection list for the Location column filter. When you expand the list, you can begin typing part of a location name in the search box at the top of the list to quickly locate that location in the list.

With this release, you can export the Audit Log (Home > Audit Log).
To export the report, click Export. The current page as it is displayed is downloaded as a .csv file. You can open the .csv file in a spreadsheet program. The first row contains the column headers. The second row contains the filters in use for each column. The subsequent rows contain the details of each log entry.

New Security Right for Viewing Production Amounts on the Calendar
With this release, there is a new security right: “View Production.” To view production amounts on the calendar, this security right is required. By default, all user roles that have the “Review Schedule” right are granted the “View Production” right. If you remove this right from a user role, the corresponding users will not be able to view production amounts in the calendar, and the buttons and links to show amounts will be hidden.
Note: The “Review Schedule” right is required to grant the “View Production” right. Both these rights are located in the “Schedule” category.
Settings
Importing Users - Changes to Import Excel Template
You can import user data from a file to add multiple user accounts to your organization's database at one time. In this new release, there has been a change to the Import Template (Settings > User Accounts > New User > Import Users from File). There is a new column added – DEA Exp. Date [The expiration date of the provider's DEA number (for prescriptions)]

Important: If users are importing from an old excel file, they should have DEA Exp. Date column added. Entering values into this column is not mandatory. If users do not add this column, the Excel sheet will not upload.
Medical alerts permission updates
Previously, medical alerts could only be created when the Update Patient Information checkbox (Settings > User Roles > Select from Available Roles > Security Category – Select Patient Information dropdown) was selected. Now, this permission is no longer required. With this release, users can create, edit, and delete medical alerts without the need for the Update Patient Information permission when assigning permissions.

Comments
0 comments
Please sign in to leave a comment.