
Many new feature enhancements and several bug fixes are included in the product update released in late June 2024.
Note: All content will be available in PROD on June 29, 2024.
The major enhancements in this release include the following:
-
Evaluations
-
Clinical
-
General
-
Imaging
-
Patient Information
-
Financial
-
Insurance
Several bug fixes are also included in this release.
Evaluations
Total and passing points for evaluation forms increased
The total amount of points that can be set for a demerit-based evaluation form has been increased from 200 points. The maximum total points that can be set is now 9999. The total amount of passing points has also been increased to 9999.
When setting up evaluation forms on the Evaluation Setup page > Evaluation Forms tab (Settings > Academic > Evaluation Forms), users can now enter any number up to 9999 in the Total Points field and Passing Points field.
Note: The Passing Points field must still be less than or equal to the Total Points field.

Clinical
Ability to add watch notes
When working on a patient’s Chart tab (Patient > Clinical > Chart) or Quick Exam tab (Patient > Clinical > Quick Exam), users can now quickly view and enter or edit a watch note. They can also select surfaces that they want to watch and flag a surface as class 5.
Chart:
If a watch note is present on a patient’s Chart, a note icon displays next to the W chart symbol. When clicked, a Watch tooth (delay treatment) window displays the graphical representation of the surfaces involved and the watch notes.

If a note is not included, the user can click Edit to display the Edit Condition window and add a note.
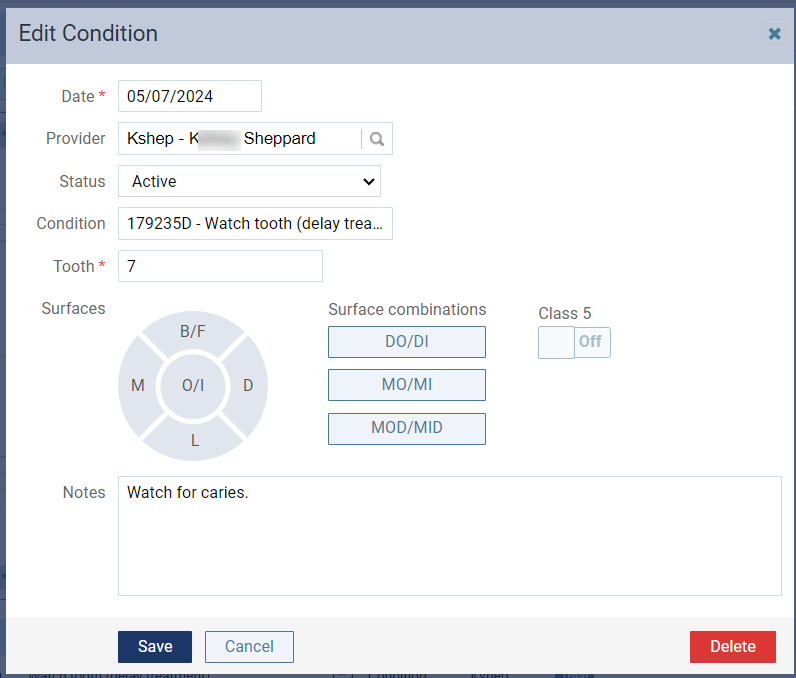
Quick Exam:
Users can also add a watch note to a tooth from a patient’s Quick Exam tab. When the user selects Watch tooth (delay treatment) as a condition, they can select the surfaces and enter any necessary watch notes.

Tip: When finished, a graphical representation of the surfaces involved displays.

New Date quick-pick prompt
When setting up clinical note templates (Settings > Patient Care > Clinical Note Templates), users can now create a Date quick-pick prompt. This allows users to enter or select a date when completing clinical notes using a template with this type of prompt.
To build a Date quick-pick prompt, users can click Manage Quick-Picks and click Create New. Once a Quick-Pick name and Quick-Pick question have been assigned, they can select the (new) Date radio button and set a radio button on the Specify Options tab:
-
Empty field - This always requires a user to enter a date.
-
Today’s date - This automatically selects today using the date the user creates the note but can be changed.
-
Specific date - The chosen date will always be automatically selected, e.g., the beginning or end of the year, but can be changed.

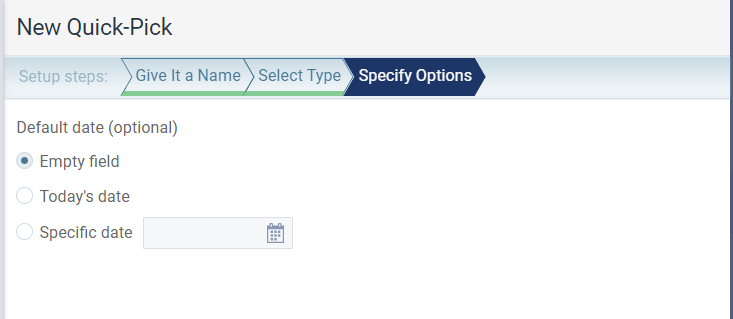
Once saved, the user can close the Quick-Pick Manager.
The quick-pick prompt displays as a date picker when a user works with an applicable clinical note template.
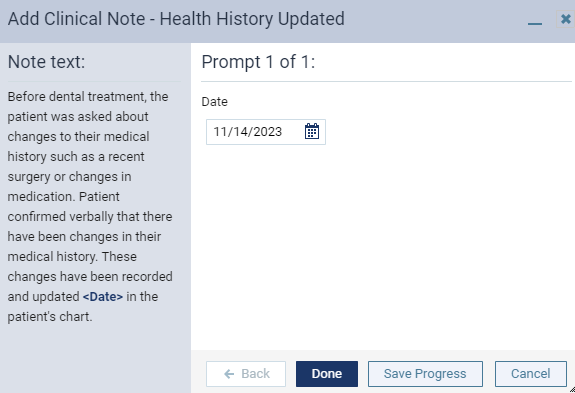
Note: The Manage clinical note templates security right is required to add, edit, or delete quick-pick prompts.
New Number quick-pick prompt
When setting up clinical note templates (Settings > Patient Care > Clinical Note Templates), users can now create a Number quick-pick prompt. This allows users to use a number pad to enter clinical note values when completing clinical notes using a template with this type of prompt.
To build a Number quick-pick prompt, users can click Manage Quick-Picks and click Create New. Once a Quick-Pick name and Quick-Pick question have been assigned, they can select the (new) Number radio button and set a radio button on the Specify Options tab:
-
Empty field - This always requires a user to enter a number.
-
Default value - This automatically displays a default number but can be changed.


Once saved, the user can close the Quick-Pick Manager.
The quick-pick prompt displays as a number pad when a user works with an applicable clinical note template.
Note: This number entry box only accepts zeros and positive whole numbers. It cannot accept decimal points or negative signs.

Note: The Manage clinical note templates security right is required to add, edit, or delete quick-pick prompts.
New One Response quick-pick prompt
When setting up clinical note templates (Settings > Patient Care > Clinical Note Templates), users can now create a One Response quick-pick prompt. This allows users to select an option from a list of specified radio button options when completing clinical notes using a template with this type of prompt.
To build a One Response quick-pick prompt, users can click Manage Quick-Picks and click Create New. Once a Quick-Pick name and Quick-Pick question have been assigned, they can select the (new) One response from list radio button and create the list of radio button options on the Specify Options tab.


Once saved, the user can close the Quick-Pick Manager.
The quick-pick prompt displays as a list of radio buttons with the specified options when a user works with an applicable clinical note template.

Note: The Manage clinical note templates security right is required to add, edit, or delete quick-pick prompts.
Update to Home page widgets
We have updated the Unattached Procedures and the Unsent Claims widgets on the Home page (Home > Overview) so that (30 days) displays at the top of each widget. This indicates that the numbers in each widget reflect the last 30 days and improves the performance of the widgets.
Important: When a user clicks to open the page associated with the widget, all data will still display.
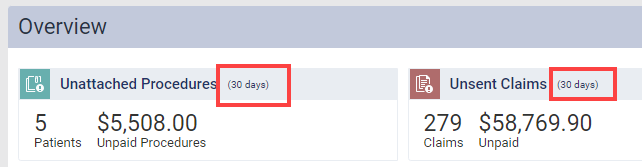
Ability to assign Class 5 indicators to surface-specific conditions
When working on a patient’s Chart tab (Patient > Clinical > Chart) or Quick Exam tab (Patient > Clinical > Quick Exam) with a surface-specific condition, users now have the option to set the Class 5 toggle to On if an applicable surface is selected.
Chart:

Quick Exam:
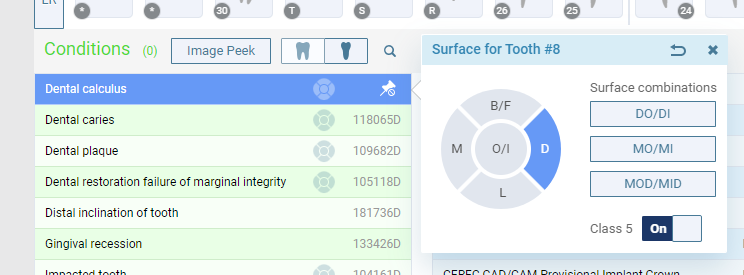
Notes:
-
By default, users must select a surface to enable the Class 5 toggle.
-
The Class 5 toggle is not applicable for the occlusal surface. If selected, the toggle remains disabled.
Procedure codes update for 2024
The American Dental Association (ADA) is the national standard keeper of the codes that define all dental procedures. Your institution uses these codes every day for proper record keeping and communication with insurance carriers, laboratories, and more.
Henry Schein One maintains a licensing agreement with the ADA that allows us to make the 2024 changes to your institution as a software update. Ascend Academic provides this service to you as part of your active customer service plan so that your organization can use these resources without interruption to your work. To learn more about changes to the ADA codes, visit the ADA website.
We recommend that your institution update your fee schedules to account for the procedure code changes.
This update will insert the new procedure codes into your existing fee schedules and update your fee schedule templates. The charge for all new codes is $0.00, so you will want to visit your fee schedules and update them after researching what you would like to charge for those procedures (if applicable for your institution). If you have been importing fee schedules from a spreadsheet, you will want to update your spreadsheet template as well.
New indicator for treatment plan fees
When viewing procedures on a patient’s clinical record > Tx Planner tab (Patient > Clinical > Treatment Planner), an icon now displays next to a procedure Amount to indicate where the fee comes from:
-
 - Indicates that the fee is from the fee schedule assigned to the procedure’s provider.
 -
 - Indicates that the fee is from the fee schedule assigned to the patient.
 -
 - Indicates that the procedure’s provider does not have a fee schedule assigned nor does the patient have an assigned fee schedule, so the fee comes from the fee schedule assigned to the location that the user was logged in to when they charted the procedure or updated its amount.

General
Return to patient after logout
We have improved logout and login behavior.
When provider users manually log out of Ascend Academic and log back in within a two-hour window using the same device and browser, they will return to the same patient and page if on a patient-specific page. If not on a patient-specific page before logout, they will be directed to the Provider Overview page when they log back in.
After the two-hour window, they will be directed to the Provider Overview page when they log in.
Note: If the user was on a patient-specific page of a confidential patient before logout and requires permission to view again, they will be directed to the Provider Overview page when they log in.
Important: Non-provider users will be directed to the landing page if enabled. If not enabled, users will be directed to the Location Overview page.
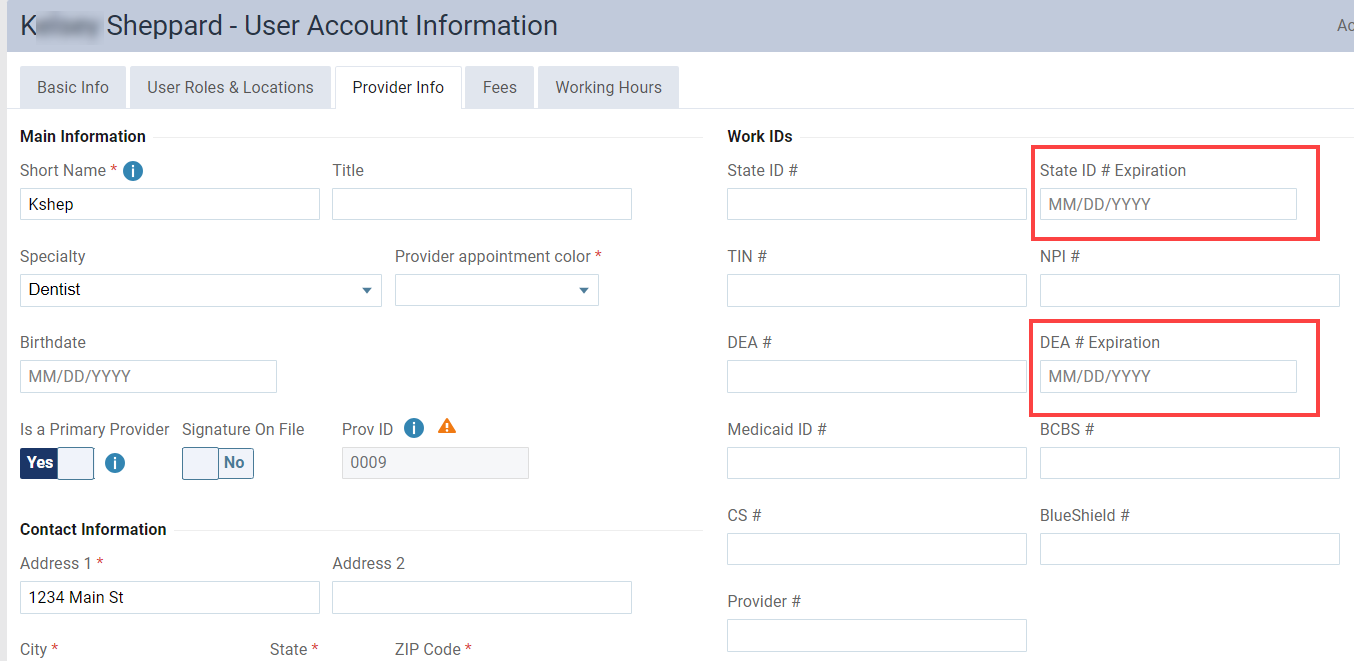
New State ID# and DEA# expiration dates
When managing provider information (Settings > Location > User Accounts), users can now enter expiration dates for State ID #s and DEA #s using (new) State ID # Expiration and DEA # Expiration fields.
Notes:
-
The DEA #expiration date is required if the provider prescribes controlled substances.
-
The other fields in the Work IDs section have been rearranged to accommodate the new fields.
Updates to favorite procedures
We have made several changes to how favorite procedures are handled by your organization:
-
The Favorites column has been renamed to Org Favorites.
When setting favorite procedures on the Procedure Codes & Conditions page (Settings > Production > Procedure Codes & Conditions), the Favorites column has been renamed to Org Favorites.

-
The Add Procedure window has been updated.
When adding a procedure from the Add Procedure window (Patient > Clinical > Chart > Add Procedure button), the following changes have been made:
-
A My Favorites tab has been added.
-
The Top Procedures tab has been renamed to Organization Favorites.
-
The View by Categories tab has been renamed to By Categories.
-
The text “Please select tooth/teeth to display more procedures” which displayed if no teeth were selected, no longer displays. Instead, the text “Shown procedures depend on selected treatment area” now always displays in the upper-right corner.
-
Ascend Academic now remembers whether My Favorites or Organization Favorites was selected the last time someone added a procedure on this computer and selects that option by default the next time a user accesses the Add Procedure window on this computer.

-
-
Ability to set personal favorites.
When adding a procedure (Patient > Clinical > Chart > Add Procedure button), users can now mark procedure codes as personal favorites so they can more easily chart procedures that are relevant to their role.
To add a personal favorite, click the Organization Favorites or By Categories tab or enter a name in the Available procedure search bar to view procedures and click a procedure’s gray star.
To remove a personal favorite, click a procedure’s yellow star icon.

Imaging
Improvement to Show/Hide for Ascend Detect AI
When working with images and Ascend Detect AI, users can now click an image to access an updated menu and choose to show/hide caries detections, RBL measurements, or root tips individually. Users can also show/hide indications for all teeth or an individual tooth.
Notes:
-
The Show Caries, Show RBLs, and Show Root Tips options are selected by default.
-
The menu options vary depending on whether the user clicks a finding or anywhere on an image. If a user clicks a finding, Hide this finding and Show only this finding display, while the Show Caries, Show RBLs, and Show Root Tips options apply to only that finding. If a user clicks anywhere on an image, Hide all findings and Show all findings display while the Show Caries, Show RBLs, and Show Root Tips options apply to all findings.


Update to Schick 33/Xios XG acquisitions
Prior to this release, two image filters were applied to images that were acquired with the Schick 33/Xios XG digital sensor device. The Schick 33/Xios XG digital sensor would apply an image filter in addition to the default Apply Enhancement filter in Ascend Academic, which could cause image resolution issues.
When acquiring images with a Schick 33/Xios XG digital sensor device, only one image filter is now applied. The default Apply Enhancement filter will not be available for images acquired with this device to prevent image resolution issues and improve image quality.
Update to bitewing single images
When acquiring a single bitewing image, users must now select at least one tooth in the maxillary arch and one tooth in the mandibular arch when they want to acquire a single bitewing image to meet correct clinical standards. Users also still have the option to click the brackets to select maxillary and mandibular teeth.
Note: The Acquire button is not enabled until at least one tooth in the maxillary arch and one tooth in the mandibular arch are selected.

Updates to Dynamic Measure tool
The Dynamic Measure tool on the Tools tab has been renamed to Measurements.

We have also enhanced the workflow. When a user presses Enter on their keyboard after they draw the calibration line and enter the measurement in the Standard for calibration box, the Measurements tab now automatically opens.
Update to Measurements
We have made several improvements to the Measurements tool:
-
Calibration changes
Calibration is no longer required if an image has a known pixel size; the Measurements tab is selected automatically so users can start drawing the actual measurements.
-
Pixel size warnings changes
The warning text for known pixel size measurements now displays after the measurement list, and the last sentence of the warning (Calibration to a known object length is highly recommended for any diagnostic use of measurements.) has been removed.
New Videa Health AI link token
A (new) Videa Health AI link token is now available. When users access the image viewer and click the Launch Videa AI link in Ascend Academic Imaging, they are automatically logged into the Videa Health website and the images display.
Note: Access to Videa Health’s website is included in your Ascend Detect AI subscription.

New AIDE tool for Ascend Detect AI
We have added a (new) Detect AI Artificial Intelligence with Diagnostic Enhancement (AIDE) tool to Ascend Detect AI to give providers the ability to automatically apply image enhancements.
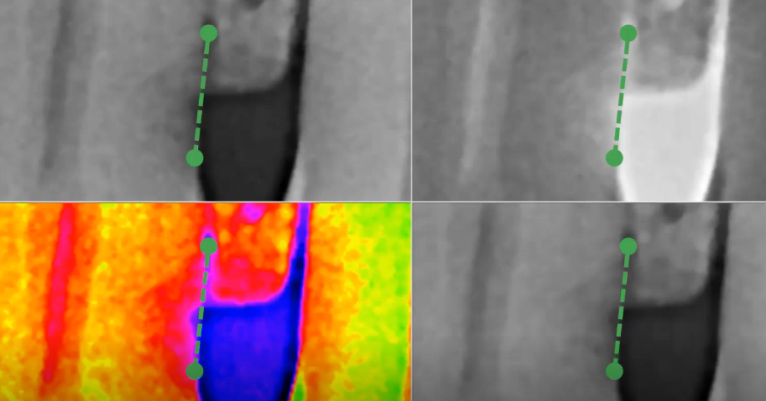
To use the AIDE tool, click inside a caries detection or next to the RBL indication and click AIDE to open four views with different pre-applied effects to diagnostically enhance the image.
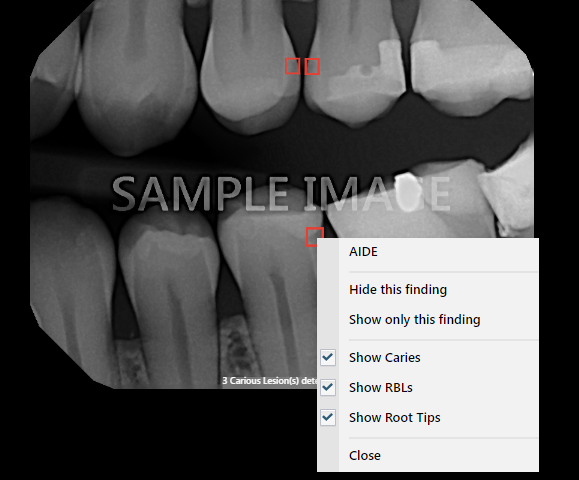
The four AIDE display views are:
-
Zoomed in filtered
-
Zoomed in inverted
-
Zoomed in colorized
-
Zoomed in unfiltered

Caries Detect Indications:

Radiographic Bone Level Indications:
Tips:
-
The Detect AI AIDE tool uses the same functions to decrease or increase brightness and contrast. Users can click and drag up/down in the viewing area to decrease/increase the brightness, click and drag left/right in the viewing area to decrease/increase the contrast, and double-click in the viewing area to reset the brightness and contrast levels.
-
The Detect AI AIDE tool also uses the same navigation functions to navigate images. Users can zoom in by rolling the mouse wheel forward, right-click to pan across the image (in zoom in mode), zoom out by rolling the mouse wheel backward, and expand the view to a full screen view by clicking the expansion arrow.
New Huddle dashboard for Ascend Detect AI
A (new) Huddle link and dashboard in Videa Health are now available for Ascend Detect AI. The dashboard can help users review patients that are that are due for bitewings, perio charting, or a prophy. It also identifies patients with potential periodontal disease and/or potential restorations.
Note: This is the first phase of development for this feature.
The information collected on the Huddle dashboard is gathered when users acquire images in Ascend Academic Imaging. Initially, users can use the dashboard retroactively to review patients that were seen that day. As users acquire more patient images, they can use the dashboard more proactively.
Tip: Use the dashboard at the end of the day to review the recent patients and see if treatment was missed. This gives users an opportunity to check a patient’s perio exam to see if periodontal disease was noted or to check if a treatment plan for restorations was created for a patient. Even during its initial use, the dashboard can help users find potential production for your practice.
Later, in the next six-month recare cycle, users can see patients that are due for bitewings, perio charting, or a prophy. This can be extremely useful, e.g., if a patient is coming in for a filling, a user can see that they are due for prophy and bitewings. If due, they can schedule an appointment before the patient leaves or try to schedule the treatment for that day if there is an opening in the hygiene schedule.
The dashboard is accessed through a (new) AI Patient List link on the Imaging Tools tab for any patient.

By default, the dashboard opens to today’s date with a Privacy On setting to hide patient names and ages. The dashboard displays treatments, tasks, and AI findings for each patient listed if they are due. Additionally, the Huddle dashboard displays potential periodontal disease or caries requiring restorations for a patient if detected by the AI.
At the top of the dashboard, a toolbar displays the total number of appointments for that day and a task filter that displays the total number of:
-
Patients with bitewings due
-
Patients with a perio chart due
-
Patients with a prophy due
Note: These numbers automatically update within 15 minutes after users acquire patient images, so the numbers will update throughout the day as users see patients.

Tips:
-
To view the patients’ names and ages, click Privacy On or the
 icon.
icon. -
To view the patient’s date of birth, click the ellipsis next to the patient’s name.

The dashboard gives users options to filter the information listed. They can filter by:
-
Task: Users can sort the information on the dashboard by task when they click Patients with Bitewings Due, Patients with Perio Chart Due, or Patients with Prophy Due.
Note: When users first start using the dashboard, these numbers will be zero because they are calculated on patient images that were acquired since this feature was enabled. As they continue to acquire images, these numbers will automatically update so that in the next six-month cycle, they can monitor patients that are due for bitewings, a perio exam, or a prophy.
Example: If a user clicks Patients with Bitewings Due, the dashboard finds and lists the patients that are due for bitewings that day—even though bitewings may not be among the procedures planned for today.
-
Time, Radiographs, or Findings: Users can sort or filter the information on the dashboard by selecting an option on the Sort & Filter menu:
-
Appt. Time (earliest)
-
Appt. Time (latest)
-
Radiographs available
-
Resto Findings
-
Perio Findings
-
-
Operatory: Users can also filter the information on the dashboard by operatory from the Operatories menu.
Note: No operatories are selected by default.
Users can view the number of hours, time, and date of the last update at the top of the dashboard. They can also see the update for each patient.

When a user clicks the status icon under Potential Perio or Potential Resto (Potential Restorations), a thumbnail image opens so they can review the AI findings.
Note: Radiographs and findings are from the image set taken on (or closest to) the selected appointment date.

When a user clicks Review, a full view image opens in Videa Health so they can review all AI findings.

After a user clicks Potential Perio, Potential Resto, or Review, a  and Findings Reviewed message displays.

Users can click the Print  icon to print the information on the dashboard for their staff to refer to at the end of the day to check the following for patients seen that day:
-
If they received the bitewing images, perio chart, or prophy treatment that were due.
-
If they had perio or restorative treatment entered in their chart and/or their Treatment Planner in Ascend Academic.
When a user clicks Recent Visits, historical patient information displays.

New mirrored exam view
When working with images, users can now use a (new) mirrored exam view. This allows them to view template images as if they are looking at the patient from behind, where the images are displayed from the left side to the right side.
Note: The current view allows users to view template images as if they are looking at the patient’s face, where the images are displayed from the right side to the left side.
Tip: Mirrored exam view is also known as military view.
To use the mirrored exam view, users must first create a custom imaging procedure template, then select the (new) Mirrored Exam checkbox and click Save.

New share volume software devices
The following software device options are now supported in Ascend Academic and have been added to the Available Devices menu for sharing 3D volumes:
-
3D – Anatomage/TxStudio One-Way Bridge Integration
-
Owandy QuickVision3D
-
Nemo Studio Nemotec
Updates to supported imaging devices
The following changes to imaging devices are now supported in Ascend Academic and have been added to the Available Devices menu for acquiring images:
-
VistaScan – This device is now supported via VisionX Connect for computers running Windows 11.
-
DTX Studio Clinic SW Bridge – This device is now supported for computers running macOS.
-
SoPro Camera – This device is now supported for computers running macOS 10.15 (Catalina) if SoPro Imaging 1.13 is installed. Users can capture images from the SoPro Camera using a new MAV2M application which has replaced SoPro Capture. The MAV2M application launches automatically after users click Start Acquisition.
Patient Information
Update to text messaging
We have added a (new) two-way text message warning placeholder so that staff members read the HIPAA warning before sending a text message. The warning placeholder message is: “Per HIPAA guidelines, please do not communicate personal health information here.”
Note: The warning placeholder message displays in the following areas of Ascend Academic that you can access text messaging from:
-
Inbox
-
Routing panel (blue text messages hyperlink)
-
Calendar- patient appointment panel (blue text messages hyperlink)
-
Patient Ribbon (Message icon)
-
Patient Connection page (accessed from the Home menu)

Ability to print route slip for specific day
Users can now access a (new) Print Route Slip menu located at the bottom of the Routing Panel. They can choose whether to print a routing slip for Today, the Next Business Day, or a (new) Specific Date.
If the user selects Specific Date, they can then use a date picker to select any future date and click Print.

Document Manager redesign
The patient Document Manager has been redesigned to help users better organize and locate documents.
Tags have been moved to the left panel, and are now alphabetized, allowing users to easily read the listed tag types.

Tips:
-
The tag list is specific to the selected patient, so not all tags in the Document Manager display.
-
If the tag list is still long and users want to check whether a tag already exists before adding a new one, they can click the (new) Manage Tags button and enter the tag name in the window that opens. If the tag does not display, they can click the + Create button to add what they entered in the search bar.
Note: The (new) Manage Document Tags security right is required to create new tags.
-
If any of the patient’s documents are not tagged, select the Not Tagged checkbox to show those documents. Then, click the (new) Edit
 icon to display the Edit File Details window and add one or more tags.
When searching for documents, the Document Manager looks for a matching name or tag as users enter words. The search is only within the documents included in the filters selected on the left panel.
By default, documents are now sorted by Newest First, making it easy to find documents that were recently scanned or uploaded. However, a (new) Sort By field allows users to also sort by Oldest First, Alphabetical A-Z, or Alphabetical Z-A, if necessary.
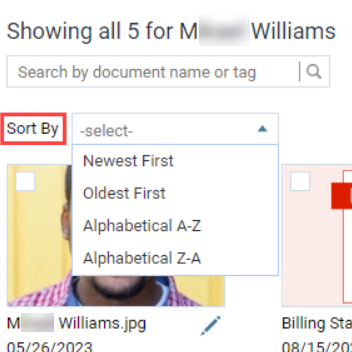
Tip: When working in List View, users can also click a column header to sort the documents by name or date and click again to reverse the sort order.
When necessary, users can now click the (new) Edit icon to display the Edit File Details window. From here, they can change the file name, tags, and set a date for document from a (new) Date field. By default, documents have the date they were uploaded.
Tip: If necessary, users can use the Date field to backdate a document.

Financial
New No Write-off checkbox
We have added a (new) No Write-off checkbox to the Fee Schedules page (Settings > Production > Fee Schedules) so that users can determine if they do not want a write-off for a procedure code in a contracted fee schedule.

Typically, when a dentist performs a procedure for an insured patient, a write-off is calculated by subtracting the maximum allowable fee from the office UCR fee, and that amount displays on the patient’s ledger as an adjustment. However, there may be situations when your office does not want a write-off for a procedure code in a fee schedule.
Example: Your office may have a policy that the patient pays the full fee for certain procedures that the insurance carrier does not pay for, like nightguards, specialty procedures, and nitrous.
In these situations, users can select the No Write-off checkbox for a procedure code in a fee schedule and charge the difference to the patient.
When the No Write-off checkbox is selected for a procedure, Ascend Academic will not estimate or post any write-offs to the patient’s ledger for the associated procedure even if the provider is contracted with the patient’s insurance plan that is associated with the fee schedule.
Important: By default, the No Write-Off checkbox is deselected. When not selected, Ascend Academic will estimate and post write-offs to the patient’s ledger for the associated procedure.
Tip: To select the No Write-off checkbox for all procedures in a fee schedule, select the checkbox in the No-Write off column heading.
Improvement to importing fee schedules with $0.00 amounts
We have improved how to handle $0.00 or missing fee amounts for procedure codes when users import a fee schedule. Previously, fee amounts that contained invalid or missing values were assigned a value of $0.00. Now, Ascend Academic lets users decide how to handle them. Users can decide to mark them all as No Write-off or as NOT charged.
When importing a fee schedule, users can click Create New and, from the (new) Bulk Edit drop-down list, select Import fees from file. Once they have reached the Fee Handling tab, they can select how to handle $0.00 and empty fee values.
-
For $0.00 fees:
-
Marked as “No write-off” - This ensures write-offs are never posted for $0.00 procedures and patients will be billed the difference.
-
NOT charged - This ensures $0.00 procedures in the imported fee schedule will have no charge.
Note: The Marked as “No write-off” radio button is selected by default.
-
-
For empty fee values:
-
Do not change, use current fee in this fee schedule – This sets empty fee values as the current fee.
-
Set to $0.00 mark as “No write-off” – This sets empty fee values as $0.00 and marks them as No write-off.
Note: The Do not change, use current fee in this fee schedule radio button is selected by default.
-

Insurance
Ability to set Max Allowable Fee Schedules by location
Although fee schedules are shared throughout the organization, fee schedules are assigned on a per-location basis. To reduce some of the labor this entails, when working with insurance carriers (Home > Insurance > Carriers), users can now select an insurance plan and click the (new) Set For All Locations button under Max allowable amount fee schedule to display a (new) Max Allowable Amount Fee Schedules By Location window and set an insurance plan’s Max Allowable Fee Schedule for multiple locations in one place.

After the (new) Max Allowable Amount Fee Schedules By Location window displays, users can select a fee schedule for each location individually or select a fee schedule for one location and click Apply to All.

Tip: It is common for a payer to specify different reimbursement rates according to geography. The more physically distant your multiple locations are, the more likely this is to be true. Therefore, you must still create a fee schedule for each location that is priced differently from a centralized standard (for example, Aetna Location #1, Aetna Location #2, and so on). On the other hand, if your locations are tightly clustered in a metropolitan area, they may not vary at all, and you can apply the same fee schedule to all locations.
Note: The Edit Insurance Plans security right is required to edit a plan.
Updated coverage table frequency exceptions
Many dental plans will only cover some procedures at stated intervals as determined by the plan.
Example: Cleanings and examinations are commonly covered twice in a plan-year or every six months.
When working with coverage tables (Settings > Production > Coverage Tables), users can now enter frequency exceptions, which will help Ascend Academic to automatically calculate insurance and guarantor portion estimates.
To configure a frequency exception, users can select a template and click Add New Exception. From the Exception Type tab, they can select the (new) Frequency radio button.

From the Select Procedure(s) tab, they can search for and select the procedure codes that share the same frequency limitation.

From the Specify Options tab, they can use the How many times and Over the course of fields to specify how many times and in what time frame the procedure will be covered.
Example: One time per year

From the Reason for Exception tab, they can enter a short explanation why the exception was added.
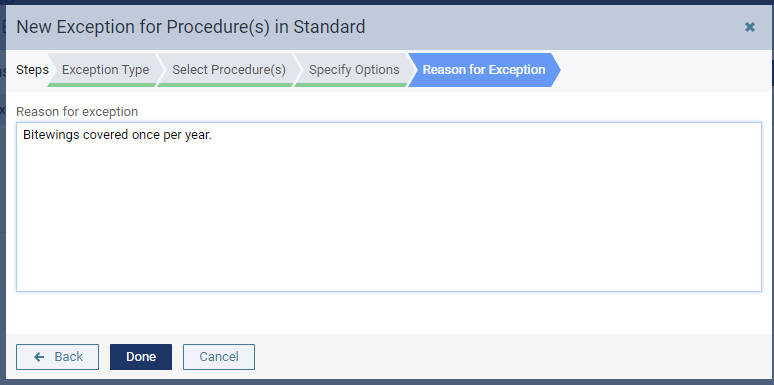
When ready, the user can close the exception.
As with other coverage table exceptions, the Ledger and the Tx Planner pages use an indicator to highlight procedures where exceptions apply. Also, in the Detailed View of the Patient Portion and Guarantor Portion explanations, users can click a value in the Primary Coverage % column to view the exception information.
Tx Planner:

Ledger:

New ADA 2024 claim form
We have added a (new) 2024 ADA claim form that can be used to print paper claims.
The 2024 version of the form includes four (new) fields:
-
Box 3a. Payer ID for third-party payers
-
Box 11a. Other Payer ID for other supplemental coverage
-
Box 39a. Date Last SRP (not included in the electronic claim format)
-
Box 53a. Locum Tenens Treating Dentist? (not included in the electronic claim format)
Note: These changes to the printed version of the form have no impact on electronic claims. The ADA encourages practices to continue submitting electronic claims, and to submit paper claims only when documentation for Locum Tenens or Last SRP is needed.

To set an insurance carrier to use the 2024 claim form (Home > Insurance > Carriers), users can select an insurance carrier and set the Printed claim format drop-down list to the (new) American Dental Associated, 2024 version.

Support for Locum Tenens treating dentist
Ascend Academic now supports Locum Tenens providers. This is one of the new fields in the printed ADA 2024 form.
To identify a provider as a Locum Tenens treating provider, users can access the provider record (Settings > Location > User Accounts), click the Provider Info tab, and set the (new) Locum Tenens Treating Provider toggle to Yes.
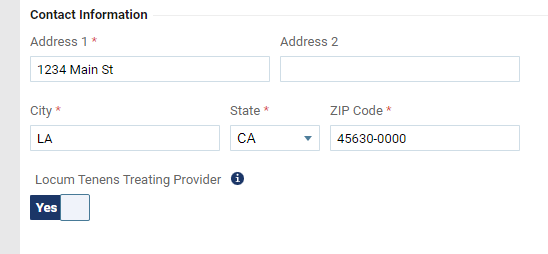
Note: The Edit User security right is required to modify the Locum Tenens Treating Provider toggle.
When reviewing unsent claims (Home > Insurance > Unsent Claims) or sent claims (Home > Insurance > Sent Claims), users can also use a (new) Locum Tenens Treating Provider toggle on the Claim Detail window > General tab to identify such a provider in the claim detail.
Note: The default value for the toggle reflects the claim’s rendering provider as set in the provider’s user account, but users can change it for a particular claim if needed.

Bug Fixes
HTML tags automatically added to patient communications display in patient-facing emails
Issue: Automated appointment reminders with custom messages display HTML tags in the emails sent to an organization’s patients.
Solution: Fixed so that outgoing emails do not display HTML tags.
SMS reminders may be incorrect if multiple appointments are quickly scheduled
Issue: When multiple patient appointments are scheduled in quick succession, the appointment reminder sent over SMS does not include the first appointment in the series.
Solution: Fixed so that all appointments are included in SMS reminders, as expected.
Deleted procedure code may cause Progress Summary tab to display incorrectly
Issue: If users delete a procedure code that was used in the Progress Summary setup, the Progress Summary tab may not display correctly.
Solution: Fixed so that the Progress Summary tab displays as expected. When necessary, the tab indicates where a procedure code was deleted and Ascend displays a message at the top of any page in Evaluations settings warning that a procedure code was deleted.
Caution icons may display incorrectly when saving changes to user accounts
Issue: If an error occurs when saving changes to a user account, caution icons display on multiple tabs instead of indicating which tab is missing information.
Solution: Fixed so that the caution icon only displays on the tab(s) that are missing information.
Comments
0 comments
Please sign in to leave a comment.