
Several new feature enhancements and bug fixes are included in the product update released in early April 2024. The major enhancements in this release include the following:
-
Forms
-
Imaging
-
Add-On Integrations
Important: Enhancements and bug fixes from this release will be available in PROD on April 06, 2024.
Forms
Ability to import and convert custom forms
Ascend Academic now offers a service to import and convert custom patient forms to electronic forms.
Important: All imports will be performed by Support. For more information, contact Ascend Academic Support.
Imaging
Radiographic imaging limit improvements
We have made several improvements to how radiation limits are controlled during radiographic imaging exams. We have added two (new) security rights:
-
Limit Radiation Imaging security right to limit number of x-ray retakes.
This controls whether users can capture radiographic images without an enforced limit. If set for a role, users with that role cannot exceed a maximum number of radiographic image exams per patient visit and a maximum number of radiographic image retakes per exam.
Example: Faculty members may exercise judgement about a patient’s levels of radiation exposure while students should be limited to a specific number.
-
Can Override Imaging Limits security right to override the radiographic imaging limit.
This controls whether faculty can choose to override the limit and continue image captures.
Example: A student has reached the radiographic image capturing limit per patient visit, but the faculty determines the images taken so far are not adequate to proceed with treatment and must be recaptured.
When setting or modifying user security rights (Settings > Location > User Roles), the (new) security rights are now listed under the Imaging security category.

The radiation exposure limit for the (new) Limit Radiation Imaging security right is controlled from a (new) Miscellaneous tab on the Location Information page (Settings > Location > Location Information). There is one (new) field on the Miscellaneous tab:
-
Maximum number of radiographic image retakes allowed per exam: This field indicates how many recaptures a user can perform per imaging exam and per patient visit.
Important: The range of values that can be entered is 0-10. If 0 is entered, there is no maximum. The value defaults to 0.

Tip: Users can click the  icon next to the field to view a tooltip with additional information about the field.
Notes:
-
The radiation limit applies only to imaging exams that emit radiation. It does not apply to intraoral camera imaging.
-
Imaging exams may require several images to be considered complete. In these cases, additional images are not considered retakes unless they capture the same area.
Example: A 4 bite wings exam requires one image per quarter for a total of four images. It is considered a retake if a user captures two images of the same quarter.
If a provider with the Limit Radiation Imaging security right reaches the retake limit, they are prompted with a Request Retake Limit Override Approval window.

When prompted, the provider can enter the supervising faculty member in the Attending Provider field and click Request Approval.
Note: Only faculty members with the (new) Can override imaging limit user permission display in the field.
Once selected, the supervising faculty member can enter their name and password in the Approver and Password fields and click Approve Override to allow the provider to proceed.
Note: The workflow after receiving override approval may vary depending on the type of exam.
Examples:
-
If recapturing a single image exam or multiple image exam, the approval window displays when the limit is reached. After receiving limit override approval, the provider must click Recapture to recapture images.
-
If recapturing a single image exam and recapture limit has already been reached, the approval window displays. After receiving limit override approval, the provider must cancel the recapture and start a new recapture.
-
If recapturing a single image exam while in endo mode, the approval window displays when the limit of repeating images is reached. After receiving limit override approval, the provider must finish the current acquisition and select the exam to recapture.
Notes:
-
Override approval is limited to that day and patient chart only and is maintained if the provider logs out and back in on the same day. Approval also applies to all locations.
-
Any other providers attempting to take recaptures for the same exam on the same day must also receive override approval.
-
The image retake limit is calculated separately for each day.
Example: If a provider is given override approval to recapture images for an exam on a patient chart, but decides they want to recapture images for the same exam on a different day, they may reach the limit for that day and must receive override approval for that day as well.
New Imaging Retake Request notification for faculty
Providers that are now restricted to an image retake limit may need to request override approval from a faculty member to continue taking image recaptures if they reach the image retake limit.
If a provider is prompted with a Request Retake Limit Override Approval window, they can select a faculty member and click the Request Approval button to send an Imaging Retake Request notification to the selected faculty member.

RCI updated to version 109.2
The RCI version has been updated to 109.2.
Important: Users must update their Acquisition Agent.
Pixel size for TWAIN sources
Note: This is only applicable once the Acquisition Agent is updated to 109.2.
In Ascend Academic Imaging, you can now use the Measurement tool without having to perform a calibration for an image that was acquired using a TWAIN source just like you can with an image that was acquired using a directly integrated device.
To allow this, you must specify a pixel size for that TWAIN source in the acquisition agent’s preferences by doing the following (Windows only):
-
Click the Acquisition Agent icon in the notification area of the Windows taskbar and click Preferences.
-
In the Preferences window, click the TWAIN tab.
-
Under TWAIN Rotation, select a device, select a type and rotation option, and enter the correct number of microns in the Pixel Size box.

-
Click Done.
New supported 3D imaging device
Direct acquisition of 3D volumes using an Owandy CBCT machine is now supported for Ascend Academic (Windows only).
Note: This is only applicable once the Acquisition Agent is updated to 109.2.
Ability to stack images
Ascend Academic Imaging has been redesigned to allow multiple images to be stored per slot in a series. This applies to the recapture functionality, as well as during scans or imports. If multiple images are stacked in a slot, users can now navigate through the images stacked in a slot, and change which image is the top of the stack. They can also move a stacked image to another slot in a template and delete a stacked image.
Recapture changes
When recapturing an image, users can now choose whether to keep previous images stacked in a template slot and determine which image is the top of the stack.
Several updates have been made to the Select Image window.

-
The recaptured image now displays under New Image while the existing image now displays under Old Image.
-
The button to keep the recaptured image has been renamed to Keep New. When clicked, the recaptured image is kept and placed on the top of the image stack for the template slot.
-
The button to keep the existing image has been renamed to Keep Old. When clicked, the existing image is kept and left on the top of the image stack for the template slot.
-
A (new) Delete rejected image checkbox has been added to the window and is selected by default. If selected when you click a button, the rejected image is deleted. If deselected when you click a button, the rejected image is hidden.
Scan/Import changes
As users acquire a series of images and assign the images to slots in the template, they can drag an image from the panel at the bottom to a box of the template that already has an image assigned. The image is now put on the top of the image stack for that template slot.
Arrow buttons now display above the box, allowing users to quickly navigate between stacked images.
Tip: The image that is visible in the stack when you click Begin Uploading is set as the top image of the stack, but this can be changed later, if needed.

Users can also drag the image that is visible in the stack to the panel at the bottom or to another box in the template.
Additionally, any images that are unassigned when you click Begin Uploading or Cancel can now be stored indefinitely for the patient, allowing them to be recovered later. When prompted that unassigned images will not be added to the patient record, the message now provides options to store or discard the images.

Users can click one of the following buttons:
-
Send to Recovery: This saves the unassigned images. You can assign them to the patient later using the existing functionality for recovering images.
-
Discard Images: This deletes the unassigned images permanently.
-
Stay on Page: This allows the user to continue to assign unassigned images or make other changes without leaving the page.
Viewing changes
When viewing images, the viewing area has been updated to accommodate stacked images.
If viewing an entire series, the teeth and date on the header of an image slot have been shifted to the left and arrow buttons now display so users can navigate between stacked images.

If viewing one image, a (new) Set Top Image  icon now displays in the upper-right corner to allow users to set an image as top of the stack. Arrow buttons also display so users can navigate between stacked images.

Notes:
-
The Manipulate Patient Images security right is required to set the currently viewed image as the top one of the stack.
-
The Set Top Image
icon is not enabled if viewing the top image or there is only one image. -
The left arrow button is not enabled if viewing the top image or there is only one image.
-
The right arrow button is not enabled if viewing the bottom image or if there is only one image.
Moving changes
Users can now click a (new) Re-arrange button to move a stacked image between template slots.
Note: The View Recaptured button has been replaced with the Re-arrange button. The Re-arrange button only displays if there are multiple images for a slot.
If moving an image, users can view the image in the stack and click Re-arrange.

When prompted with the Move Image window, they can drag the image to another template slot and click Confirm. The image will become the top one in the stack for the destination slot and will be selected by default.

Deleting changes
Users can now delete images that are stacked in a template slot.
If deleting an image, users can view the image in the stack and click Delete.
Important: Only the visible image is deleted, rather than the entire stack.
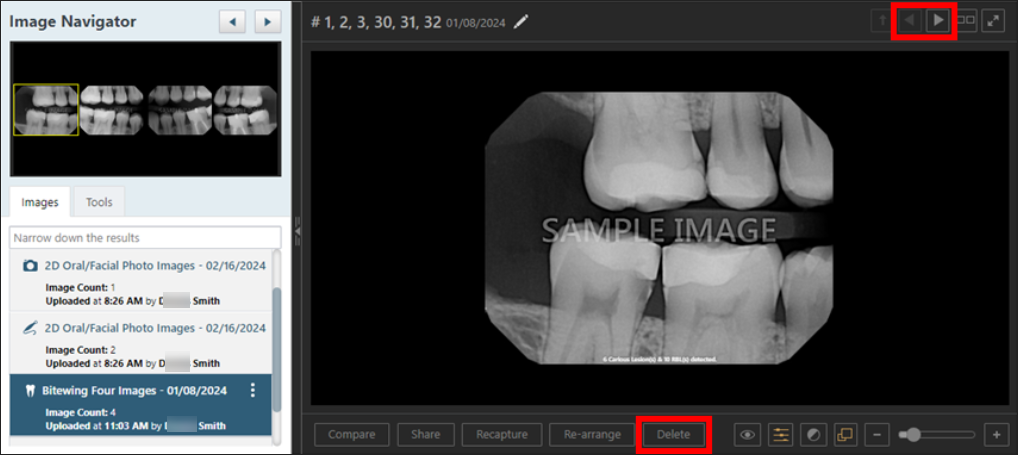
Note: If you delete an image that is the top of the stack, the next image in the stack becomes the top, and it is selected. If you delete an image other than the top image, the top image is selected.
Updates to image sharing
Users can now select individual images from an exam and export/print them as one image.
Several updates have been made to the Exam or Image(s) to be shared window.

-
The Selected image(s) option has been renamed to Selected image(s) in separate image(s).
-
A (new) Selected image(s) in one image option has been added along with its (new) export and print functionality:
-
Export: Export a single image containing only the selected images in the layout of the template.
-
Print: Creates a PDF containing only the selected images in the layout of the template. The PDF has two pages. The first page is the images in the layout. The second page has the images in the layout colored green with the tooth numbers added over the corresponding image (similar to the existing functionality of printing an entire exam in one image).
-
-
If the Entire exam in one image option is selected, and the user selects an image, the Selected image(s) in separate image(s) option is selected automatically.
Add-On Integrations
Ascend Detect AI
Ascend Academic now offers the ability to use artificial intelligence (AI) to detect possible caries and the interproximal radiographic bone level (RBL) on X-ray images in Ascend Imaging. Seamlessly integrated into the acquisition process, this functionality is powered by Videa Health and requires the purchase of Videa Health licenses.
Videa Health's artificial intelligence leverages algorithms, analytics, and health data to produce extremely accurate real-time, chairside models that can identify and measure clinical indicators on dental X-rays with ease. These insights and analysis allow providers to radically accelerate and improve decision-making, thereby improving patient care and retention and increasing revenue.
As part of the setup, we have added a (new) security right that controls whether AI detection can be used during patient imaging.
When setting or modifying user security rights (Settings > Location > User Roles), the (new) AI Image Processing security right is now listed under the Imaging security category. If added to a role, AI can automatically detect caries or radiographic bone level (RBL) and indicate in the imaging file when users with that role acquire new images or open existing images.

Important: Ascend Detect AI is empowered by Videa Health. Organizations must purchase licenses from Videa Health and Ascend Support must enter a Videa Health license key prior to use.
For more information about Ascend Detect AI, please contact Ascend Academic Support.
Bug Fixes
Waiting 60+ minutes on image acquisition screen causes authentication error
Issue: When a user is on the image acquisition screen for 60+ minutes, any images they have taken before mounting them will not upload. The user receives an authentication error and must exit the acquisition screen before they can proceed.
Solution: Increased timeout value for RCI authentication.
Saved Credit Cards should not be available as part of Patient Information
Issue: A section for saving credit cards is visible in Patient Information.
Solution: The section has been removed because Ascend Academic does not support this functionality.
Comments
0 comments
Please sign in to leave a comment.