
You can create a custom treatment plan by using treatment-planned procedures in a patient's clinical chart or ledger.
To create a treatment plan
How to get there
-
Use the Patient Search field to access a patient's record.
Notes:
-
If the last patient record you accessed since you last logged on is the correct patient's record, you do not need to re-enter the patient's name in the Patient Search field.
-
You can include inactive patients in the search results by setting the Include inactive patients toggle to On.
Important: If the Access Confidential Patient window displays after selecting the patient from the search results, it means the patient is a confidential patient and you don't have the security rights to access their record. To continue, a user with the security rights must enter their credentials into the window. Once given access, you have access to the patient's information until your session expires.
-
-
Complete one of the following:
-
From the Patient Information ribbon, clicktap the Tx Planner link.

-
From the Patient menu, under Clinical, clicktap Treatment Planner.
-
From the Patient menu, under General, clicktap Overview.
The patient's Overview page displays.
ClickTap the Treatment Plan widget.
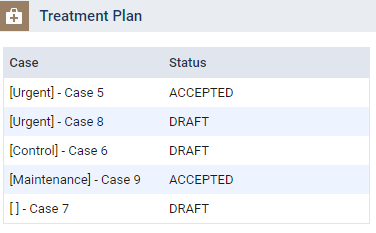
The patient's clinical record displays with the Tx Planner tab selected.
-
-
On the Treatment Planner tab of a patient's clinical record, under Draft, confirm that Unassigned is selected.

The procedures that have not been assigned to a treatment plan display on the right side of the page.

-
To create a new case, complete one of the following.
-
Move a procedure to a new case using any of the following methods:
-
ClickTap and drag a procedure to the box on the left, above the category list.

-
Select the procedure checkbox(es), clicktap Move/Copy To, and then select New Case.

-
-
Copy a procedure to a new case.
-
Select the procedure checkbox(es).
-
ClickTap Move/Copy To, select the Create a copy checkbox, and then select New Case.
Note: The copy is added to the new case and the original procedure remains in Unassigned.
-
-
Copy an existing case.
-
ClickTap the
 icon of an existing case.
If copied successfully, all visits, procedures, expiration dates, and other information are copied to the new case.
Notes:
-
Linked appointments and related appointments are not copied.
-
If you try to copy a case with procedures that are in progress or completed, an error displays.
-
-
The Select phase window displays.

-
-
Complete the fields as necessary and clicktap Save.
-
Phase - From the drop-down list, select Urgent, Control, Re-Evaluation, Definitive, or Maintenance.
Note: The selected option displays in square brackets before the case name in several places throughout Ascend Academic. It classifies the various phases of work and allows you to discern between treatments that are urgent and those that are maintenance.
-
Name - Enter a name for the case.
Note: You can clicktap Skip to skip this step. If skipped, a case name is auto-generated and [ ] displays in place of a phase.
The new case displays in the list and the Status is set to Draft.
Note: By default, new cases are in Draft. If necessary, you can change the status to a different status.
-
-
Under Draft, select the case to view the treatments.
The procedure(s) you added to the case display.

-
To modify a case name or phase, complete the following as necessary.
-
ClickTap the
 icon to open the Edit Case name window.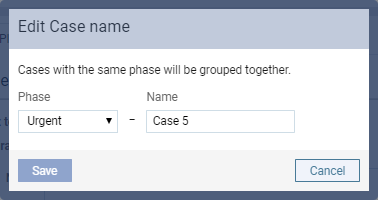
-
Modify the fields as necessary and clicktap Save.
-
Phase - From the drop-down list, select Urgent, Control, Re-Evaluation, Definitive, or Maintenance.
Note: This classifies the various phases of work and allows you to discern between treatments that are urgent and those that are maintenance.
-
Name - Enter a new name for the case.
-
-
-
To add visits to the case, complete the following as necessary.
-
ClickTap and drag a procedure to the Drag procedure to create new visit section at the bottom of the page. Repeat this step as necessary.

-
(Optional) If there are multiple procedures within a visit and you want to adjust the order of the listed procedures, clicktap and drag each procedure to the correct placement in the list.
-
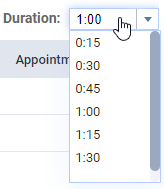
(Optional) To change a visit's duration, clicktap the Duration field and select a new option from the drop-down list.
-
-
Specify the expiration date of the case.
-
ClickTap the Expiration field.
-
Complete one of the following:
-
To set the expiration date to the last date of this year, select End of the Year .
-
To set a specific expiration date, select Specific Date, set the date, and clicktap Done.
-
-
(Optional) To show the expiration date when presenting the case or on a printed copy of the case, select the Show on printout and preview checkbox.
-
-
(Optional) Enter a note regarding the case.
-
ClickTap the Note field.
-
Enter any information regarding the case.
-
(Optional) Address the Show on printout and preview checkbox located beside the field:
-
Deselect the checkbox to not show the note when presenting the case or on a printed copy of the case.
-
Select the checkbox to show the note when presenting the case or on a printed copy of the case.
Note: When you create a treatment plan, the checkbox is selected by default. However, if you are creating it by copying an existing case that has the checkbox deselected, the new treatment plan also has the checkbox deselected.
-
-
Comments
0 comments
Please sign in to leave a comment.