
Several new feature enhancements are included in the product update released in early September 2022. The major enhancements in this release are new 3D Volume Cone-beam Computed Tomography (CBCT) imaging procedure, improvements to power reporting, improvements to coverage exceptions, and orthodontic procedures can now include orthodontic treatment information.
Important: Enhancements from this release will be available on PROD on September 2nd, 2022.
New 3D Volume Cone-beam Computed Tomography (CBCT) imaging procedure
We've added a (new) 3D Volume Cone-beam Computed Tomography (CBCT) imaging procedure to Ascend Academic Imaging (Patient > Clinical > Imaging). The new imaging procedure is intended to enhance the standard of care and expand practice services for general dentists by evaluating the underlying bone structure, nerve pathway, and surrounding soft tissues. During a 3D CBCT scan, the imaging machine rotates around a patient's head, capturing about 150-200 images from a variety of angles in less than a minute. These images are then compiled into a single 3D image. It's designed to bring 3D imaging capabilities into the system's existing imaging workflow and to run on any standard desktop computer.
Important:
-
The 3D CBCT imaging procedure is only meant for general dentists. It's not intended for specialty doctors, such as oral surgeons, orthodontists, and implant specialists.
-
This is only available after Support turns it on for your organization by request. Please contact Support if you're interested in the feature.
-
You need to download the most recent acquisition agent to acquire 3D images.
The imaging workflow to acquire a 3D CBCT image is same as a regular imaging workflow. To acquire a 3D CBCT image, select the (new) 3D Volume under the Standard tab of Imaging Procedures.

The acquisition options for 3D Volume displays.

Select a 3D acquisition type and then select a 3D software device that you want to use.
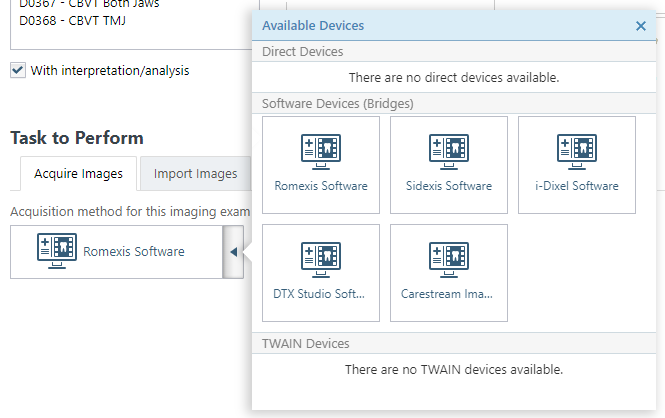
Note: Ascend Academic Imaging includes several bidirectional software device bridges that automatically open your manufacturer's software device to acquire and rending the image.
ClickTap Proceed with Acquisition to acquire the 3D CBCT image.
After the image is acquired, the 3D image is automatically imported from your 3D imaging device to Ascend Academic Imaging. Upload may take up to a minute due to the large size of the 3D image. To keep you informed of the upload progress, the status of the upload displays in the image Acquisition Status.

You can see the status change from image transfer to transferring, receiving, rendering, image(s) uploading, and then image(s) uploaded.
Important: The 3D volume imaging uploading feature only works on Windows desktop computer. If you're using a Mac device with the Romexis software bridge, the image will only be imported in the system as a 2D image. You need to use the Romexis 3D software to view and manipulate the 3D volume image.
Once uploaded, you can open the 3D CBCT image in Multiplanar Reformatted (MPR) Orthogonal view mode. It's the most common view mode for 3D CBCT imaging. It includes the following:
-
Axial view - Includes a series of images that start at the chin and move up to the top of the head.
-
Coronal view - Includes a series of images that start at the back of the head and move towards the face.
-
Sagittal view - Includes a series of images that start on the left side of the head and move to the right side of the head.

There is an additional view called the volume rendering view, which is located below the sagittal view. It includes the front, left, and right skeletal view to help dentists see the full anatomy. By default, the volume rendering view doesn't display to reduce your graphics card's workload.
Important: The Volume Rendering feature has been minimally implemented, and isn't fully complete.
To view it, clicktap the  icon.
icon.

Note: It takes about 20-30 seconds for the volume rendering view to load.
Once loaded, the view opens to the front view with the volume plane indicators by default.

If you want to change to a different view, select one of the following icons from the volume plane indicators:
-
- Displays the front view
-
 - Displays the left view
 -
 - Displays the right view
If you want to hide the indicators, you can by selecting the  icon. If you want to swap the volume rending view to histogram view, you can by selecting the
  icon.
icon.
While viewing the images to evaluate a tooth/region of interest, you can use the slice plane indicator lines to select specific anatomy on the 3D image slice to view it.
To use it, select the  icon.
icon.

The slice plane indicator lines display on the images. The lines are color-coded to represent the axial, coronal, and sagittal views.

The red line represents the sagittal view, the green line represents the coronal view, and the blue line represents the axial view. You can clicktap a line and drag it to the tooth/region that you want to see. As you navigate one image, the slice plane indicator lines automatically move on the other views to display the same tooth/region of interest.
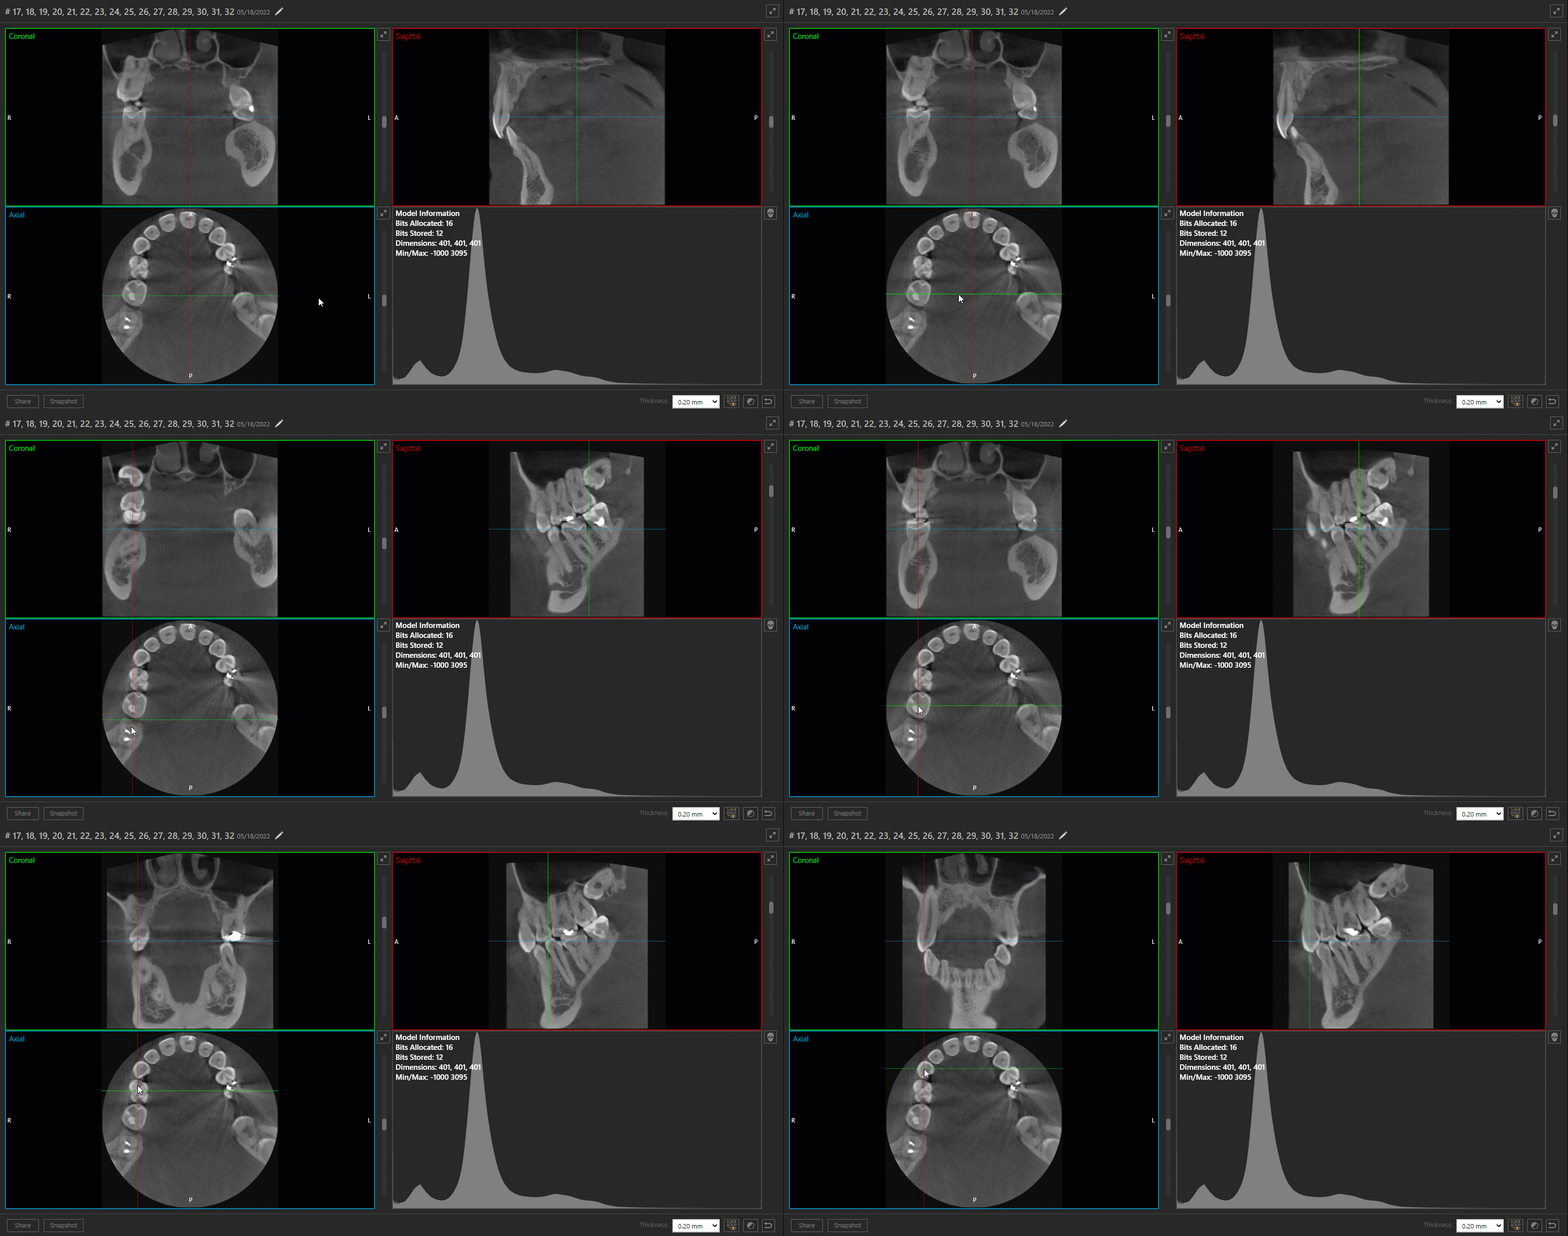
After you finish acquiring the 3D image, you can use the same navigation functions in the Image Preview that you normally use to navigate 2D images. These include expanding each view to either a full panel view or full screen by clickingtapping the expansion arrows. 3D CBCT also comes with a slider tool. You can drag the slider tool up and down each view to view each slice of the image.
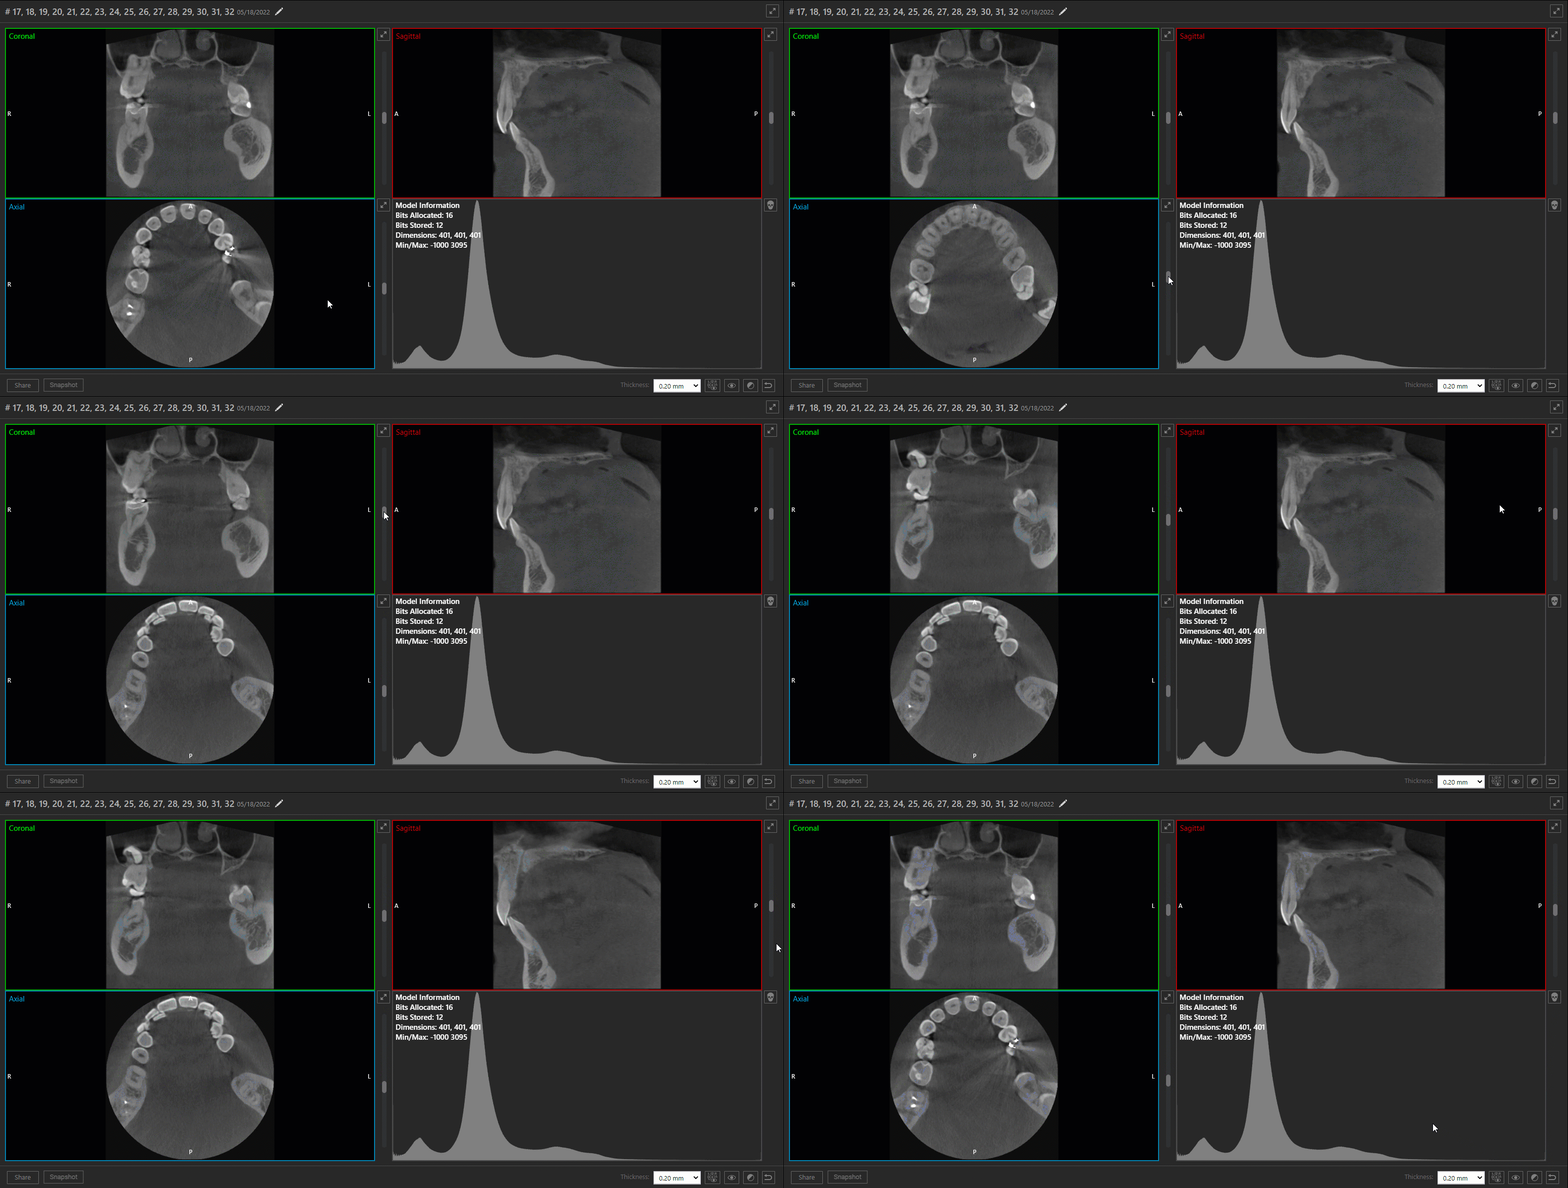
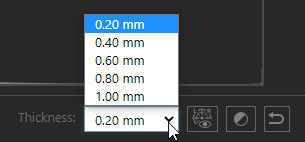
By default, a image slice thickness is 0.2mm. You can change the thickness of the slice by selecting the desired thickness from the Thickness drop-down list.
Tip: If you want to reset the image to its original view, you can by selecting the  icon.
icon.

Like a regular image, you can add annotations and measurements to your 3D images. The only difference is that when you add an annotation/measurement, it's added to the specific 3D image slice that you're currently viewing. Also, the annotations/measurements listed under the Annotation and Measurement include the names of the views (axial, coronal, or sagittal view) and slice number. To view, select the annotation/measurement listed under Annotation or Measurement.
| Annotation | Measurements |
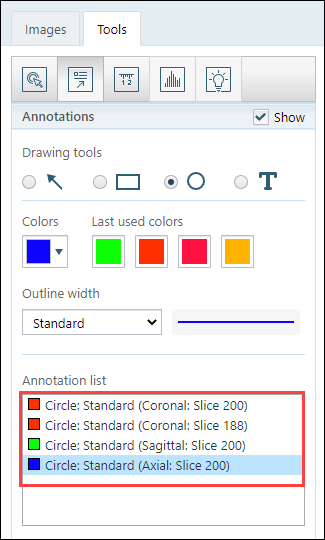 |
 |
Note: The annotation colors that display under the Annotation represent the annotation color you selected; the colors don’t represent the axial, coronal, and sagittal views
You can also share the 3D image by using the buttons located below the axial view.

There are 2 buttons:
-
Share - Use to share an image with a specialist or another provider like a regular image.
-
(new) Snapshot - Use to capture an image to attach to an insurance claim or a predetermination. The image is captured and saved as a 2D JPEG image.
Improvements to power reporting
Several changes have been made to power reporting (Home > Reports > Power Reporting):
-
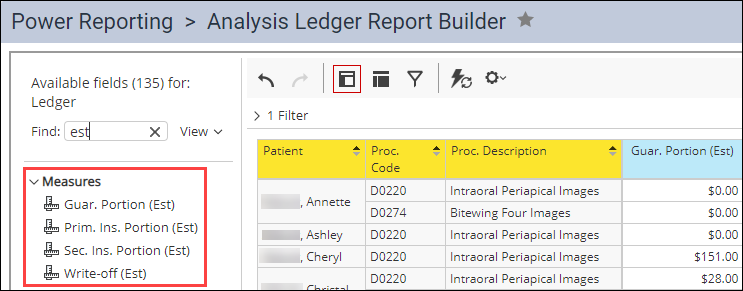
We've added (new) estimate fields to the Analysis Ledger Report Builder and the Interactive Ledger Report Builder. Users can use to capture the values calculated on the xfer record in the expanded transaction history of the patient's Ledger (Patient > Financial > Ledger).

Note: These estimates are the system's attempt to calculate the primary and secondary insurance estimates, the write-off amount, and the guarantor estimate for a patient's procedure.
You can use the new fields to see the estimates for all ledgers in one report.
Analysis Ledger Report Builder
Interactive Ledger Report Builder

Important: You can't use these fields to view historical data. They're only a snapshot of the current state of the ledger and will always reflect the most recent modifications.
-
There's a (new) financial power report called Collection Success. You can use the report to survey locations in a multi-site practice over the past 12 months to see how successful they were at collecting production revenue. The report includes pre-payments and unallocated money.

The values display as percentage and reflect the collection amount divided by the production amount. These data display with conditional formatting, which makes it easier to notice relative success: green is improvement and red is decline. If desired, you can modify the filters to control the type of generated data, such as customizing the baseline report to limit the scope to a specific location, change the date range, break out collection by providers, and so forth.
Important: You can only access this report if you have the Financial Reports user role permission set.
-
We added a (new) Credit Card Processing module to the Analysis Ledger Report Builder and Interactive Ledger Report Builder.
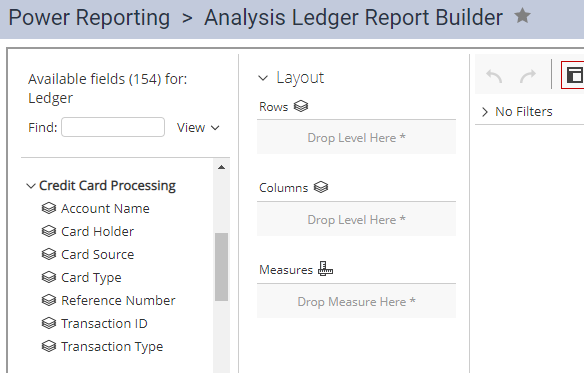
You can use the fields to generate data on credit card transactions.
-
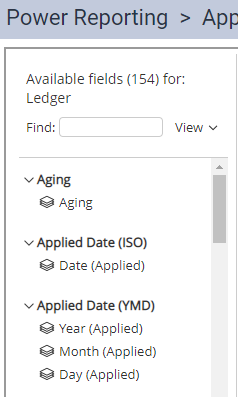
On our power reports, we have multiple modules that deal with dates. These date fields generally have the same names, making it difficult to differentiate them from one another. To help differentiate them from each other, we've added descriptions to the fields.
Before After 
-
There is a (new) Appt Status filter on the Daily Huddle and Scheduled Production reports that provides a more realistic estimates of scheduled production. The new filter excludes broken/canceled appointments from the report, so the data don't incorrectly contribute to the sum.
-
We've added 2 (new) measures to the DH New Patients Seen - Yesterday and DH New Patients Seen - MTD power reports: the (new) Patients Scheduled and the (new) % Scheduled measures. You can use these measures to see how many of your new patients left with a scheduled follow-up appointment.
-
Previously, whenever we made changes to the power report's field(s), we recommended that you update your custom reports to remove old and add new fields as necessary. With this release, the system automatically makes those changes for you.
-
We've updated the power report version of the Deposit Report to now include the Patient, Transaction ID, and the Payment Reference Info fields in the layout by default.
Improvements to coverage exceptions
Several changes have been made to coverage exceptions throughout Ascend Academic:
-
We've removed the pre-estimate required functionality from coverage exceptions because predeterminations are now configured separately in the Manage Predeterminations window (Home > Insurance > Carriers).
-
Previously on the New Exception for [name of a coverage table template] window of a coverage table template (Settings > Production > Coverage Tables), users could select the procedure code(s) that will receive the exception on the 1st step.

We've changed the name of the window to New Exception for Procedure(s) in [name of a coverage table template] and configured the procedure code selection feature as a 2nd step on the window called the (new) Select Procedure(s) tab. Now, users can only set the exception type on the Exception Type tab.

Note: We've also renamed the Coverage with age limit option as Age limitation.
You can select procedure(s) that will receive the exception on the Select Procedure(s) tab.

You can select procedure(s) by selecting the corresponding check box(es) on the window. If you're having difficulty locating a specific procedure, you can use the Search for procedure search field above the list to refine the list. You can search by entering the procedure's code or name. If you want to select all procedures, you can select the check box in the header.
On the Specify Options tab, we've also replaced the Max age limit field, which only displays when the exception type is set to Age limitation, with a (new) Age limitation slider.

Instead of configuring the age limitation by setting the maximum age limit, you can now configure by setting a range. You can set the range by using the slider or entering the lowest and highest age manually in the numeric fields.
Tip: When setting the age range manually, you ca use the Tab key to switch between the numeric fields.
Also previously, if you tried to add an exception to a procedure code that already has an exception, a
 icon displayed with an Error tooltip, as procedures can only have one exception per coverage table template.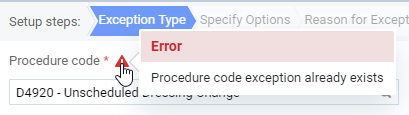
To help you save time, procedures that already have an exception no longer display on the window, including from the Search for procedure search field on the Select Procedure(s) tab.
-
We renamed the Exceptions for [name of coverage table template] window as Manage Exceptions for [name of coverage table template] window to make the functionality of the window clear. Procedure codes with exceptions also now display as expandable sections instead of regular list items.

We've made them expandable because later in the future, we're planning to add an ability to apply multiple exceptions to a procedure code. To prepare for the future enhancement, we've made them expandable so you can select a listed procedure to view all of its exception(s).

You can also see the total number of exception(s) a procedure code has on the right side of the window.
-
The Coverage Exception tooltip that displays on the Detailed View of a guarantor portion on a patient's Ledger (Patient > Financial > Ledger) and tx planner (Patient > Clinical > Treatment Planner) has been renamed to Coverage Exception(s). Also, the tooltip now includes age limitation details if applied.

-
Scheduled and actual production calculation on appointments (Schedule > Calendar) now include exceptions on the patient's insurance coverage table.

Orthodontic procedures can now include orthodontic treatment information
Throughout Ascend Academic, we've added a (new) Orthodontic Treatment section to the Enter Procedure, Edit Procedure, and View Procedure windows. Users can use the section to include orthodontic treatment information to procedures.

You can only provide this information on orthodontic procedures, as the section only displays for orthodontic procedures. The section is meant to help make the procedures' insurance claims more successful by providing additional information.
To add orthodontic treatment information, select the Orthodontic treatment check box to enable the section's fields.

Be default, the section is optional. However, you can make it mandatory for specific procedure(s). To make it mandatory for an orthodontic procedure, select the procedure on the Procedure Codes & Conditions page (Settings > Production > Procedure Codes & Conditions). On the generated Edit Procedure Code window, set the (new) Require treatment info toggle switch to Yes.

Tip: If you need a reminder on the purpose of the toggle switch, clicktap the  to generate the Information tooltip.
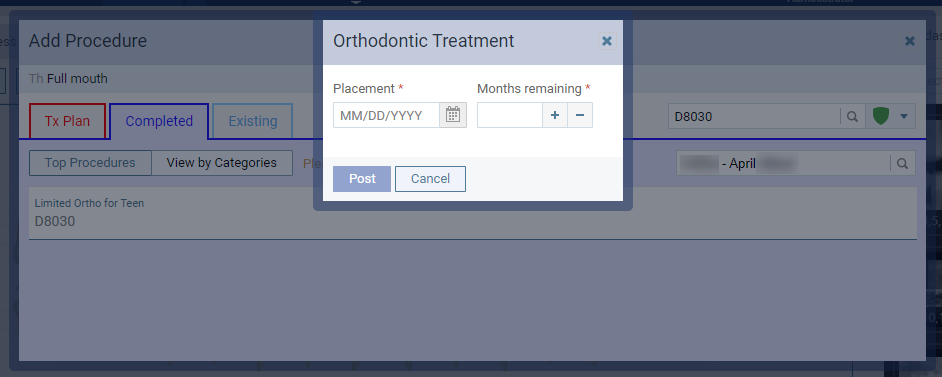
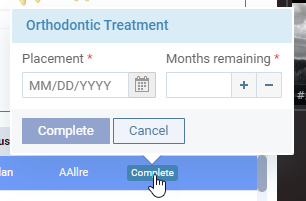
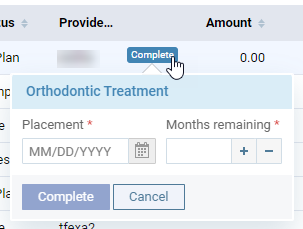
Once set and saved, it's mandatory for all users to input the procedure's Placement date and Remaining months when the procedure is posted. If you try to post or complete the procedure without inputting its orthodontic treatment information, the system will generate a warning, (new) Orthodontic Treatment window, or a (new) Orthodontic Treatment tooltip to remind you to enter the information. These warning, window, and tooltip display depending on where you are in the system:
-
The Chart tab of a patient's clinical record (Patient > Clinical > Chart) - When you attempt to add the procedure as a completed procedure on the patient's chart, the window displays.
-
The Edit Procedure window from a patient's treatment planner (Patient > Clinical > Treatment Planner) and from an appointment on a Patient Routing panel in Chair or Checkout - A
icon displays on the window.
-
An appointment on a Patient Routing panel - If you attempt to complete the procedure on the chart's chairside dashboard, the tooltip displays.
-
An appointment on a Patient Routing panel in Chair or Checkout - When you attempt to complete the procedure on the Patient Routing panel, the tooltip displays.

-
A patient's progress notes (Patient > Clinical > Progress Notes) - When you attempt to complete the procedure on a patient's progress notes, the tooltip displays.
-
The Patient Walkout window (Patient > Financial > Ledger)

Update on insurance plan information in letter templates
Previously on the Year End Treatment (With Insurance) letter template on the Letters page (Home > Location > Letters), there was an issue with the placeholders that dealt with patient's insurance plan information.

The placeholders were only designed to display a patient's primary insurance plan information, which is an issue for patients that don't have an active primary insurance plan. Hence, we've updated the placeholders to display one of the patient's active insurance plan, whether that plan is primary, secondary, or tertiary. To reflect this new behavior, we've also changed the name of the placeholders:
-
The [Primary_Insurance_Plan_Name] placeholder has been renamed to [Insurance_Plan_Name]
-
The [Primary_Insurance_Remaining_Benefits] placeholder has been renamed to [Insurance_Remaining_Benefits]
The placeholders display the following insurance plan information on the patient letter (Patient > General > Letter to Patient) depending on the situation:
-
If a patient has an active primary and secondary insurance plans, the placeholders will display the patient's primary insurance information.
-
If a patient has an inactive primary insurance plan and an active secondary insurance plan, the placeholders will display the patient's secondary insurance information.
-
If a patient doesn't have any active insurance plans, the placeholders will display a blank, and a message displays.

Improvements to patient information
Several changes have been made to the Patient Information page (Patient > General > Patient Information):
-
Users can now edit a patient's chart number. To edit, you need to have the Update patient information and the (new) Edit patient chart # user role permissions set.
Important: For existing users, if you have the Update patient information and the Access Social Security # user role permissions set, the new user role permission will be set automatically after this release.
Once you have the proper security rights, the Chart # on a patient's Patient Information page will display with the
 button.
ClickTap the
button to enable the field.
Once enabled, enter the desired chart number. The chart number can be maximum number of 10 characters, and contain any combination of letters and numbers. If desired, you can auto-generate a chart number by clickingtapping the
 button. If you enter a chart number that's already being used by a different patient, a icon and an error message displays.
Note: The error message only displays if you clicktap Save after entering a pre-existing chart number.
For information on the cause of the error, clicktap the icon to generate the Validation Error window.

If you changed and saved a chart number successfully, the action is audited in the Audit Log (Home > Reports > Audit Log) with the old and new chart number.

Improvements to the Calendar
Several changes have been made to the Calendar (Schedule > Calendar):
-
Previously, users could only book an event at one operatory at a time. This isn't ideal when you need to book an event that will require multiple operatories, such as for early closures, meetings, holidays, and lunch breaks. With this release, you can. The Event Information panel > Operatory drop-down list now displays as a drop-down menu with operatories as check box items.
Before After 
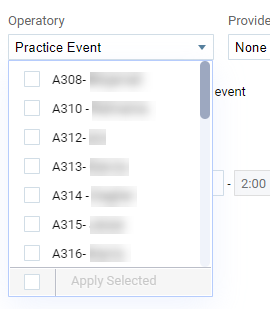
This allows you to select multiple operatories at once.
If you book an event at multiple operatories and there's a conflict with any of the selected operator(ies), the (new) Create Event window displays.

If you still want to book the event, you can clicktap Yes, Create Event. Once booked, the new event displays with the pre-existing booking on the Calendar. If you don't want to continue and change your selection(s), you can clicktap Back to Calendar to go back to the Event Information panel.
-
We've added a (new) pending message on events that lets other users know it's being edited. When you edit an event, the pending message displays on the event that you're editing for other logged-in users.

While pending, other logged-in users can't open or edit it.
New evaluations power report
Users can now generate a list of evaluations that are completed by all assigned parties by using the (new) Analysis Evaluations Report Builder (Home > Reports > Power Reporting).

It's a flexible report that you can use to generate information on the following:
-
Evaluators
Example: Full name, contact information
-
Evaluation forms that was used to create the evaluation
Example: Grading scheme type, discipline, status of the Failable setting
-
Answers on the evaluations
Example: Total number of error(s) a student got on an evaluation, whether or not they passed or failed an evaluation
Important: The report only contains the answers from the assigned faculty evaluators, and excludes answers from self-evaluations.
You can use the report to generate a list of specific evaluation data to determine the total count of procedures/evaluations per student, which evaluations are in pending state, trends based on students' answers to questions, and so forth.
Here are few things to note on the report's fields and terminology:
-
In this report, Contributor is the faculty evaluator and Evaluatee is the student.
-
The Contributor module > Contributor Points displays the grade on the faculty's evaluation. It may be over 100 if it includes the points from patient complexity.
-
The Contributor Comment module > Contributor Comment displays the faculty's general comments on their evaluations. The field has a maximum limit of 256 characters.
-
The Total Errors and the Total Critical Errors fields display the total number of error(s) the student got on an evaluation with a demerit grading scheme.
-
Modified Date field displays the calendar date when all parties, including the student, assigned to the evaluation completed their copy of the evaluation request.
-
The EvaluationActivity.Evaluation Activity module > Evaluation Request Procedure Code displays procedure codes on the report as individual cell items.
Tip: You can use it with the Procedure Count measure field to view the total number of completed procedures based on the procedure code per student.
-
The Evaluation.Evaluation module contains fields that deal with information on the evaluation form, and the the EvaluationAnswer.EvaluationAnswer module contains fields that deal with answers on the evaluation request.
-
The Evaluation.Evaluation module
-
The Total Points and Pass Points fields are the configuration fields for the evaluation form. The Total Points field displays the total number of points evaluators can get from the evaluation without patient difficulties, and the Pass Points field displays the passing mark. For evaluations with a Pass/Fail grading scheme, the Total Points field always display 100 and Pass Points field displays 0.
-
The Canceled field indicates if it's a canceled evaluation request. If it's canceled, it displays as True. Otherwise, it displays as False.
-
The Category field displays the discipline of the evaluation form.
-
The Procedure Codes field displays a list procedure code(s) attached to evaluation requests. It displays the list in a single cell.
-
The Name field displays the name of the evaluation form that was used to create the evaluation request.
-
-
The EvaluationAnswer.EvaluationAnswer module
-
The Answer Text field displays the answers on all questions on the evaluation.
-
The Completed field indicates if the question was answered and submitted by the evaluator. It displays as False if the question wasn't answered by the evaluator or if it was answered but not submitted. It only displays as True if it was answered and submitted.
-
The Critical field indicates if a question is a regular question or a critical question. If it's a critical question, the field displays as True. Otherwise, it displays as False. This field is meant to be used with the Question Text and/or Answer Text fields.
-
The Demerit Value displays the total number of points the student will lose for a question based on the evaluator's answer.
-
The Procedure Code field displays the procedure code that is associated with a procedure-specific question.
-
The Procedure Specific field indicates if a question is a procedure-specific question. If a question is procedure-specific, it displays as True. Otherwise, it displays as False.
-
The Question Text field displays the questions that display on the evaluation form.
-
-
The Measures module
Located at the bottom of the list of available fields, the module displays the only fields that you can use as measures. You can't use fields from other modules as measures. The module contains the following fields:
-
Evaluations Count field displays the total number of completed evaluations, regardless of it's pass/fail status. It also counts evaluations that were canceled after completion.
Tip: If you pair the measure with a field that displays information on a contributor/evaluatee, such as their full name, the field displays the providers' total number of completed evaluations.
-
Procedure Count field displays the total number of procedures from completed evaluations, regardless of it's pass/fail status. It also counts procedures from evaluations that were canceled after completion.
Tip: If you pair the measure with a field that displays information on a contributor/evaluatee, such as their full name, the field displays the total count of procedures from their completed evaluations.
Important: Data from evaluations that were canceled after completion aren't included in the report, as the system erases answers from the evaluations when it gets canceled. However, the report still counts those evaluations, as they were still completed.
Tip: If desired, you can filter out canceled evaluations from the report so it only counts completed evaluations that aren't canceled.
-
Improvements to claims
Several changes have been made to claims throughout Ascend Academic:
-
We've made several name changes on the Claim Detail window and related claim reports. The new names are meant to increase clarity, and doesn't change the functionality of the features.
The word NEA has been renamed as Attachment. For the NEA # column in the Claim Detail window > Attachments tab, it now displays as Attachment ID.

Also, the NEA Hold status has been renamed to Attachment Hold, and the NEA Error status has been renamed to Attachment Error on the following pages:
-
The Sent Claims page (Home > Insurance > Sent Claims)
-
The Unresolved Claims page (Home > Insurance > Unresolved Claims)
-
The Insurance Claims page (Patient > Insurance > Insurance Claims)
-
The Predetermination Requests page (Patient > Clinical > Treatment Planner)
-
-
Previously, the Unsent Claims page (Home > Insurance > Unsent Claims) accessed through the Home menu didn't have any sorting capabilities. With this release, you can now sort the list of unsent claims by any of the columns. By default, the page is now sorted by the Service Date from oldest to latest.
Note: If you sort by Patient Name or Subscriber, the list will be sorted in alphabetical order by the last names.
Improvements to the Patient Complexity function
Several changes have been made to the patient complexity function (Settings > Academic > Patient Complexity):
-
We've updated the default settings for the Periodontitis stage to provide more information on the descriptions and to provide realistic points based on the stages.
Before

After

Note: To help differentiate the changes from this release, the changes display in bold text just for the above screenshot. It won't display in bold in the system.
The new default setting will only be applied to organizations that have never used the patient complexity function on an evaluation form. Even if an organization has a modified periodontitis stages, the system will automatically apply the new default settings if it was never used in an evaluation form.
-
Users can now add and delete Calculus stages as desired. To delete a calculus stage, select the corresponding X icon. To add a calculus stage, clicktap the (new) Add Calculus Stage to add a new row.
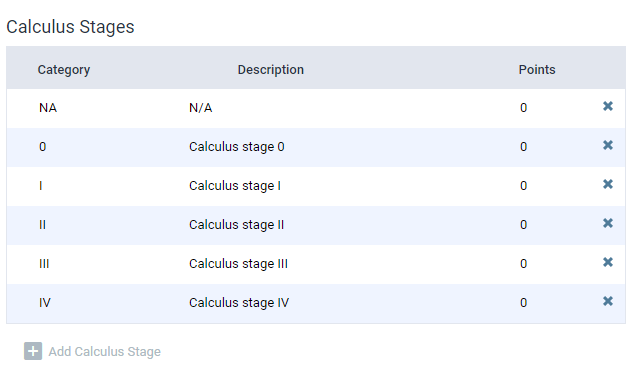
Important: There's a maximum limit of 6 stages for Calculus. If there's already 6 stages, Add Calculus Stage is disabled..
Comments
0 comments
Please sign in to leave a comment.