
After the browser extension is installed and registered, and your microphone is working, Ascend Voice is ready for use in dictating clinical notes.
To dictate a clinical note
How to get there
-
From the Patient menu, under Clinical, select Chart.
The patient record displays with the Chart tab selected.
Tip: You can also access charting from other clinical areas such as Progress Notes, Quick Exam, Perio, Imaging, or Tx Planner.
Note: If the correct patient is not already selected, use the Patient Search field to access the patient's record.
-
(Optional) To assign tooth numbers to a new clinical note, on the Chart tab of a patient's clinical record, select one or more teeth.
Tip: If skipped now, you can assign tooth numbers in Step 3.

-
On the Chart tab of a patient's clinical record, clicktap Add Clinical Note.
Note: If the patient already has a clinical note, clicktap the Clinical Notes button menu and select Add Clinical Note.

The Add Clinical Note window displays.
Tip: To view the patient's completed and treatment-planned procedures for the selected date, clicktap the Procedures tab.

-
Complete the fields as necessary.
-
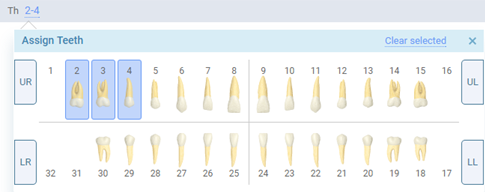
Th - If you assigned teeth in Step 1, the tooth numbers are automatically assigned to the note. If necessary, you can assign or remove teeth from the note by adding and/or removing the tooth numbers. To add and/or remove tooth numbers, complete the following:
-
ClickTap the Assign teeth or the assigned tooth number(s) link.

Note: If you did not assign teeth in Step 1, the Assign teeth link displays. If you have assigned teeth, the link displays as the assigned tooth number(s), such as 2,4.
A tooltip displays.
-
To add tooth number(s), select the necessary teeth. To remove tooth numbers, deselect the selected teeth.
-
When ready, clicktap X to close the tooltip.
-
-
Provider - Enter a provider to associate with this note.
If you need to add a secondary provider to the note, clicktap the
 icon to display the Additional Provider field and enter a secondary provider.
 Tip: To remove the Additional Provider field, clicktap the
 icon.
icon. Note: Only providers who have access to the current location are available.
-
Attending Provider - Enter a faculty provider to associate with the note.
Notes:
-
Only providers who have access to the current location are available.
-
This field is mandatory for students and other users that do not have the Sign clinical notes security right. The Save button will be disabled until an attending provider is set.
-
-
Date and Appointment - You can use these fields to associate the note with a specific date or link it to an existing appointment. By default, the note links to today's earliest appointment.
Tip: If you link to an existing appointment, the Attending provider field automatically updates to the linked appointment's attending provider.
Complete any of the following:
-
To associate with a specific date, set the Date field to the necessary date and set the Appointment field to -.
-
To link to an appointment, set the fields to the appointment's date and time.
-
-
-
ClickTap the blue Ascend Voice
 icon or say, "Bola start" (if allowed).
Note: The Ascend Voice icon is only available if the Bola AI browser extension is installed and registered on the computer.
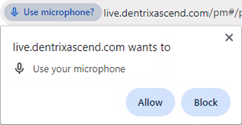
Tip: If the Chrome browser prompts you to grant permission for the website to use your microphone, clicktap Allow.
-
Dictate the text of the note.
Tip: You can also enter text manually and/or insert text from note templates.
-
To pause or stop voice recognition at any time, clicktap the red Ascend Voice
 icon or say, "Bola stop" (if allowed).
 -
If the note is complete, and if you are the selected provider or have permission from the provider, you can sign the note.
-
Set the Ready to sign toggle to Yes.
-
ClickTap the Sign as [provider name] link and enter the selected provider's or your password in the Password field that displays.
Tip: If the note needs to be finished later, or if the provider has to review the note, the note can be signed later.
Note: The Sign as [provider name] link is available only if a digital signature for the selected provider has been set up.
-
-
ClickTap Save.
Comments
0 comments
Please sign in to leave a comment.