
Several new feature enhancements are included in the product update released in early June 2022. The major enhancements in this release include completion of the Predetermination function, Evaluation on the navigation bar renamed to Academic, new Checklist function, no longer able to download documents from the Document Manager, and new default answers to the demerit grading schemes.
Important: Enhancements from this release will be available on PROD on June 10th, 2022.
Completion of the Predetermination function
In our previous release 390-0, we removed the pre-authorization functionality that was available in Ascend, which is meant to be used for treatment and insurance coordinators to confirm patients' eligibility to coverage. This feature is now replaced with a more comprehensive pre-determination functionality. Users can now use the function to send predetermination claims to patients' insurance carriers to confirm whether or not the patients qualify for coverage before their appointment.
To submit a predetermination claim to a patient's primary (PRIM) or secondary (SEC) insurance plan, select the check box(es) of procedure(s) that require predetermination on a patient's treatment plan case (Patient > Clinical > Treatment Planner). When ready, clicktap the Create drop-down menu.

From the drop-down menu, select the insurance plan that requires the predetermination to create a predetermination claim and to open the Predetermination Detail window.

Review and edit any details as necessary. When ready, clicktap Submit to submit a claim.
Important: If you close the window without submitting the claim, the predetermination claim still exists in the system as an unsent claim.
The action of creating and submitting is audited in the audit log like a regular insurance claim, but as a Tx Plan Case type.

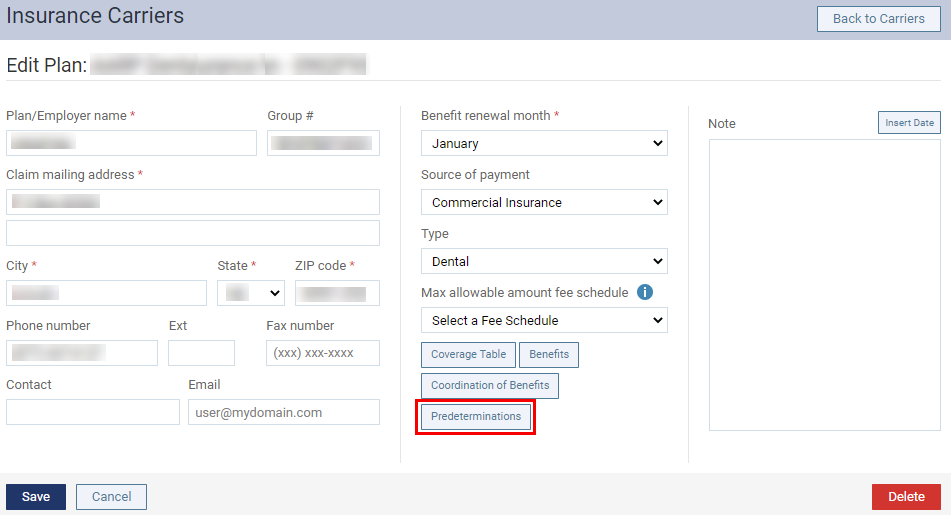
If desired, you can configure an insurance plan's (new) predetermination configuration to identify procedure(s) that require predetermination on tx planner. Once set, these procedure(s) will be marked to indicate they require predetermination. To set the configuration, select the Predeterminations button an insurance plan's Insurance Carriers page (Home > Insurance > Carriers).
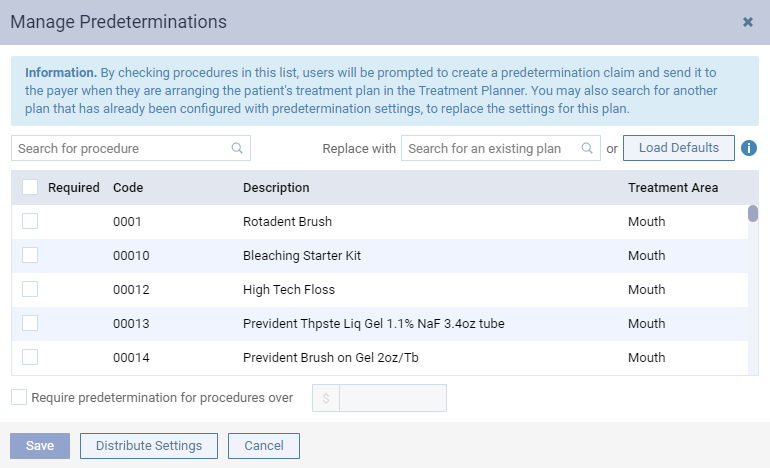
On the generated Manage Predeterminations window, you can configure the plan's selection of predeterminations for the entire organization.
Note: You can't configure a plan's selection to a specific location. It can only be set for the entire organization.
There are 4 ways you can configure the selection:
-
You can select a procedure's check box to set it as requiring predetermination.

Once selected, the procedure displays with the (new)
 icon. You can also deselect the check box to remove the selection.
 -
You can clicktap the (new) Load Defaults button to download Ascend Academic's default configuration. The system's default configuration is based on 18 months' worth of survey data on procedures that were frequently requested for predeterminations. Once downloaded, these procedures will display with the
icon. You can continue selecting or deselecting check box(es) to make additional changes.Tip: When you download the default configuration, it deletes all the work you've made on the window. It's recommended you download the default configuration first and then make additional changes.
-
If a different insurance plan already has the configuration you want for this plan, you can import their selections to the window. By importing, you replace the current plan's selections with the selections from another insurance plan. To import, enter the desired insurance plan's name, group plan/employer number, or group number in the (new) Replace with search field.

Select the insurance plan in the search results to apply their selections to the window. You can make additional adjustments as desired.
Tip: When you import a configuration, it deletes all the work you’ve made on the window. It’s recommended you import first and then make additional changes.
-
You can set a financial threshold that will mark all procedures that exceed it as requiring predetermination. To set the threshold, select the (new) Require predetermination for procedures over check box and then enter a dollar amount in the enabled field beside the check box.

The check box can be used with predetermination selections.
Tip: When you replace the current selections with selections from a different plan, the check box is deselected. It's recommended you do the replacement first and the set the financial threshold.
When ready, clicktap Save to save the configuration. Once set, (new) predetermination warnings display in tx planner to inform you that a tx plan case has procedure(s) that require predetermination.
There are 2 (new) warnings:
-
Whenever there's a procedure in a tx plan case that requires predetermination, a (new) warning message displays at the top of the tx planner page.

-
A
icon displays in the following areas of the tx planner:-
On an open tx plan case, the icon displays on procedures that require predetermination.

Note: If you hover overtap and hold the icon, a tooltip displays with information on which of the patient's insurance plan requires the predetermination.

-
On a open tx plan case preview, the icon displays on procedures that require predetermination.

Note: If you hover overtap and hold the icon, a tooltip displays with information on which of the patient's insurance plan requires the predetermination.

-
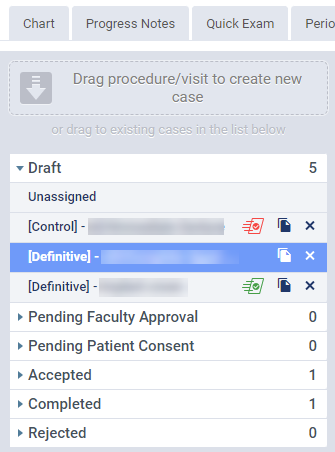
On a tx plan case listed on the left side of the page if the case has a procedure that requires predetermination.
-
To create and submit a predetermination claim, you can select the procedure(s) that are marked as requiring predetermination and use the Create drop-down menu. Once submitted, the icons on submitted procedure(s) will change from red to green as a visual indicator that the predetermination claim has been submitted.

Also, if you try to schedule an appointment through the tx planner and the tx plan case have marked procedure(s), the Create Appointment window displays. On the window, you can select the insurance that requires predetermination from the (new) Create Predetermination drop-down menu.

Once submitted, you can clicktap Create Appt. to create an appointment. If desired, you can schedule an appointment without creating a claim. Instead of selecting an insurance plan from the Create Predetermination drop-down menu, you can clicktap Create Appt.
If there's a procedure that's not part of an insurance claim but is marked as requiring predetermination, you can exclude it from the tx plan case's predetermination workflow by turning the function off for the case. To turn it off, select the procedure on a tx plan case to open the Edit Procedure, and then set the Bill to Insurance toggle switch to Off. Once saved, the icon displays on the tx plan case in gray. If you hover overtap and hold the gray icon, a tooltip displays with information on why it's turned off.

Note: The gray icon only display on the tx plan case and the preview. It doesn't display on the list at the left side of the page.
All predetermination requests that were created or submitted through Ascend Academics can be found in patients' treatment planner. To view the complete list of their claims, clicktap the Predeterminations button.

The Predetermination Requests page displays.
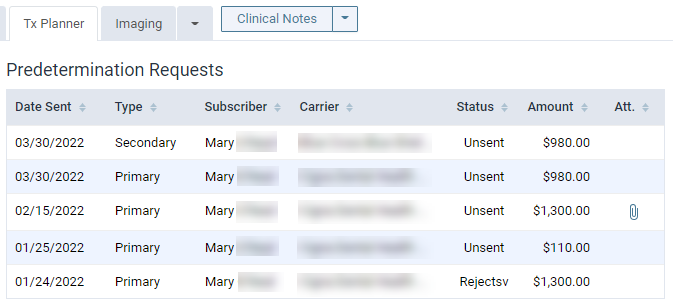
The page also includes unsent, queued, sent, rejected, and approved claims. By default, the page is sorted by the Date Sent column to display the most recent records first, but you can adjust the sorting order accordingly. You can also view information on these claims on the Insurance Claims page (Patient > Insurance > Insurance Claims). To view them, you need to set the (new) Include predeterminations toggle switch to On to include them on the page.

Once set, the predetermination claims display as a (new) PreDet ([Primary or Secondary]) type.
If necessary, you can edit or delete a predetermination claim by selecting it on the Predetermination Requests page or the Insurance Claims page to open the Predetermination Detail widow. You can either make the necessary changes and then re-submit the claim, or delete it from the window. These actions are also audited in the Audit Log.
Important: For consistency, we've renamed the Prior Auth Nunber field on the Claim Detail window into Predetermination Number to make the reference number on the Predetermination Details window.
Note: Deleted predetermination claims don't display on Ascend Academic.
Evaluation on the navigation bar renamed to Academic
The Settings menu > Evaluation column has been renamed to Academic to better reflect the features listed in the column.

New checklist function
We have added is a (new) checklist function that users can use to ensure all critical stages of patient care is performed according to the standard protocol. As a front desk user, you can create a checklist all students can use to make sure they're following the standard process for their patient care. As a student, you can use the checklist to make sure you didn't accidentally skip a step in your patient management and to improve your patient management skills. As a faculty, you can view students' pending and completed checklists to make sure they're following the standard protocol.
To configure the checklist, you need to have the (new) Manage Checklist user role permission (Settings > Location > User Roles) set to have access to the (new) Student Checklist Setup page (Settings > Academic > (new) Student Checklist).

In the beginning, the checklist function will be disabled and the page will be blank until it's setup.

Note: If you attempt to navigate to the page without proper security rights, a (new) You do not have permission to access this page error message displays.
To start, you can add a section by selecting the Add a Section button.
You can clicktap the generated box and enter the name of the section.

When ready, you can select the Add a New Item to add a checklist item. ClickTap the generated box and enter the checklist item.
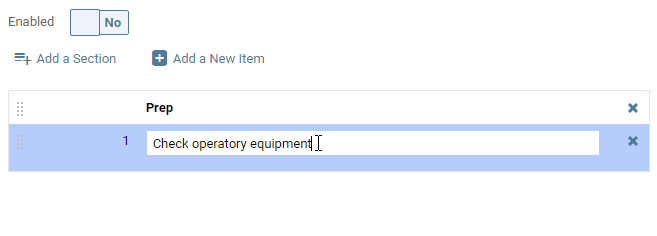
When ready, you can clicktap anywhere on the page to close the box or select the Add a New Item to add another list item. If you've completed configuring the checklist, you can see how it'll display to the students by clickingtapping the Preview button. The Student Checklist Preview window displays.

To return to the page, close the window by using the Cancel or the x button. When ready, you need to set the Enabled toggle switch to Yes to turn on the checklist function and then clicktap the Save button to save the configuration. If saved successfully, a (new) Checklist saved green notification displays at the bottom of your screen.
Any appointments that are created after the configuration of the checklist now comes with a (new)  button. You can find the button in any of the following areas of Ascend Academic:
-
The Provider Overview page > Schedule widget (Home > Location > Overview)

-
The Appointments page > Future Appointments tab (Patient > General > Appointments)

-
The Calendar page > Appointment Information panel (Schedule > Calendar)

You can open an appointment's checklist by clickingtapping the appointment's button. The checklist opens as a window.

If you're the logged in user and you're set as the appointment's appointment provider, you can select the check boxes of the list items. You can select the Yes check box to indicate you've completed the listed task, or you can select the N/A check box it you weren't able to complete it for whatever reason. If desired, you can also enter notes in the Note text box.
Note: THe Note text box has a maximum limit of 500 characters.
If you're the logged in user and you're not set as the appointment provider, the check boxes are disabled for you. You can only view the appointment provider's progress with the checklist.
When ready, you can close the window by using any of the 3 buttons:
-
Save - Saves your progress with the checklist and closes it without completing it. Once saved, the appointment will still display with the
button to indicate the checklist is in progress. You can always complete it by clickingtapping the button.Note: The Save button is enabled when at least one check box is selected.
-
Sign & Complete - The button is only enabled when all check boxes are selected, and is used to indicate the checklist is completed. Once it's completed, the checklist is locked, so it can't be edited. When you clicktap the button, the system will ask you to sign it to confirm that it's completed. If you have an e-signature setup in your user account, the Sign & Complete window displays.

If you don't have an e-signature setup in your user account, a (new) warning message displays. You won't be able to sign the checklist until you setup your e-signature.

-
Cancel - Closes the checklist without saving your progress.
To complete a checklist, you'll be required to prove that you're the logged in user by providing your credentials and signing it. If you successfully signed the checklist, the following occurs:
-
The checklist window closes and the (new) Checklist signed and completed notification displays at the bottom of the screen.
-
The appointment displays with a (new)
 button.
 -
The action is audited in the Audit Log (Home > Reports > Audit Log) as an Appointment type.

You can view a completed checklist by clickingtapping the button to open it.

At the bottom of the window, the full name of the user that signed the checklist, the date and time of the checklist was completed, and the provider's e-signature displays.
As a front desk user, you can always re-configure the checklist function on the Student Checklist Setup page whenever as desired. You can rename a section or a checklist item by selecting it and entering a new name. You can even move a section or a checklist item by clickingtapping and holding the item's  icon and dragging it to the desired spot.

If desired, you can add more sections and list items, or delete them by clickingtapping the corresponding x icon. Once you save your changes to the configuration, the updated checklist is only available to appointments that were created after the update. Also, the update won't affect existing, in-progress, and completed checklists.
However, if you turn off the checklist function by settings the Enabled toggle switch to No and saving it, all new and in-progress checklists will be deleted. The system will only keep completed checklists in the system.
Note: When you turn off the feature, a warning message will display to let you know that all new and in-progress checklists will be deleted it you save it.
Important: The configuration of the checklist function is per organization, not location. So, any changes you make to the configuration is applied to all locations within your organization.
No longer able to download documents from the Document Manager
To minimize PHI information being downloaded to personal devices, we've changed the Download file from Document Manger user role permission (Settings > Location > User Roles) to View documents stored in Document Manager.

Now, users with this user role permission set can no longer download individual documents from a patient's Document Manager (Patient > General > Document Manager). Instead, you can only view them. When you select a document, a (new) View Document window displays, allowing you to view the document within the system.
This new behavior only applies to PDFs and image-type files, and other files will maintain the current behavior.
Tip: If you need to download a document, you can export if if you have the security rights to perform an export.
Important: Currently, the permission doesn't work on Safari. We're currently working on making it available on Safari.
New default answers to the demerit grading schemes
Majority of the time, students don't make mistakes on evaluations (Academic > Faculty Evaluations) with a demerit grading scheme, and it can be very repetitive and time consuming for faculty to answer every question with a 0 - no error answer. To make it easier and faster, the answer is now set by default.

The default answer isn't locked, so faculty can always select a different answer if necessary.
New Credit Card Type column on the Deposit Slip report
Previously, the Deposit Slip report (Home > Reports > Deposit Slip Report) only displayed the total sum of payment(s) received by credit card, and didn't identify the specific type of credit card that was used for the payment(s). Now, there's a (new) Credit Card Type column in the Credit Card Payments section that identifies the method of credit card payment and the payment amount.
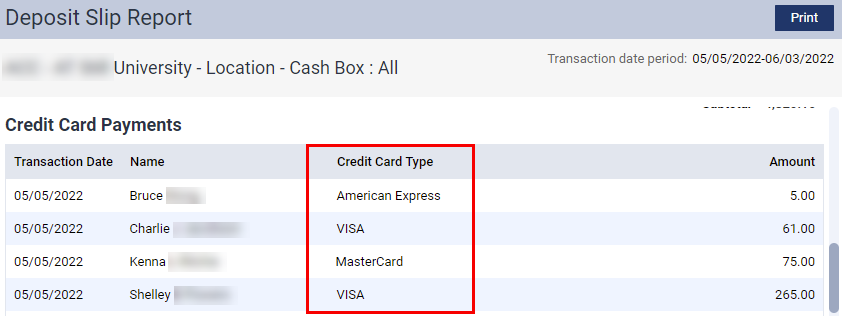
The column displays when users run the report to include Credit card payments payment method, and it displays for preview, print, and export. Also, you can control what types of credit card payment methods will display on the report by managing the tags (Patient > Financial > Ledger) applied to payments.
Note: As some old credit card payments don't have applied tags, the column will display no data for these payments.
Error message displays when a procedure is successfully deleted from a patient's progress notes
Issue: When users successfully delete a procedure attached to an approved/accepted tx plan case from a patient's progress notes, an error message displays.
Solution: Fixed so error messages don't display when a procedure is deleted successfully.
Warning message displays when an unassigned procedure is moved to a treatment plan case pending for faculty approval
Issue: When students successfully moves an unassigned procedure to a tx plan case pending for faculty approval, a warning message displays along with the green notification that indicates the case was updated successfully.
Solution: Fixed so the warning message doesn't display.
Group leaders with limited patient access generate a blank page when attempting to view a patient
Issue: When faculty that can only view their own patient data is set as a group leader of a user group, and they select a patient while reviewing the group members' patient lists, the information on the Ongoing Patient Care page disappears when the expected error message is generated.
Solution: Fixed so the generated information remains on the page.
Able to deactivate a provider without assigning a new provider to the their patients
Issue: When users deactivate a provider that's set as patient(s)' primary provider, the provider can be deleted without assigned a new provider to the patient(s) on the Inactivate Provider window.
Solution: Fixed so a provider can't be deactivated without assigning a new primary provider to their patients.
Insurance coordination order tooltip generates the wrong article link
Issue: When users clicktap the  icon on a patient's Insurance Information page > Insurance coordination order drop-down field, the generated tooltip contains an article link to a Dentrix article.
Solution: Fixed so the tooltip contains an article link to an Ascend article.
Warning message displays when users move a procedure to a treatment plan case and then select another procedure
Issue: When users move a procedure from a tx plan case to another case, and then selects a procedure assigned to a different tx plan case, a warning message displays.
Solution: Fixed so the warning message doesn't display.
Follow-up on an appointment with a lab case causes the lab case to disappear from the appointment
Issue: When users complete a patient follow-up on an appointment that has an attached lab case, the lab case doesn't display on the appointment's Appointment Information panel.
Solution: Fixed so attached lab cases display as expected.
Appointment providers with limited patient access can't access their patients
Issue: When users that only have access to their patients attempt to view information on patients that have them set as their appointment provider, their access is denied.
Solution: Fixed so they can access patients that have them set as their appointment provider.
Merge fields don't display on printed patient letters
Issue: When users add merge fields to a patient letter on the Letter to Patient window, the added merge fields don't display on the printed letter.
Solution: Fixed so merge fields display as expected.
Can't delete simulation patients with appointments
Issue: When users deleted a simulation patient that has an appointment from the Simulation Patients page, the patient still displays on the page.
Solution: Fixed so sim patients can be deleted as expected.
The Refresh and Close buttons on the Unsent Claims page aren't aligned
Issue: When users navigate to the Unsent Claims page by using the Unsent Claims widget on the Overview page, the Refresh and Close buttons display unaligned with each other.
Solution: Fixed so the buttons display properly.
Error occurs when unvoiding a voided procedure in the Ledger
Issue: When users attempt to undo a void on a procedure that's locked due to a locked transaction, an error occurs, and the procedure remains voided.
Solution: Fixed so users can unvoid voided procedures as expected.
Error when adding range to a coverage table
Issue: When users add a new range to a coverage table, an error occurs.
Solution: Fixed so users can modify coverage tables as expected.
Comments
0 comments
Please sign in to leave a comment.