
Several new feature enhancements are included in the product update released in late May 2022. The major enhancements in this release include ability to switch a patient's insurance plan order is temporarily disabled, improvements to imaging, improvements to power reporting, and layout changes to the Patient Follow-up page.
Important: Enhancements from this release will be available on PROD on May 27th, 2022.
Ability to switch a patient's insurance plan order is temporarily disabled
We are working on additional improvements to the insurance swap feature to make it easier and faster. Until the improvements are complete, we've temporarily disabled the system's ability to switch a patient's insurance plan order.
Tip: If a patient's insurance plan order needs to be switched or a patient's primary plan expired and their secondary needs to be set as the new primary, we recommend you end the current plans' coverage. Once ended, you can re-attach the plans with the desired place order.
Improvements to imaging
Several changes have been made to make imaging workflows (Patient > Clinical > Imaging) easier and faster:
-
Previously, users were able to adjust an image preview's brightness and contrast by clickingtapping anywhere on the image and then dragging across the image.

However, you can only drag within the image, and the adjustment stops as soon as you drag beyond it. Now, you can continue dragging outside the image without fear of the adjustment stopping.

You can even clicktap and drag outside the image first.
Reminder: You can only clicktap and drag to adjust an image's brightness/contrast if none of the image drag tools are selected.
-
We have added a (new) Move Recaptured button on the View Recaptured Images window that allows you to move a recaptured image to any desired template slot.

When selected, the Move Recaptured Image window displays.

From here, you can clicktap and drag the recaptured image to any desired template image slot that is empty.
When ready, you can clicktap the Confirm button, which is only generated when the image is moved to a different slot, to complete the process. If the move was saved, a
 icon displays to indicate the move was successful.
When ready, clicktap Close to close the window.
-
When you acquire an image during an exam or import images, you no longer need to clicktap a button to close the exam/import. The system has been updated to automatically finish and close the workflow once you've completed it. This also applies when you acquire an image for Pans or from Phosphor plate scanners.
Note: If you need to re-capture an image, you will need to re-open the exam and proceed with the acquisition to recapture it.
-
Previously, while acquiring an image, you needed to use the Skip Backward and Skip Forward buttons to navigate through a template sequence to capture an image for a specific slot.

Now, you can select the desired slot in the Default sequence instead of using the buttons to navigate to it.

Note: You can still use the Skip Backward and Skip Forward buttons to navigate through the slots.
Important: The system still follows the acquisition sequence of the imaging procedure, so it's important to follow the sequence when acquiring images. If you don't, the system will assume you've finished the acquisition when it captures an image for the last slot. When it does, the system will automatically close the acquisition, even if there are empty slots.
Example: If you select slot 15 of 18, the system will proceed to slot 16, 17, 18, and then close the acquisition.
-
When you import an image, the system sets the date you imported the image as the exam date, which isn't true. Now, you can manually change it to the actual exam date. To change the exam date, select an image on the Image Navigator and then clicktap the
 icon.
icon.
From the generated options menu, select the (new) Change exam date option.

The Change Exam Date window displays.

You can enter the desired exam date in the calendar field and then clicktap Change Date to set it as the image's exam date. If saved successfully, a "The exam date has been changed" notification message displays at the bottom of your screen.
-
When you select Acquire Images from the Imaging tab's drop-down menu, the system now auto-selects the 1st imaging procedure listed under the Favorites tab. The procedure is also automatically displayed on the side panel.
This allows you to easily open your most frequently-used imaging procedure quickly and easily by setting it as 1st on your favorite list.
-
We've increased the imaging procedure code from 7 characters to 11 characters, which is very useful when you want to create imaging multi-codes.

-
To speed up the process of acquiring series of images, we've remove the large image preview and the countdown between each image acquisitions from the process.
-
We've changed the background of the image viewer from dark gray to black to provide a greater contrast when viewing images.
Improvements to Power Reporting
Several changes have been made to power reporting (Home > Reports > Power Reporting):
-
To help users understand a patient's insurance plan order on the Analysis Patient Insurance Report Builder, we added 3 (new) insurance fields:
-
Plan Order End Date - Displays the date when an insurance plan stopped being a patient's primary/secondary/tertiary/other insurance plan.
-
Plan Order Start Date - Displays the date when an insurance plan started being a patient's primary/secondary/tertiary/other insurance plan.
-
Insurance Plan Order - Displays an insurance's place in a patient's insurance plan order. It displays 1 for primary, 2 for secondary, and so forth.

Note: Active plans that doesn't have an end date will display Not Available under Plan Order End Date.
-
-
The following power reports no longer run on modified date, but run on other dates to better fit the reports' intended use:
-
The Production Trends - Chart report - As the report's intended purpose is to accurately depict production trends, it now runs on the Service Month filter. The report now also uses the Revision History filter to include current transactions. A combination of these filters allow the report to display the latest information.
-
The Daily Huddle Completed Production - MTD report - The report now runs by the Service Month filter. The filter allows you to compare current month's production to the previous month after changes from the previous month are completed. The report also uses the Revision History filter to include current transactions, so you can see the latest amounts.
-
The Daily Huddle Collections - MTD and the Daily Huddle Collection % - MTD reports - These reports now run by the Transaction Month filter. Also, it now uses the Revision History filter to include the current transactions. Hence, the reports only display the current numbers when you run them, and the numbers change as collection activities continue through the month.
-
The Daily Huddle New Patients Seen - MTD report - The report now runs by the Transaction Month filter. It now also uses the Revision History filter to include the current transactions. There's also a Procedures category filter to make sure that the count is correct and it matches the regular New Patients See report.
-
-
There is a (new) Proc Treatment Area procedure field on the Analysis Treatment Plan Report Builder, which displays the exam treatment area of a procedure.

Note: If a procedure's treatment area is a series of teeth, the treatment areas are listed as a list, not as a separate list item.
-
To help differentiate an adult patient from a pediatric patient, we added a (new) Patient Date of Birth. Patient filter category that allows you to filter the report data by patients' age.
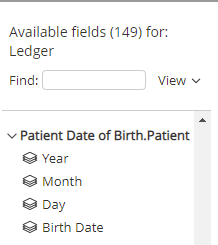
This filter category is added to all analysis reports, except Analysis Patient Report Builder, because it already has a filter category that filters date of birth.
-
On the Analysis Treatment Plan Report Builder, we've split an appointment field called App Time into 2 separate appointment fields: Appt Date and Appt Time. Appt Date displays the calendar date of an appointment in MM/DD/YYYY format, and the Appt Time displays the time of an appointment in HH:MM [AM or PM] format.
-
On the Deposit Report and the Active Patient Count - HSPA Report reports, you can now use the (new) Revision History filter to exclude historical information from the report. This ensures the reports only count the latest information to display accurate counts.
Layout changes to the Patient Follow-up page
Previously, the Patient Follow-up page (Schedule > Patient Follow-Up) displayed all appointments with pending and completed patient follow-ups on the same page.

To make it easier to navigate between pending and completed follow-ups, we've split the content into 2 (new) tabs: Needs Follow-Up and Complete (Last 7 Days).

The Needs Follow-Up tab displays a list of past appointments that require a patient follow-up. Each appointment comes with a Complete button, which used to be located above the list. Users can clicktap the button to indicate the follow-up is completed and to move the appointment to the Completed (Last 7 Days) tab.
The Complete (Last 7 Days) tab displays a list of past appointments that require a patient follow-up, which was completed within the past 7 days. This tab comes with a (new) Completed On column, which displays the date and time the follow-up was completed on in the MM/DD/YYYY | HH:MM [AM or PM] format. Also, each appointment comes with a Needs Follow-Up button, which used to be located above the list.

If necessary, you can clicktap the Needs Follow-Up button to move the appointment back to the Needs Follow-Up tab. You can use the button in such cases where a patient requires another follow-up regarding their appointment or if an appointment's follow-up was accidentally set as complete.
As the Complete and Needs Follow-Up buttons now display for every appointment, we've removed the check boxes and the Status column that displayed before this release.
New ability to hide insurance estimated credit from the printed Treatment Plan
We have added a new ability to hide insurance estimated credit from printed treatment plans. Users can now hide it to avoid patient confusion with their total payment or explaining to a patient how they must pay the full amount before the insurance is processed. This ability is controlled by the (new) Hide insurance estimates user role permission (Settings > Location > User Roles), which isn't set by default.

When set, a (new) Hide insurance estimates check box is added to treatment plan case previews (Patient > Clinical > Treatment Planner).

When the check box is selected, the following occurs in the print-version of the treatment plan:
-
The Planned Procedures table > Prl Ins column is removed. Also, the Patient column is removed to hide the value of the guarantor estimation, which is based on the insurance estimation.
When check box isn't selected When check box is selected 

-
The breakdown of insurance from the Treatment plan case total section is removed.
When check box isn't selected When check box is selected 

-
The total calculation won't reflect the insurance amount.
New ability to view other users' patient lists
We have added a (new) ability for faculty providers to view the patient lists of their students. Faculty providers can use the list to properly assess the students' progress with their patients and to confirm they're completing their treatments correctly. To view their students' patient lists, the students must be a member of a use group and the faculty must be set as the user group's group leader. The faculty provider doesn't need to be a member of the user group to be set as the group leader.
To set a faculty as the group leader, they must be added to the user group by using the (new) Add Leader field on the user group. (Settings > Location > User Groups)

When added successfully, the faculty will be listed in the (new) Group Leaders table.

Note: A user group can have maximum number of 5 faculty providers set as group leaders.
Once set, the students' patient lists display on the My Patient List tab of the Ongoing Patient Care page (Home > Reports > Ongoing Patient Care).

To view a specific student's patient list, select the user group they belong to from the Group Name drop-down menu, and then select the student from the generated list.
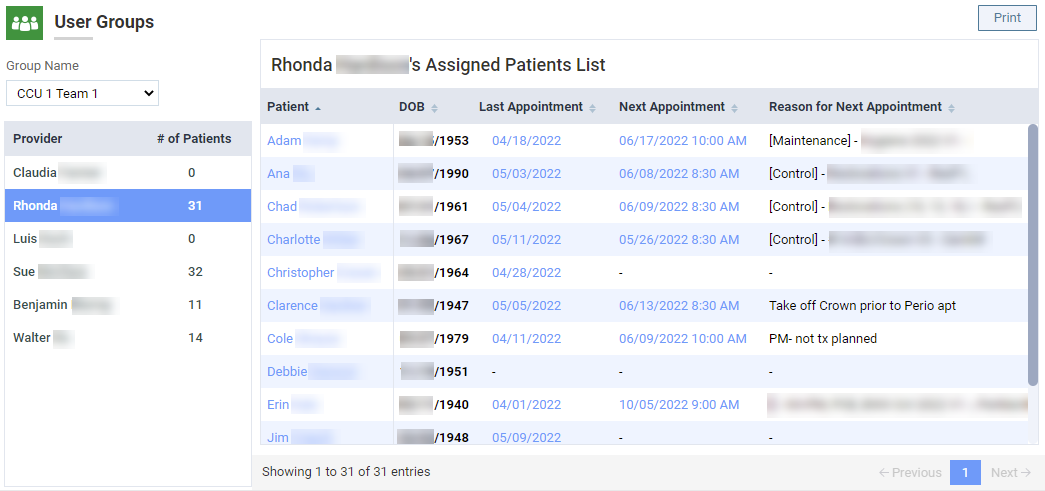
Note: The contents of the patient list is same as a regular patient list.
Pagination changes on the Insurance Carriers page
To make it easier to navigate and locate users' insurance carrier plans, we've made some pagination changes to the Insurance Carriers page (Home > Insurance > Carriers).

On the bottom-left corner of the page, we added a (new) feature that allows you to decide how many carriers you want to see at once. By default, it's set to 100, but you can always change it to 200 or 300. On the bottom-right corner of the page, there's a (new) page navigation feature that allows you to navigate through the previous/next set of 100/200/300 carriers.
New message on the Patient Selection window that displays changes to a treatment plan case
When a treatment plan case (Patient > Clinical > Treatment Planner) that was accepted by faculty goes through any changes, the treatment plan case must be re-approved by a faculty provider, and then go through the regular treatment plan workflow. Now, when a student provider attempts to collect the patient e-signature of such treatment plan case, a (new) Changes message displays on the Patient Selection window.

Note: Procedure(s) that have changes are also highlighted.
The student provider can use the message to explain to the patient the changes to their procedure(s) clearly and efficiently.
Important: The message only displays changes made to the procedure code, amount, surface, tooth, and class 5. The message also includes added and removed procedure(s).
New option to run the Day Sheet report by modified date
Previously, the Day Sheet report (Home > Reports > Day Sheet) only ran by transaction date. Now, we've added the option to run the report by modified date by adding a (new) Modified date option to the Date Range filter.
| Before | After |
 |
 |
When you run by modified date, the metrics in the report take into account the changes, corrections, and transfers of responsibility made to transactions in the Ledger. Also, running by modified date allows you to check entries made for the current date and make sure that backdating or corrections have been recorded properly.
Note: The Include in Estimated Net Prod. filter doesn't display when the Run By filter is set to Modified date.
axiUm Ascend now allows multiple patients to share an e-mail address
Previously, axiUm Ascend wouldn't let multiple patients have the same e-mail address. If users tried to create/update a patient by using an existing e-mail address, the system wouldn't let them save. However, it is common for related patients to share an e-mail address, especially if they're the primary contact for the entire household. We've updated the system to allow patients to share an e-mail address. After this release, you will be able to create/update patients with e-mail addresses that already exist in the system. However, a (new)  icon displays when you enter an existing e-mail address in the Email field to let you know the e-mail already exists.

If you clicktap the icon, a Warning tooltip dispays.

The icon specifically displays on the calendar (Schedule > Calendar) and the Patient Information page (Patient > General > Patient Information).
Deleted simulation patients display in the system
Issue: When users delete a simulation patient that's assigned to them, the patient still displays on the Provider Overview > Assigned Patients widget and the Ongoing Patient Care page > My Patients List tab. However, when the patient's hyperlinked name is selected, a "Patient has been deleted" error message displays.
Solution: Fixed so deleted simulation patients are removed from the Assigned Patients widget and the My Patients List tab.
Hide patient names toggle switch on Calendar doesn't work on broken and no show appointments
Issue: When users customize their schedule view settings by setting the Hide patient names toggle switch to On, patient names on broken and no show appointments still display on the Calendar.
Solution: Fixed so all appointments don't display patient names as expected.
Printed clinical reports don't contain medical alert information
Issue: When users print a clinical report of a patient that have active and/or expired medical alert(s) in their record, the medical alert information doesn't display on the report. The Medical Alerts table only displays the correct number of rows it should have in relation to the patient's total number of medical alerts in their record.
Solution: Fixed so patient's medical alert information display properly.
Student providers without proper security rights are able to delete patient's image
Issue: When students that don't have the Delete Patient Images user role permission set attempt to delete a patient's image, the image is deleted if the students have the Review Patient Images and Acquire Patient Images user role permission set.
Solution: Fixed so students can't delete images regardless of their security rights if they don't have the Delete Patient Images user role permission set.
Customized Photo Release Consent form displays the default content when re-opened
Issue: When users customize a consent form by using a default consent form template, the customization doesn't display properly.
Solution: Fixed so customization displays as expected.
New perio exams on a patient's progress notes also display on other patients' records until it's completed
Issue: When users create a new perio exam on a patient's progress notes, that exam record displays on other patients' progress notes as well. Once the perio exam is completed, it no longer displays on other patients' progress notes.
Solution: Fixed so exam records only display on the associated patients' record.
Full list of linked users on a User Groups page doesn't display properly when one of the members has a long name
Issue: When users add a user with a name and a username that are more than 48 characters long to a user group on the User Groups page, a portion of the Full List disappears. The right portion of the Full List table disappears because the list is pushed out of alignment with the User Groups page, and the right portion is pushed beyond the page.
Solution: Fixed so the Full list displays properly as expected.
Default clinical note templates don't display on the Clinical Note Template Setup page
Issue: When users from organizations that were created recently attempt to view clinical note templates, the system doesn't display any default templates on the Clinical Note Template Setup page. It only displays templates that were created by the organization.
Solution: Fixed so the default templates display as expected.
Progress note date don't display when the Patient Routing panel is open
Issue: When users open the Patient Routing panel while on a patient's progress notes and then pin the panel, the progress note data are no longer visible.
Solution: Fixed so users can still view a patient's progress note information while the Patient Routing panel is open.
The provider that acquires an image for a patient is selected from the Provider list, not the patient's primary provider
Issue: When users acquire an image for a patient, the image displays the patient's primary provider as the one that acquired the image.
Solution: Fixed so the provider that acquired the image is documented as the one that acquired the image.
Notification message don't display when a treatment plan case is updated
Issue: When users update a treatment plan case by adding/removing a procedure to Unassigned, the "Case has been updated" notification message doesn't display.
Solution: Fixed so the message displays at the bottom of the screen as expected.
Comments
0 comments
Please sign in to leave a comment.