
Several new feature enhancements are included in the product update released in late February 2022. The major enhancements in this release include new workflows for switching primary and secondary insurances, improvements to insurance claim attachments, new Social Security Number field on a patient's record, and improvements to the Unresolved Claims report.
New workflows for switching primary and secondary insurances
We have added 2 new workflows that allow users to switch primary and secondary insurance plans and handle its attached outstanding claims easily:
-
When a patient's primary insurance plan expires, you can set the secondary insurance plan as the primary. Before you make a switch, confirm a plan has expired on a patient's Insurance Information page (Patient > Insurance > Insurance Information).

A No Primary Insurance Coverage message displays if the primary plan is expired. To make the switch, select the listed secondary plan and then select Primary from the Insurance coordination order drop-down list.

ClickTap Save, and when prompted with the Save Plan window, clicktap Save.
The (new) Change Insurance Coordination Order for [patient's First and Lastname] - [patient's birthdate in MM/DD/YYYY] window displays.

The left side of the window displays the current order of the insurance plan, and the right side displays the new insurance order after the switch. The window also list any claims associated with the secondary plan under Claims. When ready, you can clicktap Change to make the switch and to close the window. The Insurance Information page updates with the expired primary plan removed and the secondary plan set as the new primary. If desired, you can clicktap the Insurance coordination order field's History link to review the details of the switch.

-
You can swap the order of a patient's insurance plans to set the primary as the new secondary, and the secondary as the new primary plan. On a patient's Insurance Information page, select any listed plan and select the plan order you want to swap them to on the Insurance coordination order.
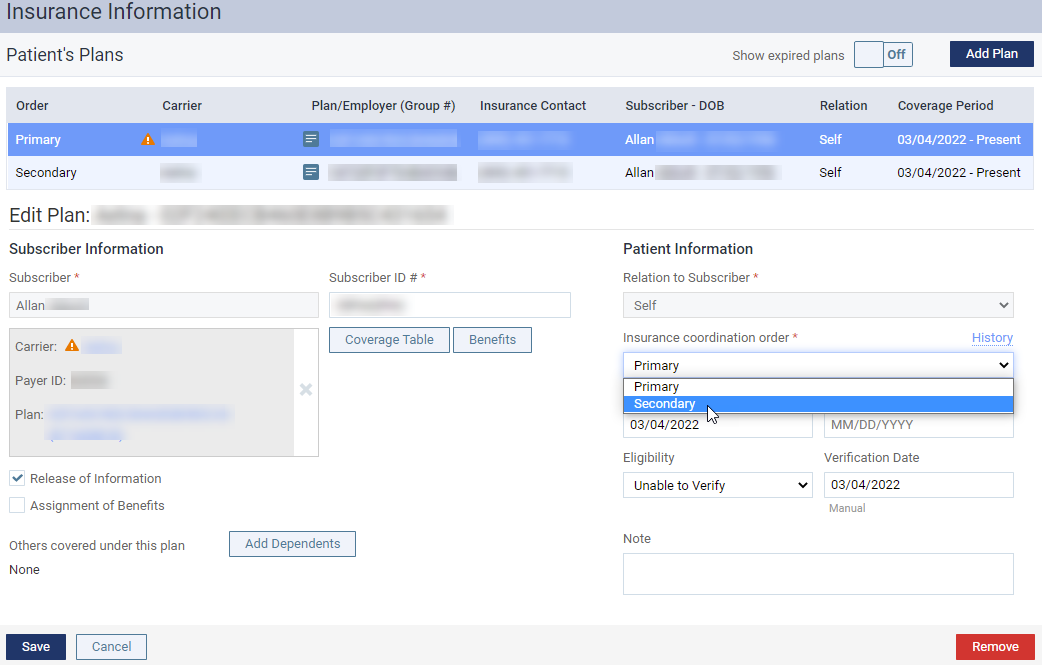
ClickTap Save, and when prompted with the Save Plan window, clicktap Save.
The (new) Change Insurance Coordination Order for [patient's First and Lastname] - [patient's birthdate in MM/DD/YYYY] window displays.

The left side displays the current order of the insurance plans and its claim(s), and the right side displays the new plan order with icons that indicate what will happen to the claims after the swap.
Icon Status of the Claim Details 
Unsent Displays for unsent claims that will be deleted after the swap. You can re-create the claims afterwards.

Sent Displays for claims that are already sent to the insurance carriers.

Payment Received Displays for paid claims. These claims can't be deleted as they're already completed.
With sent claims, you can have them deleted during the swap by selecting their check box(es) on the window. As you'll need to notify the insurance company of the deletion, you need to hover the cursor over the
 icon to view the insurance company's contact information. If you don't want to delete it, you need to change the start date to a different date after the claims' service date by using the calendar field beside the New Order as of Start Date. This will allow the claims to be processed before the swap. With paid claims, you also need to set the calendar field to a date after the claims' service date because it's already processed and completed based on the old order. You can't change the plan order for completed claims. When setting a later start date, you can use the Earliest possible date: [calendar date in MM/DD/YYYY] link to set the field to the earliest future date.
To confirm you can process the swap with the new start date, you need to clicktap the Update Preview button to update the the window.

Note: When you modify the start date, the Change button changes to the Update Preview button. When you clicktap the Update Preview button, it reverts back to the Change button.
Once updated, the window only displays the claims that fall after the new start date. You can continue modifying the start date until satisfactory. To continue, clicktap Change. If you're deleting any claims, you'll be prompted to confirm the deletion on the Delete Claims window. To continue with the swap, you need to clicktap Delete to close the window, updating the Insurance Information page with the new order.
Important:
-
When you set a secondary plan as primary after the primary plan expires, you're not prompted to address any of its existing claims, as the switch won't affect them. However, when you swap the order of the plans, you're prompted to delete any claims that weren't sent to the insurance carriers, because the claims were created based on the old plan order. As all unsent claims must follow the new plan order, you need to delete, re-create, and then re-submit them.
-
The act of switching or swapping the patient's insurance order and the deletion of its claim(s) are audited in the audit log.
Improvements to insurance claim attachments
Throughout axiUm Ascend, we made several changes to the Claim Detail window > Attachments tab to help meet the insurance claim attachment requirements set by the electronic clearinghouse:
-
Users can now attach a clinical note to an insurance claim, which is automatically converted into a JPEG file by axiUm Ascend during the attachment. To attach a clinical note to a claim, you need to select it from the (new) Add Narrative drop-down menu.

Note: You can only select one clinical note at a time. You can't select multiple notes at once.
If necessary, you can view the entire note before you attach it by clickingtapping the note's Show details link.

The generated tooltip also comes with an Add button that you can use to attach the note to the claim. You can close the tooltip by selecting the note's Hide details link.

All clinical notes are attached with the Document Name set to Narrative - [calendar date of when the note was created by a provider in MM/DD/YYYY] and the Classification / Type set to Narrative.

Note: You can update the Classification / Type to Report or Diagnosis as necessary.
The document name of the note displays as a hyperlink that you can clicktap to generate a preview of the note the way it would display to an insurance company. The preview includes the patient's name, date of birth, provider, note's creation date, and the practice's name, address, and phone number. If the note's been signed, it'll state who and when the note was signed, but won't display the e-signature configured in the system.
You can also remove any attached note(s) by selecting its check box(es) and clickingtapping the Remove Selected button located on the right side of the window. However, you can only delete it before the claim is submitted.
Important: There is a limit of 10 attachments per claim. If a claim has 10 attachments, an warning message displays on the window to indicate the claim has reached the maximum limit, and the Add Narrative drop-down menu is disabled.
Tips:
-
It's recommended you review the note before you attach it to a claim to make sure the contents are clear and contains all the information an insurance carrier needs to process the claim.
-
If you attached an unsigned clinical note, you can still sign it as long as the claim hasn't been submitted. Once signed, the note will state who and when it was signed, but won't display the e-signature configured in the system.
-
-
We added a (new) Size column that displays the size of an attachment. At the bottom of the column, the total size of all attachment(s) and claim(s) display.

Note: Size displays in kilobytes (KB) or megabytes (MB).
You can use these measurements to make sure the claim doesn't exceed the 15 MB size limit set by the clearinghouse. If the claim does exheed the limit, a
 icon displays on the Attachments tab and a warning message displays.
You won't be able to submit the claim until you address the size issue.
New Social Security Number field on a patient's record
On the Patient Information page (Patient > General > Patient Information) > Basic Info tab, users can now use the (new) Social Security # field to document a patient's social security number, which can be used for the patient's financing and insurance eligibility verification.

Note: If blank, the field displays in hashtags.
When entering a patient's social security number into the field, you can either do it manually or copy and paste it from somewhere else.
Important: When entering a number into the field, it's recommended you confirm it's the correct number, as axiUm Ascend only checks if it fits a valid pattern. It doesn't check if it already exists in the system.
If the entered number isn't a valid social security number, the field displays a icon.

If the entered number is a valid social security number, a  button displays.

To save the entered data, clicktap the button. Once saved, the number displays hidden.

To view the number, you need to clicktap the  button.

Once revealed, you can also edit it if desired. If ignored for 3 seconds, a blue line displays underneath the field. The blue line starts from the left corner of the field, and then slowly progresses towards the right corner.

If the field is unaddressed until the blue line reaches the right corner of the field, or for 15 seconds, the field automatically hides the number. Also, a notification indicating the field has been reset to the previous value displays.

If necessary, you can use the  icon to remind yourself how the field works.

To have access to the field, you need the (new) Access Social Security # user role permission set. By default, the permission is already set for Administrator and Billing Coordinator user account types, and anyone else that have the Update patient information user role permission set.
Whenever you review, update, or delete a patient's social security number, the action is audited in the audit log. For security reasons, the log only states the type of action and doesn't contain the social security number.

Note: Under Details, the act of adding or changing the social security number is audited as "SSN Updated".
Improvements to the Unresolved Claims report
Several changes have been made to the Unresolved Claims report (Home > Insurance > Reports):
-
There is a (new) Set Follow up feature that users can use to indicate when you want a follow-up on a claim.

Tip: You can set the date to 0 to hide the claim from the list for an hour.

The feature is 1 of the 2 radio buttons on the report, with the other radio button being Dismiss claim. Also, the Dismiss claim feature has been updated from a check box into a radio button.
-
Whenever you dismiss a claim, it now relocates from the Unresolved Claims tab to the (new) Dismissed Claims tab.

Also, it's excluded from the total number of claims and the total value of the claims that display above the tabs on the left.
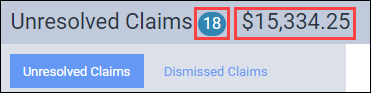
To move a dismissed claim back to the Unresolved Claims tab, you need to select a dismissed claim, select the Move to Unresolved Claims check box, and then save.

-
You can now use the (new) Show only rejected claims toggle switch to filter the Unresolved Claims report to only view rejected claims.

To only view rejected claims, set the toggle switch to On. You can also navigate to the report with the toggle switch automatically set to On by selecting the (new) Rejected column on the Overview page (Home > Location > Overviews) > Unresolved Claims widget.

-
You can now navigate to the Insurance Carriers page (Home > Insurance > Carriers) by clickingtapping an insurance carrier's (new) Visit carrier page link.

Improvements to Treatment Planner
Several changes have been made to the Treatment Planner (Patient > Clinical > Treatment Planner):
-
Users can now use the (new) Change Provider To drop-down menu to change the provider assigned to a patient's procedure(s).

Note: The menu is disabled when there's no selected procedure.
To change the procedure(s)' provider(s), select the check box(es) of the procedure(s) you want to update, and then select the desired provider from the Change Provider To drop-down menu.

Note: The generated list is in alphabetical order of the providers' short names.
When prompted by the Changing Provider window, clicktap Change to confirm the provider change.

Important: The window displays with a Update procedure amount(s) based on this fee schedule check box if the selected provider has an assigned fee schedule, even if it's the same fee schedule as the assigned provider(s). If you want to apply the select provider's fee schedule, select the check box before you clicktap Change. If you want to keep the assigned provider(s)' fee schedule, clicktap Change without selecting the check box.
If successful, a green notification will display to indicate it was updated properly, and the changes are audited in the audit log for each updated procedure.
-
For treatment plan cases in Pending Patient Consent or Accepted, we combined the Create Appointment and Create Pre-authorization buttons into a (new) Create drop-down menu. To use any of these functions, select them from the menu.

Filter enhancements on the A/R Totals Report
Previously, the A/R Totals report (Home > Reports > Provider A/R Totals Report) didn't have any ability to filter out specific procedures, charge adjustments, and/or credit adjustments data. With this release, you now can by using the following new filters:
-
Procedures - This filter decides which procedure(s) will be included in the report. The filter is exactly like the Procedures filter on the Aged Receivables report (Home > Reports > Aged Receivables Report), and they share the same presets. Any changes to the presets affect both reports.
-
Charge Adjustments and Credit Adjustments - These filters are drop-down lists that allow you to only include specific adjustments. By default, they're set to All included. To only include specific adjustments, you need to clear All and then select them from the lists. Once selected, the filters display the total number of selected adjustment(s) out of the total charge or credit adjustments in the system. If you set the filter to include all adjustments, it displays as all included.

Tip: You can see a list of selected adjustment(s) by hovering the cursor above any of the fields.

The new filter settings also display on the printed report.

Also, the Providers filter has been updated to allow you to select multiple providers.
New Predeterminations button when you edit an insurance carrier
We are currently building a new function for treatment and insurance coordinators that will save time and remind users to send out predeterminations as necessary. For now, we added a (new) Predeterminations button on the Insurance Carriers page (Home > Insurance > Carriers).
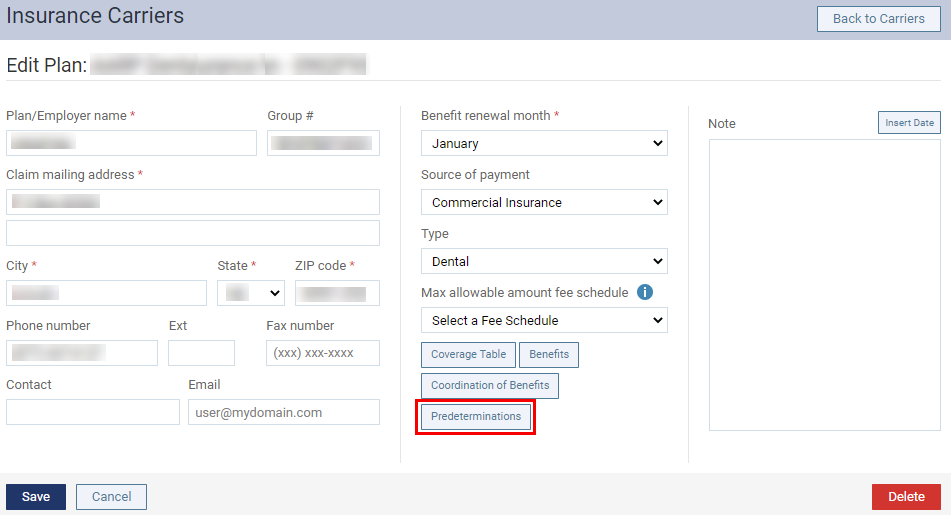
The button generates the Manage Predeterminations window, which will be used to select which procedure(s) require predeterminations once this function is complete and ready for use.

When it's ready, you can select the check box(es) of procedure(s) that require predeterminations in the selected insurance plan, which will be shared with the entire organization. If necessary, you can use the Search for procedure field to locate a specific procedure by its code or description. When selected, an icon displays next to the check box.
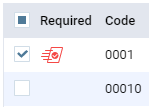
The window also comes with a Load Defaults button. You can use it to load a list of preselected procedures that we deemed are the most commonly requested for predeterminations.
Tip: Loading the defaults will replace any work you're done to this point. It's recommended you load the defaults first and then refine your selections.
Important: The function is incomplete and is still being worked on, and it's not ready for training or practical use at this moment.
Improvements to Insurance Carriers page
Several changes have been made to the insurance Carriers page (Home > Insurance > Carriers):
-
Previously, all claims were considered overdue if they were over 14-days-old, which is an unrealistic turnaround time for some insurance carriers. Now, you can customize when a claim is considered overdue for each carrier. To customize a carrier's expected period of insurance claim resolution, select a listed carrier and then enter the desired number of days when a claim is considered overdue in the (new) Expected period of insurance claim resolution field.
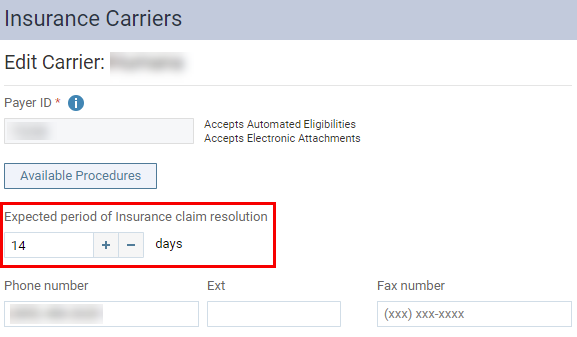
Tip: You can also use the + and - buttons to update the field.
Once saved, all claims from that insurance carrier will be considered overdue only after the entered number of days passed since its creation. The new expected period of insurance claim resolution is also applied to existing claims.
Tip: It's recommended you start configuration for Payer ID 06126 carriers that communicate by mail.
-
Any insurance carriers in the system that's not on the list of contracted payers from our parent company, Henry Schein One, are considered as non-contracted payers. They are also assigned a Payer ID 06126. As electronic attachments and eligibility verifications won't work on these unsupported carriers, claims associated with them can only be printed and mailed by the clearinghouse. To help differentiate between them from contracted payers, we added a (new) Printed Claims column.

The column displays an X symbol for all carriers that doesn't support electronic claims.
Insurance Plan Information tooltip on the patient information ribbon
We added a (new) Insurance Plan information tooltip to the system that's associated with the shield icon on the patient information ribbon.

For computers, the tooltip displays when you hover the cursor over the shield icon. For touchscreen, the tooltip displays when you tap on it. For touchscreen, the tooltip also displays with a Go to Insurance Plan Information Page link, which you can tap to navigate to the patient's Insurance Information page.

For computers, you can still click the icon to navigate to the page.
The tooltip only displays the most recent and basic insurance information of the patient. It doesn't display data on any expired plans. If the primary plan is expired, the tooltip displays the No Primary Insurance Coverage message where the primary would be listed.

For secondary, it won't display when it's expired.
Deductible and benefits fields are now disabled based on security rights
Throughout axiUm Ascend, the Deductibles and benefits window has been updated to now only display disabled fields if the logged in user doesn't have the security rights to modify an insurance plan's deductibles and benefits. Before this release, the fields were still enabled even if you didn't have the security rights, and they were interactable. If you tried to modify and save it, a denied message displayed.
Can't create patients if the organization doesn't have a default billing type
Issue: When users work in an organization that has no default billing type, an error occurs when they attempt to create new patients in the scheduler or from the Patient Search field. An error also occurs when users attempt to set a new default to correct the issue.
Solution: Fixed to work as expected.
Issues with saving certain procedures in an accepted treatment plan case
Issue: When users save certain procedures in an accepted treatment plan case without changing anything or after only changing the date, provider, note, or bill to insurance, the case moves back to Pending Faculty Approval status. Also, a blank log is added to the treatment plan history.
Solution: Fixed so the treatment plan case status doesn't change and a new record isn't created in the treatment plan history.
The Assigned Patients widget doesn't update when logged in provider set themselves as a primary provider of an existing patient
Issue: When a provider login and set themselves as a primary provider of an existing patient and navigate to the Provider Overview page, the Assigned Patients widget doesn’t update to include the patient.
Solution: Fixed so widget updates accordingly.
Generation of a Deposit Slip report may result in error based on filter settings
Issue: An error occurs when users attempt to generate a Deposit Slip report with the following filter settings: Period set to 9 months, Payment methods set to All, and Location set to All.
Solution: Fixed to no longer generate an error under these settings.
Issue with printing Patient Clinical report
Issue: When users attempt to print a Patient Clinical report, a new tab is opened on the browser and an error message displays.
Solution: Fixed so the report is saved in the Document Manager as expected.
Last Contacted on the Unconfirmed Appointments page doesn't update right away
Issue: When axiUm Asecnd sends out an appointment reminder, the Last Contacted column on the Unconfirmed Appointments page doesn't update. The page will only update when the page is refreshed or when someone changes the appointment status.
Solution: Fixed so the Last Contacted data will update immediately.
An error occurs when deleting a treatment plan case that has the same name as another case and was created after the another case.
Issue: When users delete a case that has the same case name as another case but different phase name, and the case was created after the other case, an error occurs.
Solution: Fixed so the system doesn't error.
Appointments may not display on the Calendar
Issue: When users navigate to the Calendar, some appointments may be missing.
Solution: Fixed so all appointments display.
Comments
0 comments
Please sign in to leave a comment.