
Several new feature enhancements are included in the product update released in mid-August 2021. The major enhancements in this release include the new time clock function, changes to power reports, improvements to the ePrescription function, and improvements to the Ledger.
New time clock function
We have added a (new) time clock function that allows users to punch in their work hours by clocking in and out of their shifts to create data on worked hours. These data can later be used to generate reports on worked hours of an individual user or entire location(s). To clock in and clock out, you must have the time clock feature enabled on your user account by an administrator that has the security rights to edit user accounts.
To enable the feature, an administrator must set the (new) Uses time clock toggle switch on your User Account Information page (Settings > Location > User Accounts) > Basic Info > Working Information section must be set to Yes. The toggle switch can also be set to No to disable the feature.

Any changes to the toggle switch are only applied to the user's next session.
Example: The time clock feature is enabled for a user that is already logged into axiUm Ascend. The user can't user the feature until they logout and log back in.
By default, you're clocked out when you first login with the feature active. If it's your first login of the day, a (new) Time Clock Status tooltip displays, encouraging you to clock in. You can clock in by clickingtapping the Clock In button.

If it's not the first login of the day, the tooltip won't display, and you can clock in by using the (new) Clock In button on the Hi, [user name] menu.

When clocked in, you can also clock out by using the same button from the menu. However, as you're already clocked in, the button would display as Clock Out. You need to clock in and clock out manually, as logging in, closing the browser, or logging out doesn't automatically clocks you. To indicate you've started and ended your shift, you need to do it manually.
If desired, you can see your record of check ins and outs per your location on the (new) My Timecard page by selecting the (new) My Timecard from the Hi, [user name] menu.

Important: Records on the timecard are automatically adjusted for any time zone differences that apply.
By default, the timecard only displays data from the last 7 days. If necessary, you can adjust the Date Range filter to view older data. When you clock in and out, you clock in and out at all of your locations. So, any recorded punches that's not at the location you clocked in or out of will display with a  icon.
icon.
Example: You have access to Office A, B, and C. You check in at Office A, and axiUm Ascend records that you checked in at Office A, B, and C. As you checked in at Office A, the recorded check ins on your timecard for Office B and C displays with the icon.
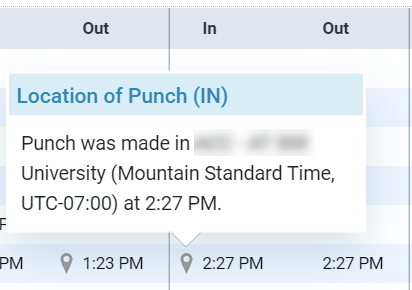
You can clicktap the icon to generate the Location of Punch ([IN for check in, OUT for check out]) tooltip, which displays the name of the office the punch was made and the time.
If you're missing a clock entry, possibly due to not clocking out when you're shift ended, a  icon displays beside the Total Hours and the the Daily Subtotal of the date that's missing it.
You can also export the data displayed on the My Timecard page as a .CSV file by clickingtapping the Export button. The exported data only displays your total worked hours for the set date range, and doesn't display individual punches or organize data by date.

If you're an administrator, you can view data on punches for all users at all locations. With the (new) Time Clock Summary user role permission set, you can access the (new) Time Clock Summary report (Home > Location > Time Clock Summary). To generate a report, you need to set the filters and clicktap Search.

The Time Clock Summary report displays a list of total worked hours within the set date range for all locations by all users. You can expand a user to view their individual punches within the set date range.

Just like the My Timecard page, you can export the generated data as .CSV, and the and the icons display accordingly.
Also as an admin, you can correct any mistakes in the data by adding, editing, or deleting punches on the Time Clock Summary report as long as you have the (new) Manage time clock punches user role permission set. To add a punch, you can clicktap the  icon of the date that's missing a clock entry to generate the Add Punch on [selected calendar date in MM/DD/YYYY format] tooltip.

You can set the tooltip's fields accordingly and save it to add the punch. You can edit existing punches by using the Edit Punch on [calendar date of the punch in MM/DD/YYYY format] tooltip, which is generated when you select a punch.

You can also delete a punch from this tooltip by clickingtapping the  button.
After modifications, the Daily Subtotal and the Total Hours updates automatically, and these changes are audited in the Audit Log. Also, added and edited punches display in bold text to help differentiate them from others.
Important: This function is not meant to be a full payroll solution, and doesn't display hourly rate definitions or track earnings.
Changes to power reports
Several changes have been made to power reports (Home > Reports > Power Reporting) to utilize the new transaction date and revision history function in the Ledger. Specifically, power reports that deal with provider production:
-
We have added a (new) Provider Production History report that represent all changes and the current state of provider production for the previous month. It's meant to help investigate and explain provider production numbers, especially if there is confusion or misunderstanding when paying on production. Users can utilize the date of the transactions and modifications with the revision status.

-
The following power reports have been updated to now use Modified Date data from the Ledger:
-
Patients & Production by Referral Type - Chart
-
Production by Provider Type – Pie Chart
-
Production by Referral Source
-
Production by Referring Patient
-
Provider Production
-
Referred Patients & Production
The usage of the data is meant to help maintain integrity of historical data within a set date range. Any changes made after the date range won't be included in the report.
-
-
We have added a (new) Primary Provider field that allows you to add information on patients' primary providers to procedure details.

Note: The field doesn't display the provider of the procedure. It only displays the providers that are set as the patients' primary provider on the Patient Information page (Patient > General > Patient Information).
Tip: It works best with the Analysis Procedure Tracking Report Builder.
-
The term Pre-authorization in power reports has been renamed to Predetermination. The change was made because we thought it more accurately explained its purpose in power reports: to provide confirmation that patients are covered enrollee of a dental plan and their treatment-planned procedures are covered by benefits. Hence, all labels that uses the term Pre-authorization in power report has been renamed to Predetermination. Specifically, the Pre-authorization field category on the Analysis Treatment Plan Report Builder and the Interactive Treatment Plan Report Builder has been renamed to Predetermination. The predetermination fields use PreD as a prefix to keep the field names short.

-
There is a (new) Predetermination - Unsent power report generates a list of predeterminations that you created but didn't sent in the past 6 months. Specifically, the past 180 days.
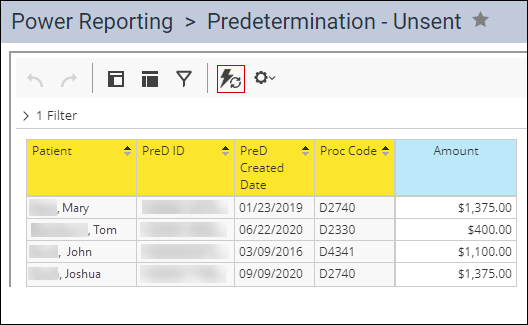
The report also includes the following information:
-
Patient name
-
Predetermination ID – a tracking number generated by axiUm Ascend
-
Predetermination created date
-
Procedure Code
-
Procedure amount that was entered into the Treatment Planner
-
-
We have added a (new) Predetermination - Tracking power report that displays a status list of predeterminations that were sent in the last 180 days and what needs to be completed for each predeterminations. axiUm Ascend displays the status as is received from the payer clearinghouse. The following statuses are possible: Accepted, Additional Information Requested, Paid, Payment Received, Pending, Printed, Queued, Received, Rejected, Resubmitted, Sent, Settled, Unprocessable Claim, Unsent, Voided, and Zero Payment.

Important: The Amount is the amount that was sent to the payer, and it can be the provider fee, the insurance fee, or a fee manually inserted at time of posting the procedure.
The following information also display:
-
Insurance carrier
-
Predetermination Status
-
Patient name
-
Predetermination ID
-
Predetermination sent date
-
Predetermination status date – the date the status value was returned from the carrier
-
Scheduled/Unscheduled status – Displays whether the patient has an appointment scheduled for the procedure
-
Procedure code
-
Procedure amount
-
-
The Daily Huddle – Completed Production – MTD and the Daily Huddle – Collections – MTD reports have been updated to filter by the Modified date. Also, we’ve renamed the Modified date field to Modified Month.
-
We have removed the Adjusted Production Report from the system, as there are now other ways to better capture the information for which it was originally created.
-
To avoid double counting of appointments, the Patients Seen and the New Patients Seen reports are now filtered by default to include only the current records.
Improvements to the ePrescription function
Several changes have been made to electronic prescription function:
-
We have added a new proxy user feature that allows non-providers to enter an electronic prescription on behalf of a provider, that will require the provider to review, approve, and submit the prescription.
To set a non-provider as a proxy user, an administrator must update the proxy user's user account information (Settings > Location > User Accounts) by setting the (new) Is ePrescribe Proxy User toggle switch to Yes. Once enabled, new fields display that requires the administrator to enter the proxy user's birthdate and address for the proxy user to start entering prescriptions.

Once set, the proxy user can start entering prescriptions on a patient's Patient Prescriptions page (Patient > General > Prescriptions) by selecting the Prescription drop-down menu > New Electronic Prescription. Also, the proxy user must indicate which prescribing clinician they're acting on behalf of.

From here, they can enter an electronic prescription as usual. When entered successfully, a (new) red asterisk start displays on the prescribing clinician's Hi, [user name] menu and the Electronic Prescriptions option, to indicate they have a new pending prescription that requires action.

-
We have added a (new) Clinical ID field on a provider's User Account Information page (Settings > Location > User Accounts) that displays when the Enable Electronic Prescriptions toggle switch on the same page is set to Yes. The field automatically displays the provider's clinical ID number that's assigned to them by DoseSpot, and can't be edited.
Improvements to the Ledger
Several changes have been made to the Ledger (Patient > Financial > Ledger):
-
We have added a (new) Locked Time Period tooltip that displays when users attempt to create a transaction before their location's transaction lock date. It also displays when you attempt to edit a transaction that's after the transaction lock date to a date before the lock.

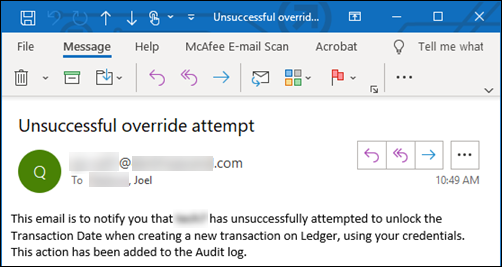
If necessary, you can temporarily unlock the transaction lock date by enter the credentials of a user that has the Override Locked Transaction user role permission set. When done successfully, the action is audited in the Audit Log. If it wasn't successful, axiUm Ascend sends an e-mail to the e-mail address associated with the entered username, and the attempt is audited in the Audit Log.
Important: As the tooltip is activated when you set the Transaction date field to a date before the transaction lock date, you still need to clicktap the
 icon of a locked transaction's window when you're editing it. Just because you've already overrode the transaction lock function by using the tooltip on a previous transaction doesn't mean the function has been overridden for all transactions.
 -
We have added the following new check boxes to the View drop-down menu:
-
Include deleted items
-
Include transfers of responsibility
These new check boxes are associated with the Show transaction history toggle switch, so they're only available when the toggle switch is set to Yes.

-
Fields that deal with appointment length enhanced for consistency
Fields that deal with appointment lengths have been renamed for consistency in the following areas of axiUm Ascend:
-
The Treatment Planner (Patient > Clinical > Treatment Planner) - The Duration field has been renamed to Appointment length (hh:mm).

-
The Calendar (Schedule > Calendar) - The Length field has been renamed to Length (hh:mm).

-
The Location Hours page (Settings > Location > Location Hours) - The Default appointment length (min) field has been renamed to Default appointment length (hh:mm).

Also, when you update an appointment's length by using one of these fields, the modification is applied to the other fields for consistency.
Example: You change the length of a patient's appointment to 2 hours in the Calendar. The length of that appointment in their corresponding treatment plan also updates to 2 hours automatically, and vice versa.
We have also added a (new) green notification that displays on the Treatment Planner when you change an appointment's length successfully in the Calendar.

New names for labels that deal with dates for consistency
For consistency, names of certain fields and columns have been changed throughout axiUm Ascend:
-
The Ledger (Patient > Financial > Ledger) has been updated to now display the Created On column as Modified Date.

-
The Deposit Slip Report (Home > Reports > Deposit Slip Report) has been updated to display the Service date option as Transaction date, and Last modified date as Modified date period.

Also, the date columns in the generated report now display as Transaction date.
-
The Payment Analysis report (Home > Reports > Payment Analysis) has been updated to now display the Run by filter > Service date option as Transaction date.

-
The Provider A/R Totals report (Home > Reports > Provider A/R Totals) has been updated to include a (new) Provider Totals title with a Run by modified (applied) date note.

-
The Day Sheet page (Home > Reports > Day Sheet) has been updated to now display the Created Date column as Modified Date. Also, when a transaction is revised in the Ledger, an asterisk now displays in the column.

New icon on the Inbox page
On the Inbox page (Home > Locations > Inbox), we have added a (new)  icon.
icon.

Note: If a patient's preference is set to no longer receive text messages, the icon is disabled for the patient.
The icon displays as followed based on the message's status:
-
- Read
-
 - Unread
Users can clicktap the icon to change its status to the other: read to unread or unread to read.
Refresh on provider's scheduled and actual production applied to all of their appointments
When the Calendar page (Schedule > Calendar) is set to display columns by provider and users clicktap the  icon for the displayed date, the refresh is also applied to all appointments with that provider for that day.

New security rights for insurance management
To help office managers have more control over patient insurance management (Patient > Insurance > Insurance Information), we have added the following new user role permissions (Settings > Location > User Roles):
-
Add Ins. Plan to Patient - Attach a patient to insurance, but can’t edit it after it’s been saved
-
Edit Ins. Plan for Patient - Edit the Subscriber ID and other fields on patient information on a patient’s Insurance Information page
-
Edit Ins. Benefits for Patient - Edit the deductibles met or benefits used in a patient’s Deductibles and benefits window
-
Manage Subscriber Authorizations - Select or deselect the Release of Information and Assignment of Benefits check boxes
-
Remove Ins. Plan from Patient - Remove an insurance plan from a patient
As these new security rights are only available when the Review insurance user role permission is set, users with any sort of insurance rights can view all configurations related to insurance. However, they won’t be able to make modifications except in specified areas. Any activities associated with these security rights are recorded in the Audit Log.
Improvements to patient information
Previously on the Patient Information page (Patient > General > Patient Information), the Basic Info tab > Ethnicity, Financial Status, and the Special Needs drop-down lists were set to None by default. To clarify that these fields haven't been set, we've added a (new) -Select- option, which is now the default setting. It's also a permanent list option, so users can always set the fields to -Select- whenever as desired.
Also, modifications to the configuration to these fields (Settings > Location > Custom Pick Lists) are now audited in the Audit Log as an Update or Delete. When you modify, activate, or inactive them, it's audited as an Update. When you delete them, it's audited as a Delete.
New ability to sort treatment planner by any one of its columns
Users can now sort treatment planner (Patient > Clinical > Treatment Planner) by any of the columns. You can sort it by Date, Code, Th, Surface, Description, Provider, or Amount.

Appointments' start time included in auto-generated text messages
We have included the time of the appointment to text messages that are sent when appointments are booked.

New imaging device
We have added a new imaging device to the system: direct integration for e2v sensors on macOS.
Filter missing options on the Analysis Procedure Tracking Report Builder
Issue: When users attempt to use the Analysis Procedure Tracking Report Builder with the Proc. Status filter, the filter only displays the n/a and Not Available options.
Solution: Fixed so it displays the Tx Plan, Existing, Completed, and n/a options as expected.
Incorrect payment amount on the Analysis Procedure Tracking Report Builder
Issue: When users made a modification that effects payment on a completed procedure that's already been paid, and then run the Analysis Ledger Report Builder, the generated report displays the incorrect payment amount for the modified procedure.
Solution: Fixed so the proper amount displays properly.
Comments
0 comments
Please sign in to leave a comment.