
You can edit an appointment request if it's outdated or submitted incorrectly. You can edit from two locations: the Appointment Requests page and the Calendar page.
Notes:
-
If you have the Manage Appointments security right, you can edit any appointment requests. If you do not have the security right, you can only edit your own requests.
-
You can only edit pending and approved appointment requests. You cannot edit a rejected appointment request as they are removed from the Calendar page.
To edit an appointment request
How to get there
-
From the Schedule menu, clicktap Appointment Requests.
The Appointment Requests page displays.
How to get there
-
From the Schedule menu, clicktap Calendar.
The Calendar page displays.
-
Complete one of the following:
-
On the Appointment Requests page, review the listed appointment requests.
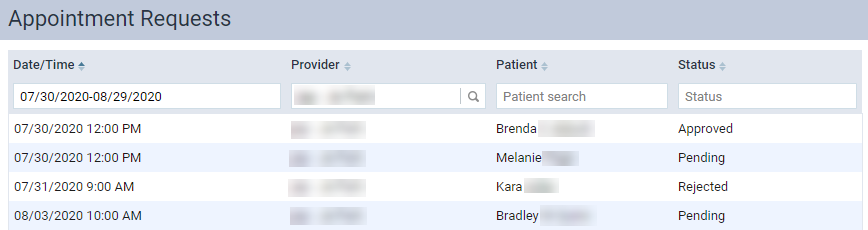
Note: The page displays a list of pending, approved, and rejected appointment requests with appointment dates within the next 30 days.
-
On the Calendar page, review the displayed schedule.

Note: Appointment requests display on the Calendar page with a cross-hatching background.
-
-
(Optional) Set the filters as necessary.
-
The Appointment Requests page.
-
ClickTap the Date/Time field and select an option to display appointment requests with appointment dates within a certain date range.
Note: By default, the list displays requests with appointment dates within the next 30 days.
-
If you selected Specific Date, select a date from the calendar that displays and clicktap Done.
-
If you selected Custom Range, select two dates from the calendar that displays and clicktap Done.
-
-
Use the Provider field to display appointment requests with a specific requestor.
-
ClickTap the Provider field and if necessary, clear the field.
-
Enter a requestor's name to narrow the list of providers and select it from the search results.
-
-
Use the Patient Search field to display appointment requests for a specific patient.
-
Enter a patient's name in the Patient Search field.
-
(Optional) Set the Include all locations toggle to On to include patients from all locations in the search results.
-
(Optional) Set the Include inactive patients toggle to On to include inactive patients in the search results.
-
(Optional) If the patient search returns too many results, clicktap Use advanced patient search for a more focused search results.
-
ClickTap the patient's name.
-
-
Use the Status field to display appointment requests with a specific status.
-
ClickTap the Status field.
-
Select the Pending and/or Approved check box.
-
ClickTap Apply Selected or clicktap anywhere outside of the generated menu.
-
-
-
-
ClickTap an appointment request.
The appointment request's Appointment Information panel displays.
-
Edit the appointment request as necessary.
Note: You can edit an appointment request like a regular appointment except for the appointment provider. You cannot change the appointment provider.
-
Save your changes according to your security rights:
-
If you do not have the ability to manage appointments, clickTap Request to update your appointment request.
-
If you have the ability to manage appointments, clicktap Save to save your changes.
-
Comments
0 comments
Please sign in to leave a comment.