
Several new feature enhancements are included in the product update released in late April 2019. The major enhancements in this release include the ability to copy treatments during treatment planning, updates to evaluations functionality, ADA procedure code updates, improvements to the Patient Portion page, the ability to add an alternate billing address and imaging updates.
Copy treatments during treatment planning
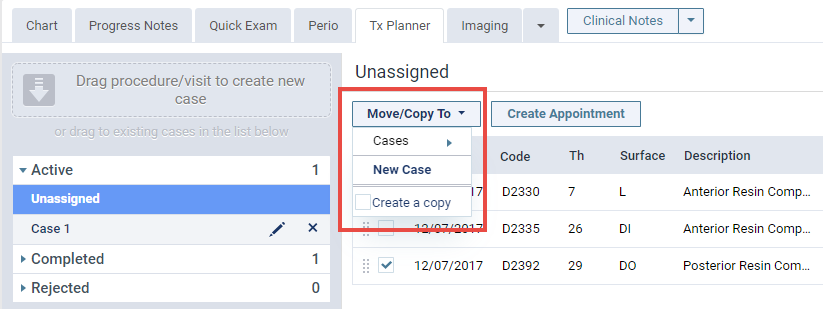
When users work with treatment plans (Patient > Clinical > Treatment Planner), the Move To button has been updated to Move/Copy To so that they can now move or copy treatments to another case. They can hover over Cases to select an existing case to move it to, click New Case to move it to a new case, or select the Create a copy check box and hover over Cases to select an existing case to copy it to or click New Case to copy it to a new case.
Notes:
-
Users can only copy procedures if they have the Create patient procedure and Manage Treatment Plan case user role permissions set.
-
A new audit log entry is created when a user copies a procedure/sets of procedures, similar to when they are entered manually via the odontogram or patient’s chart.
Evaluation forms questions default to required
When users add a question to an evaluation form (Settings > Evaluation > Evaluation Forms), the Required check box now defaults to selected. If you do not want the question to be set as required, you can deselect the Required check box.
View faculty names on completed evaluation forms
If a user with the correct permissions set opens a completed evaluation form, the form displays the name of the faculty member(s) that evaluated the student above the assigned grades and next to any comments the faculty member added to the form.
This behavior is controlled by a new View Contributer Names user role permission now listed under the Academic Evaluations Security Category (Settings > Location > User Roles).
Exit Workflow Compliance report
A new Workflow Compliance Report is now available from the Home menu. This report provides a summary of the success or failure rate for all tasks that were required within a selected time frame.

Notes:
-
The report only includes required tasks that are not yet complete.
Example: If you already have a phone number and an email address for the patient, those tasks are not required at walkout and not included in the report.
-
The report uses Succeeded or Failed to describe whether a required task was completed to avoid overusing Completed, which has other meanings when talking about appointments. Success indicates that all tasks were completed before the appointment was set as Complete, and Fail indicates that a task was not completed and a reason was provided—meaning the Track appointment tasks and require reasons for incomplete tasks feature is turned on.
-
The report may be filtered multiple ways to examine data from different aspects.
-
You can click the arrows to expand a category and drill down in the report. Where Other reasons were provided, you can hover over the text to see the complete message.
-
Access to the report is controlled by a new Schedule/recare reports user role permission.
Schedule Recare task required only for primary types
The exit workflow has been improved. The routing panel's Schedule Recare task is now required only for recare types that have the Primary Recare Type field set in the Recare Setup page (Settings > Patient Care > Recare).
Example: Most offices will set the PROPHY type as required as well as other types performed frequently.
Day Sheet results may display on multiple pages
The Day Sheet report (Home > Reports > Day Sheet) now displays the first 500 ledger transactions by default. If there are more than 500 ledger transactions, a Show next 500 rows link displays and indicates both the row numbers you are currently looking at and how many rows there are in total.
Example: 500/5772
Email updates only send when user accounts are updated
Automatic emails are no longer sent out to users when a user role has been updated. Automatic emails are sent out to users when their user account has been updated.
New Payer ID search functionality for insurance carriers
In the Insurance Carriers page (Home > Insurance > Carriers), you can now use the search field to search by Payer ID, allowing you to locate all plans associated to a particular carrier and Payer ID.
CDT 2019 update
Changes to procedure codes were released by the ADA and took effect on January 1, 2019. The procedure codes in axiUm Ascend have been adjusted accordingly to prevent fewer claim rejections and encourage quick reimbursement.
Change summary:
New Updated Inactivated
D0412 D5282 D9944 D5630 D1515
D1516 D5283 D9945 D9219 D1525
D1517 D5876 D9946 D5281
D1526 D9130 D9961 D9940
D1527 D9613 D9990
Codes that are no longer supported no longer show up in search results.
Note: If an inactivated code is attached to an outstanding claim, it will remain in place—the change will not affect existing claims.
Quick Exam indicates selected surfaces
When using Quick Exam (Patient > Clinical > Quick Exam), any selected surfaces are highlighted when you specify a condition, existing work, or treatment-planned procedure.

Updates to the Patient Portion page
On the Ledger page (Patient > Financial > Ledger), the Patient Portion amount hyperlink opens the Patient Portion page. When opened, the Patient Portion page now displays a Summary View tab and a Detailed View tab.
Notes:
-
The Patient Portion page defaults to the Summary View tab.
-
If you are viewing the Ledger page with the guarantor view when you clicktap the Patient Portion amount, the Guarantor Portion page opens instead of the Patient Portion page.
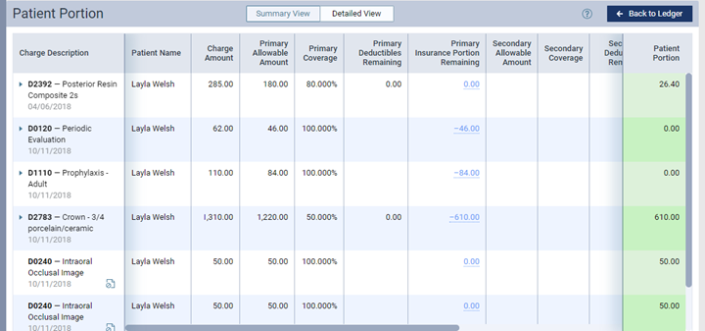
When you clicktap the Detailed View tab, three levels of additional information become available.
-
Additional columns, including the coverage percentage, allowable amount, insurance portion, credit adjustments, etc. display details for both primary and secondary insurance, if applicable.

-
Next to each charge, you can clicktap an arrow to expand the row and list any payments or adjustments made to that procedure.

-
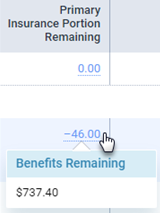
Next to any hyperlinked amounts, you can clicktap the hyperlink to review additional information about coverage exceptions, insurance overrides, or benefits remaining. It will also tell you whether Bill to Insurance has been turned off.
The Patient Portion page can be opened for the patient or the guarantor. When you open the page from the Guarantor view, the explanations include all patients for which the guarantor is responsible.
Note: The icons and color scheme used on the Ledger page are also used on the Patient Portion page.
Add any procedure code to claims
Previously, you could attach only procedure codes recognized by the ADA as official CDT codes to claims. You can now add any procedure code in your system to a claim.
For Federally Qualified Health Centers (FQHCs) this might represent a rate code required to identify a claim as being part of a specific type of Medicaid agreement. Some insurance companies may cover certain types of intraoral appliances.
Example: A specific type of toothbrush or prescription toothpastes, most of which don’t have a standard ADA procedure code associated with them.
Note: axiUm Ascend will still warn you when a procedure code is not part of the ADA standard, but allows the procedure to be included in a claim.
Disclaimers moved
The billing statement disclaimer message no longer displays at the bottom of the statement on the Disclaimers page (Settings > Location > Disclaimers). Disclaimer messages are now available only from the Billing Statements page (Home > Reports > Billing Statements) in the Statement message section of the Generate Billing Statements window.
Alternate billing address
From the Location Information page (Settings > Location > Location Information) you can now clicktap the new Billing Statements tab set an additional address which is not the location address.

When set, the alternate billing address applies to bulk-generated billing statements, statements printed for individuals, and patient walkout statements.
In this same tab, you may also now set the Add to Patient Connection toggle to a default selection that applies to all places where it displays.
Note: You can still modify the Add to Patient Connection toggle manually in other places in axiUm Ascend.
Imaging updates
The Import Image tool now defaults to select Existing Procedures on import.
In addition to all previous sensors, axiUm Ascend now supports the following sensors:
-
Hamamatsu
-
LED Dental Tuxedo
-
Apex Dental Sensors
-
Video Dental Concepts QuickRay HD
Note: For the full list of imaging acquisition devices supported by axiUm Ascend, see Supported imaging acquisition devices.
Location provider displays when not applicable
Issue: When a location has its Use this location as a claim provider for insurance toggle set to Yes, the location provider still displays in the Providers search results list when users add a procedure or edit a condition.
Solution: Fixed so that if a location has its Use this location as a claim provider for insurance toggle set to Yes, the location provider can only be used as claim provider for insurance, as expected.
Search field for Operatory Groups does not behave as expected
Issue: When adding operatories to an operatory group, the search field behaves incorrectly. A Providers watermark displays inside the Add Operatory field, the search results list displays automatically, and the X icon displays outside the search field.
Solution: Fixed so that the watermark displays Operatories and search field behaves as expected.
Scroll bar does not display on Tx Planner tab
Issue: When users select a patient and open the Tx Planner tab, the scroll bar does not display and they cannot view all treatment.
Solution: Fixed so that the scroll bar displays as expected.
Comments
0 comments
Please sign in to leave a comment.