
New features and existing feature enhancements are included in the product update released in June 2018. The major enhancements in this release include new inactive email functionality; a SNODENT-standardized list of clinical conditions and the ability to create a favorites list out of them; the ability to create custom procedure code presets for the Aged Receivables report; multiple additions to the Imaging module; the ability to define your corporate entity as a billing provider; the ability to skip forward quickly through the Calendar; and reports access rights have become more granular.
Inactive email functionality added
From Patient > Patient Information, an indicator now displays next to the Email field if the email is inactive.

You can click the indicator to display a Warning window.
From Home > Billing Statements, the same indicator also displays next to the patient name if the email is invalid. You can click the indicator to display additional information, such as when a statement was last sent.
The Statement Delivery Charge Notification window has also been updated to include a warning that the patient will not be sent their billing statement if the delivery method is set to Email and their email address is inactive.
Increased chart number character limit
Chart numbers in the Patient Information page are no longer limited to eight alphanumeric characters.When you import or manually create a chart number, the maximum length is now ten characters, and special characters “.” (period) and “-” (dash) are allowed.
New Conditions tab and improved conditions functionality
Under the Settings menu, the Procedure Codes item is now titled Procedure Codes & Conditions.

When you open the page, a new Conditions tab displays.

The original list of patient conditions created by Henry Schein has been replaced with standard SNODENT condition codes.
Example: Impacted mesial or distal conditions are now “impacted tooth (disorder)” with either a mesial or distal surface; open contact conditions are now “lack of interproximal tooth contact”, again with surfaces.
Along with this new set of conditions, we added new icons and charting symbols.
Note: The conditions are available in both the Chart and Quick Exam pages.

-
As with procedure codes, you can enter the condition code or description in the Search field, and the results filter as you type.
-
The proper SNODENT code for “watch tooth” is “delay treatment”, but “watch” is included in the description because it is a common term.
-
An “excessive tooth mobility” condition is included.
-
You can click a star icon to add the condition to the Favorites list for the Chart or Quick Exam tabs. Note: The Favorites list is shared by the entire organization.
-
You cannot create or add a custom condition to the list. You can click edit a condition, but only the description can be modified.
-
In the Chart and Quick Exam tabs, the list in the Conditions column is based on Favorites. Click the Search icon to enter and list a condition.

Updates to the estimates in the Treatment Planner and Ledger
Treatment Planner insurance estimates have also been updated to work the same as the Ledger estimates, and to include today’s procedures in the estimates.
Changes to dentition
Dentition is no longer considered a “condition”; it is just a graphical representation. Primary
( ) and Permanent (
 ) buttons that represent primary and permanent teeth have been added to the Chart and to Quick Exam tabs. To change dentition, select the tooth or teeth and click the correct button. If no teeth are selected, the whole mouth changes dentition.
Improved Calendar functionality
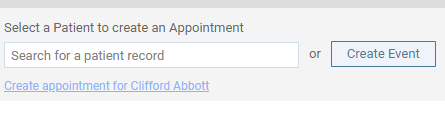
From the Calendar page, you can now click an available opening and quickly create an appointment for the currently selected patient.
There are new Quick Advance buttons at the top of the calendar:

-
The Today, Day Forward, Day Back buttons, and the pick calendar drop-down, have been moved to the left and center of the Calendar.
-
The date you are currently viewing has moved to the line below the buttons.
-
The 1 w button moves you forward by one week.
-
The 1 m button moves you forward by one month. This is a calendar month rather than 28 or 30 days, so if today is the twelfth and you move forward a month, you are on the twelfth again.
-
The 6 m button moves you forward by six months.
The calendar icon is now the date drop-down in the middle of the button set:

A new View filter has been added. You can click the View drop-down and set the Show only business days toggle so the Calendar doesn't display days which are not part of your location hours (as configured in Settings > Location Hours) and when you use Quick Advance buttons to move dates, and the calendar date falls on a date you are closed, the Calendar actually goes to the next business day after that.

Note: This toggle is workstation-specific.
Improved reporting functionality
Aged Receivables Report
You can now create your own custom procedure code presets lists for the Aged Receivables Report.
From the Home menu > Reports > Aged Receivables Report, you can create a preset from the Procedures drop-down.

The Aged Receivables Report has an additional enhancement. In the Totals section, the guarantor portion percentage is now calculated and displays the actual amount rather than a truncated amount in blue underlined text.

Outstanding Claims Report
The Outstanding Claims report has also been updated to include the subscriber and patient date of birth. The user interface was also enhanced and made more consistent with other Ascend pages.
Audit Log
The Audit Log has been updated to be more verbose when reporting a change to user roles. It now includes both the “before” list of rights and the “after” or new list of user rights.
Provider Account Receivables Report
The Provider Account Receivables report is now located in the standardized reports section under the Home menu with the name Provider A/R Totals. The report now includes providers with no transactions or a zero balance in the date range, as long as they have a beginning balance.
The Provider A/R Totals Report shows how effective your collection efforts are. From this report, you can view total accounts receivable, total production, total collections, and a ratio of collections to production.
Tip: You should run this report and review it with your staff at least once a month. Some consultants suggest running this report weekly or daily.
Day Sheet General Report
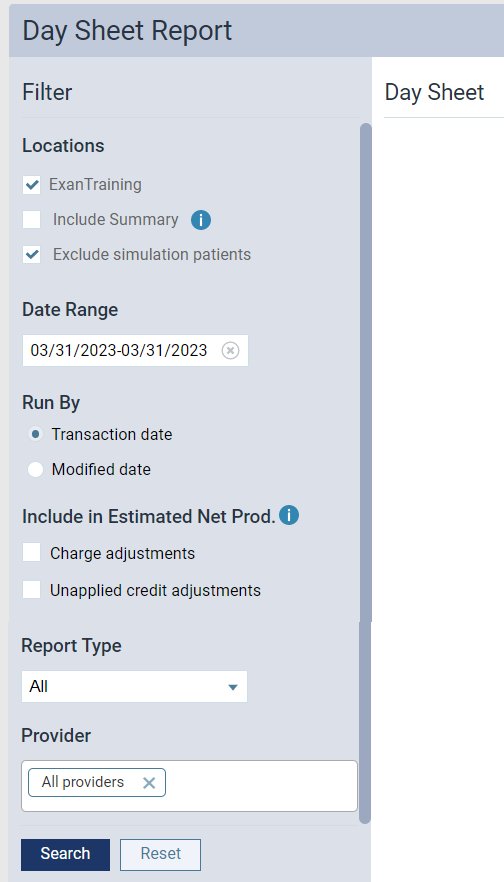
The Day Sheet General report has been removed from the Power Reporting module. The Day Sheet itself (under the Home menu) now allows you to select multiple providers before running the report. Select the providers from the drop-down or by entering the name. The report now sorts alphabetically by provider last name.
Report Categories Added
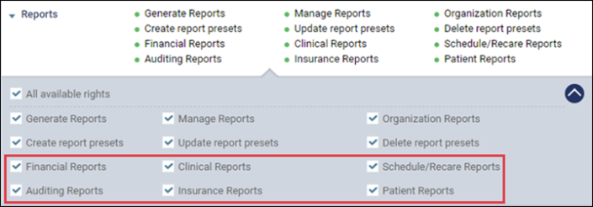
Administrators now have greater control over which reports the different roles in the practice have access to. Previously, Generate Reports rights gave access to all the reports available within Ascend. Anyone with Generate Reports access continues to have access to all report categories; however, the administrator can revisit the user roles and turn off access to selected categories.
Reports have been grouped into six categories. All reports—both those in Power Reporting and those under the Home menu—are now associated with a category. This chart outlines the categories and the reports grouped within them:

The categories in Power Reporting have been regrouped to match the access rights categories:

The Schedule and Recare categories are now one and the reports in the HSPA category are now part of the Financial category.
If you have saved power reports, they are assigned within the new category system based on the report builder originally used to create the report.
Example: A report created using a Treatment Plan report builder is in the Clinical reports category.
If you have previously saved reports and your office administrator removes your right to view the associated report category, the reports are still saved, but you cannot open them.
Access to selected report categories is limited through two new rows in the User Roles page > Reports security category.
Note: If users attempt to access a report they do not have rights for, an Access Denied message displays. Within Power Reporting, reports that they do not have access to appear grayed out.
Improved Patient Search functionality
When you log in to axiUm Ascend, the cursor now defaults in the Patient Search bar. You no longer have to click in the bar manually.
Improved Location labels and icons
There is no longer a difference between single and multi-site locations; any area where a location may be selected from a drop-down, behaves the same.
Location icons ( ) have been removed where they don’t add useful information. They no longer appear in single site locations. For multi-site locations, they appear only when a transaction or appointment is in a location other than the currently-selected site. You see a location icon only when something is at another location, making pages easier to read.
Improved email functionality
You can now change your email address without admin assistance. From the [your name] menu > My Account, you can change your email address.
Note: If wanted, you can still change your email address using admin assistance.
Improved imaging functionality
A variety of imaging functionality improvements have been introduced.
-
Added the RealCloud HD1 intraoral camera to the acquisition device list.
-
The Imaging module is now better integrated with the patient chart. You can use the patient’s current dentition in the chart to represent primary, permanent or mixed dentition in Imaging.

-
Image Peek and Image Age functionalities now allow you to quickly view an image for a specific tooth directly from the Chart and the Quick Exam tabs. The chart now has indicators that display teeth have an associated image, and the approximate age of the image. The Image Peek button becomes active when you select a tooth with an image. Note that the button appears as a tooth icon for small resolution screens.
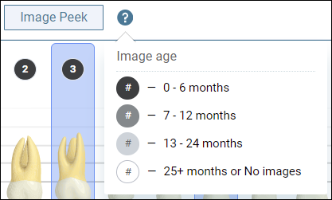
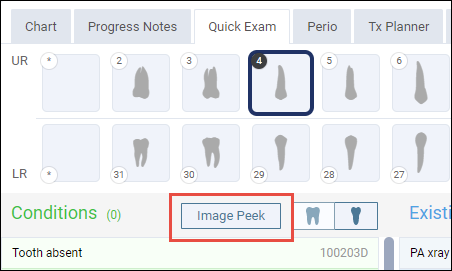
The Primary and Permanent buttons and accompanying legend behave as they do in the Chart tab.
-
Added a PA Quick Acquire drop-down option to the Patient menu > Clinical menu > Imaging tab. This allows you to quickly take a PA image from the Chart.

-
Select an image in Template or Exam view by clicking on the image.
New billing and insurance functionality
You can now define and assign your corporation as a billing provider entity.
Note: This is especially useful if your insurance billing entity (Type 2 NPI) goes by a different name than your location.
From the Settings menu > Location Information, select the Use this location as a claim provider for insurance toggle to open a new Claim Provider tab with an Add Billing Entity button. This allows you to complete the corporate name, address, and phone number and auto-populate the ADA form fields 48 and 52.

From the Settings menu > Insurance Defaults, you can use this new entity. Under the Billing Provider section, click the Specific Provider drop-down, and select the new corporate entity.
Note: This point sets the corporate entity as the default billing provider.
Updated patient messaging functionality
You can now control which confirmation text messages your patients receive when an appointment is booked. You can keep both text messages turned on, turn off one of the text messages, or turn off both.
Note: This change has no effect on email confirmation messages.
When you open the Patient Communications Appointment page, you see both an appointment confirmation text message and an Appt confirmed message:

You can click the text message icon ( ) to display the message: “This is a non-editable automated message, which is sent immediately after the appointment is confirmed.” You can set the toggle to On or Off.
You can set up one of four possible configurations for appointment confirmation text messages, including one in which no confirmation text is sent at all:

Comments
0 comments
Please sign in to leave a comment.