
Many new feature enhancements and several bug fixes are included in the product update released in late August 2024.
Note: The content in this release will be available in PROD on August 24, 2024.
The major enhancements in this release include the following:
Several bug fixes are also included in this release.
Evaluations
Completion date for evaluations
A Completed on date now displays on evaluations to indicate when they were completed.
Note: Evaluations are considered complete when all required questions have been answered by the required number of evaluators.
The Completed on date can be viewed by both faculty and students:
-
Faculty users can view the date when they view or edit a completed evaluation, or when they view the evaluation from the Academic Progress page > Proficiency Progress, Procedure Counts, or Student Performance tab.
-
Student users can view the date when they view a completed evaluation from the Student Evaluations page > Complete tab or the Academic Progress for Students page.

Note: If a user edits the evaluation after it has been completed, the Modified on date will display a later date than the Completed on date.
Ability to edit submitted evaluations
When working with evaluation forms (Academic > Faculty Evaluations), faculty can now edit their submitted evaluations that display under the Recent Completed Evaluations view using a (new) ellipsis button and Edit option. Users can modify patient complexity values, answers, and comments as necessary before clicking Submit.
Note: If faculty edit an answer in a completed evaluation that changes the pass/fail result of the evaluation, two rows may display for the evaluation in the Analysis Evaluations Report Builder (accessed from Home > Reports > Power Reporting).

Notes:
-
Users cannot edit patient complexity values, answers, and/or comments added by another evaluator.
-
Users cannot edit cancelled evaluations.
-
Once edited, the evaluation displays the last edited date in the Modified on field. However, the Completed on Date does not change.
Important: Users cannot change the type of evaluation and, once an evaluation is complete, users cannot remove their answers to change back to New or In Progress status.
Tip: If necessary, users can cancel their edits.
Ability to edit procedures on multi-visit competency evaluations
When working with multi-visit competency evaluations (Academic > Faculty Evaluations), faculty users can now edit the attached procedure codes to add or delete codes as necessary.
Notes:
-
As part of this change, procedure codes are no longer listed under evaluation requests in the evaluation list view.
-
If a procedure code is edited in an evaluation, two rows may display for the evaluation in the Pending Evaluation Status Report Builder (accessed from Home > Reports > Power Reporting).

Important: Any procedure code changes are automatically saved.
Note: Procedure codes cannot be edited if any of the following are true:
-
The evaluation is complete or cancelled. However, procedure codes can still be edited for submitted multi-visit evaluations that are not yet complete.
-
The evaluation has procedure-specific questions.
Ability to view faculty grades/comments for evaluations
Users can now view another faculty member’s saved and/or submitted grades and comments when completing a single visit evaluation or continuing a multi-visit evaluation (Academic > Faculty Evaluations > Create New Evaluation button). As different faculty may supervise the student throughout their visits, this allows faculty to check the student’s progress and continue from where previous evaluators finished.
As part of these changes, we have renamed the View Other Evaluator’s Unsubmitted Grades security right to View Other Evaluator’s Grades. This security right now allows users to view another evaluator’s submitted and unsubmitted grades and comments.
Note: This security right does not impact faculty members’ ability to view evaluations completed by other faculty from the Faculty Evaluations page.
Tip: Institutions that do not want to be influenced by other faculty evaluations can remove access to the View Other Evaluator’s Grades security right.

Default grades for grading schemes
When configuring grading schemes for evaluation forms (Settings > Academic > Grading Schemes), users can now set a default grade for each grading scheme.
Note: Default grades can be used for both pass/fail and demerit types.
-
To set a default grade, users can select a grading scheme and select a (new) Default radio button next to one of the listed grades.

Tip: To not use any default grade, click the (new) Clear Default Grade option.
-
To determine if an evaluation form will use default grading scheme values, users can select an evaluation form and select the (new) Use grading scheme default checkbox.

Once configured, when an evaluation form is opened and completed, it defaults to the set value of the grading scheme associated with each question.
Note: If an evaluation form is configured to use default grading scheme values but a default value was not defined in the grading scheme, any questions set to that grading scheme do not display default values.
Important: Users can still modify grades as necessary when completing evaluation forms.
New date range filter for student Academic Progress
We have added a (new) Completion Date filter to the Academic Progress page (Academic > Student Progress) that allows faculty users to filter student progress by a specified date range.
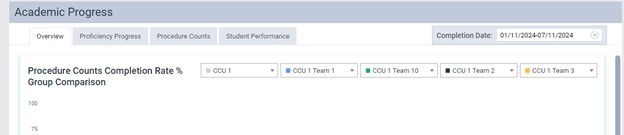
When the filter is set, all progress data such as procedure counts and % of completion rate are recalculated based on the evaluation completion date.
Notes:
-
Evaluations are considered complete when all required questions have been answered by the required number of evaluators.
-
The set date range is maintained across all tabs on the Academic Progress page.
-
The default date range is the previous 6 months.
Sessional evaluation requests no longer auto-created
Ascend Academic no longer auto-creates sessional evaluation requests when a student procedure is approved.
Important: This change has no impact on manual evaluation request creation. Users can continue to create sessional and competency evaluation requests manually as part of their usual workflow.
Patients
New Emergency Contact information section
We have added a (new) Emergency Contact section to the Patient Information page (Patient > Patient Information) that allows users to include an emergency contact on the patient record.
The (new) fields include First name, Last name, Phone type, Phone number, and Relationship to patient.
Note: The (new) Emergency Contact section does not display for simulation patients.

Imaging
RCI updated to version 113.1
The RCI version has been updated to 113.1.
Important: Users must update their acquisition agent.
Updates to acquisition agent
A variety of changes have been made to the acquisition agent:
-
Multiple users are now supported for Windows OS.
Windows users can now access the acquisition agent even if another Windows user is still signed in on the same computer. Each time a Windows user signs in, the acquisition agent restarts.
Note: macOS does not support this functionality yet.
-
Users can now send patient IDs when VistaScan is used to acquire images.
A (new) Send Patient ID checkbox allows users to specify whether to send the patient ID in a job file when VistaScan is used to acquire images.
To include patient IDs, users can right-click the acquisition agent icon, select Preferences, click the Phosphor Plate tab, and select the (new) Send Patient ID checkbox.

-
Reorganized the list of device names in the acquisition agent Preferences window.
The devices in the various Device lists on the General, TWAIN, and Filters tabs are now sorted alphabetically. The reorganized lists include the following:
-
General tab > Grayscale JPEG Compression section > Device field
-
General tab > Alternate Button Workflow section > Device field
-
TWAIN tab > Twain Categories section > Device field
-
Filters tab > Acquisition Filters section > Device field
-
-
Sharpness settings were added to the acquisition agent for the Supreme and Velocity family of sensors, which use the new Sirona IOSS SDK.
To customize the Sirona sharpness settings, users can right-click the acquisition agent icon, select Preferences, and click the Filters tab. Under the (new) Sirona Filter section, users can configure the Supreme family of sensors or the AE (Velocity) family of sensors.

-
Users can now enable/disable simulation devices.
A (new) Enable simulation devices checkbox allows users to enable or disable simulation devices.
Notes:
-
With this update, simulation devices are disabled by default.
-
macOS does not support this functionality yet.
To enable/disable simulation devices, users can right-click the acquisition agent icon, select Preferences, click the General tab, and select/deselect the (new) Enable simulation devices checkbox as necessary.

-
Update to Delete rejected image checkbox
When users recapture an image, the Delete rejected image checkbox is now deselected by default in the Select Image window.

Ability to align/size placeholders in custom imaging procedures
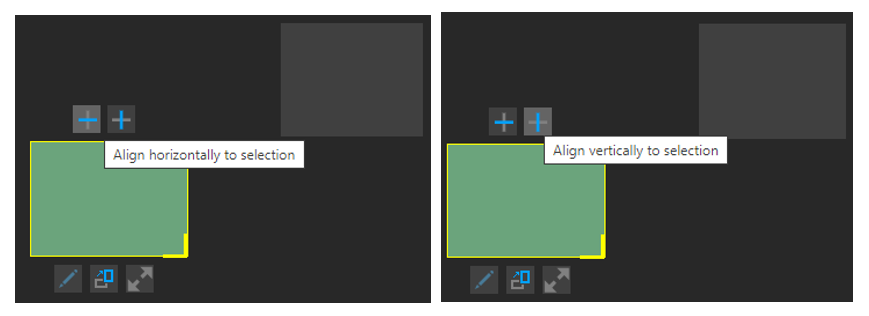
We have added (new) options that allow users to align and size placeholders in their custom imaging procedures. When users create a custom imaging procedure (Patient > Clinical > Imaging > Acquire Images) and select a placeholder, several (new) buttons display:
-
Two (new) Align horizontally to selection and Align vertically to selection buttons display above and allow users to align the box horizontally or vertically with another placeholder.
-
A (new) Resize to selection button displays below the selected placeholder that allows users to resize the box to match another placeholder.

To make either change, users must click the button and select another placeholder before the first placeholder will be updated.
New Category and Patient filters for image recovery
We have added (new) Category and Patient filters that allow you to filter recoverable images by category and patient.
When recovering images (Patient > Clinical > Imaging > Show Image History > Recover Images), users can now set the (new) filters to quickly locate images.
The (new) Category filter can be set to one of the following:
-
Current Image Category
-
All Image Categories
The (new) Patient filter can be set to one of the following:
-
Current Patient
-
All Patients
Note: Current Image Category and Current Patient are the default settings for the (new) filters.

Ability to view image file details
When working with acquired images (Patient > Clinical > Imaging), users can now view a variety of details about the image file. This includes the following:
-
Image Source - Indicates the imaging device name or the sensor the image originated from. It may include the specific model of the sensor (if known) or whether the image was imported.
-
Image Acquisition Date - Indicates the date the image was acquired.
-
Image Resolution - Indicates the image’s width and height.
-
Category - Indicates the image category.
-
Rotation - Indicates any rotations applied to the image.
-
Color/Grayscale - Indicates whether the image is in color or grayscale.
-
Transformations - Indicates any transformations applied to the image.
-
Brightness - Indicates any brightness changes.
-
Contrast - Indicates any contrast changes.
-
Image Format - Indicates the image format.
-
Adjusted Pixel Size - Indicates the adjusted pixel size.
-
Base Pixel Size - Indicates the base pixel size.

To view the image details, open an image, click the Edit tooth numbers  icon to display the Assign Tooth Numbers window, and click the (new) Image Details link.

Updates to Bitewing Two Images exam
The Bitewing Two Images exam now offers three templates:
-
2BW Center
-
2BW Left
-
2BW Right
Additionally, the acquisition selection now works like Full Mouth, where the user can choose FMX18/FMX21.

Update to Set Top Image icon
The Set Top Image  icon has been moved from the image header to the Assign Tooth Numbers window (accessed from the Edit tooth numbers icon). The icon has been refreshed as the Set as Top Image button.

New Show All Findings in Videa AI link
A (new) Show All Findings in Videa AI link is now available. When users access the image viewer and click the (new) link in Ascend Academic Imaging, they are automatically logged into the Videa Health website and can review the listed AI findings. While reviewing, they can easily click the applicable icon to confirm, reject, or monitor the listed AI findings.
Tip: If they see a finding that Videa AI missed, they can also click Create Findings to manually add the finding.
Note: Access to Videa Health’s website is included in your Ascend Detect AI subscription.


Number of images added to header
When working with acquired images (Patient > Clinical > Imaging), users can now view the number of images in the header above an image. The header now displays Image: x of y, where ‘x’ is the current image and ‘y’ is the total in the stack to indicate the current position within an image stack.

New image list count
When working with acquired images (Patient > Clinical > Imaging), users can now view a count of images for each exam, including those within image stacks. This provides a more accurate overview of available images for review.
Note: This count excludes deleted images.

Reorganized imaging device list
The list of acquisition devices that display when acquiring images has been reorganized.
Depending on the type of image being acquired, direct devices, software devices (bridges), and/or TWAIN devices may display in the list.
If enabled, any simulation options display first in alphabetical order. Any import options display second in alphabetical order. Any sensors or machines display third in alphabetical order. Any phosphor plate scanners display last in alphabetical order.
Updates to supported imaging devices
The following changes to imaging devices are now supported in Ascend Academic and have been added to the Available Devices menu for acquiring images:
-
A2Z Imaging Duo sensors - These are now supported directly for intraoral X-ray acquisitions for computers running Windows.
-
Carestream CS7600 phosphor plate scanners - These are now supported directly for phosphor plate acquisitions for computers running Windows.
-
Acteon Sopix Gen 2 intraoral sensors - These are now supported for intraoral X-ray acquisitions for computers running Windows and Mac.
-
Gendex CBCT machines - These are now supported through the VixWin software bridge for 3D volumes for computers running Windows.
-
Handy intraoral sensors - These are now supported directly for intraoral X-ray acquisitions for computers running Windows.
-
Kavo extraoral devices - These are now supported for extraoral X-ray acquisitions for computers running Windows.
-
Kavo devices - These are now supported for extraoral X-ray acquisitions (Cephalometric procedure).
-
Sirona / Schick - The device names have been updated. They are now as follows:
-
Schick 33 / Xios XG
-
Schick CDR / Elite
-
Sirona / Schick USB 3 / AE
-
-
Sirona / Schick USB 3 / AE -These now offer additional filtering options during image acquisition and save the last used filter option selected
-
Sirona intraoral sensors - Schick/Sirona Xios and 33/Elite sensors are now supported for intraoral X-ray acquisitions for computers running Windows using the new Sirona IOSS SDK.
-
Vatech intraoral X-ray sensors - These are now supported directly for intraoral X-ray acquisitions for computers running Windows.
-
iTero/Align Bidirectional Software Bridge - This is now supported for 2D and CAD/CAM image acquisitions.
-
Acteon AIS Software Bridge - This is now supported for 3D volume acquisitions.
Bug Fixes
Issue when exporting the Monthly Patient List Extraction interactive report
Issue: The Monthly Patient List Extraction interactive report does not export the full list of active patients and may generate a message indicating incorrectly that the report has reached the maximum number of rows.
Solution: Fixed so that the report exports the full list of active patients, as expected.
Custom forms added to Ascend Academic cannot be edited
Issue: Users cannot edit custom forms that have been added to Ascend Academic.
Solution: Fixed so that custom forms can be edited.
Prompt to submit evaluation as multi-visit displays incorrectly
Issue: When a user completes all required questions for a multi-visit evaluation and clicks Submit, a prompt to submit as multi-visit may display.
Solution: Fixed so that Ascend checks all required questions on evaluations, and the prompt to submit as multi-visit only displays if the evaluation has incomplete required questions, as expected.
Locations may be unable to edit operatories or create new operatories
Issue: Locations may receive an error when editing or adding operatories if all operatories are associated with individual calendar events.
Solution: Fixed so that operatories can be edited and created, as expected.
Comments
0 comments
Please sign in to leave a comment.