
Many new feature enhancements are included in the product update released in early-December 2023. The major enhancements in this release include the following:
-
Patient Information
-
Scheduling
-
Clinical
-
Evaluations
-
Usability
-
Imaging
-
Financial
-
Insurance
-
Reporting
Important: Enhancements from this release will be available in PROD on December 02, 2023.
Note: As of December 2023, the release versioning has been changed.
Patient Information
Improvements to patient emails
We have made several improvements to patient email functionality on the Patient Information page (Patient > General > Patient Information):
-
New duplicate email address alert
A (new) alert now displays if users save a duplicate email address on the Basic Info tab. If displayed, users can click the alert icon to see whose email has been duplicated and a link to that person.
Important: There are common cases in which patients may share the same primary contact and therefore will have the same email address.
Example: Family or group situations.

Tip: The alert also displays on the routing panel.
Notes:
-
This warning does not prevent users from entering duplicate email addresses, if wanted.
-
The alert displays only when users first save a duplicate email.
-
-
New Add Patient Email button
Staff can now use a (new) Add Patient Email button to add an additional email to patient records that have a primary contact other than themselves. The (new) button displays on the Basic tab, under the Email field.
Tip: The button also displays on the Contact Info tab when users update a patient’s appointment on the Calendar page (Schedule > Calendar).

Note: The button only displays if another person is set as the patient’s primary contact.
Example: If the Related Patients tab > Household section > Primary Contact is set to Self, the patient is their own primary contact and the button does not display.
Important: This email address is for reference only and will not be used to reach out to the patient through the automated Patient Communications system. Users can, however, copy and paste the address into an email sent from their practice’s email service provider for other communications.
-
New missing email alert
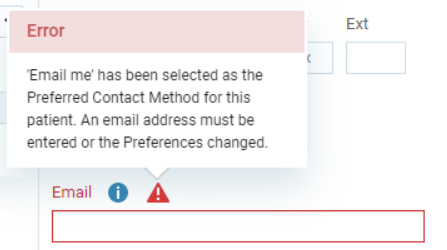
If a user removes a primary contact’s email address from the Basic Info tab after having set the primary contact’s Preferences tab > Preferred Contact Method field to Email me, a (new) Error alert displays when the user attempts to save the change.
Note: The alert also displays if the user removes the primary contact’s email address from the patient’s appointment on the Calendar page (Schedule > Calendar).
The user must enter an email address or change the contact preferences before they can save their changes.
Updated text message warning
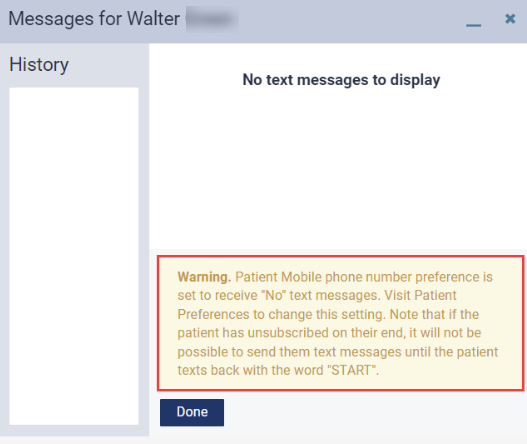
An updated warning message displays if a patient prefers not to be contacted via text messaging and a user attempts to send a text message. The message reminds the user that the patient’s mobile phone number preference is set to receive no text messages.
Note: Text messaging preferences are controlled from the Patient Information page (Patient > General > Patient Information) > Preferences tab > Text Messages section > Yes/No radio buttons.
Scheduling
Patient age displays on appointment card
The patient’s age now displays by default on their appointment card.

Tips:
-
If users want to hide patient ages, they can click the View menu and set the (new) Hide patient ages toggle to On.
-
If the patient ages are hidden, users can click and hold the
 icon to temporarily view the ages.
Update to automated appointment reminder logic
Ascend Academic is required to be compliant with the Telephone Consumer Protection Act (TCPA). As part of this compliance, automated appointment reminders cannot be sent out to patients between 9:01 pm and 7:59 am local time. Any Appointment Start Date and Time reminders scheduled to go out between 9:00 pm and 8:00 am local time will be delivered to patients at 9:00 pm. All other reminders scheduled to go out between 9:00 pm and 11:59 pm will be delivered at 9:00 pm, and all other reminders scheduled from 12:00 am to 8:00 am will be delivered at 8:00 am.

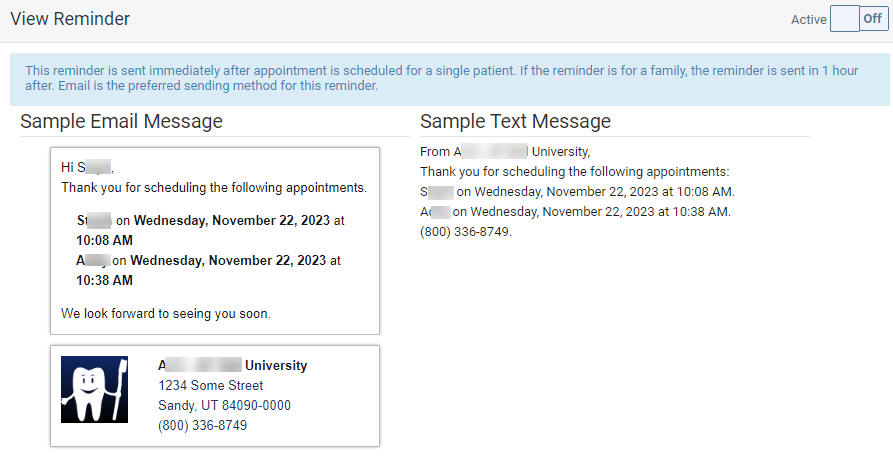
Improvement to text message appointment reminders
Text message appointment reminders now include the specific appointment time for each family member listed on the reminder.
Update to schedule event
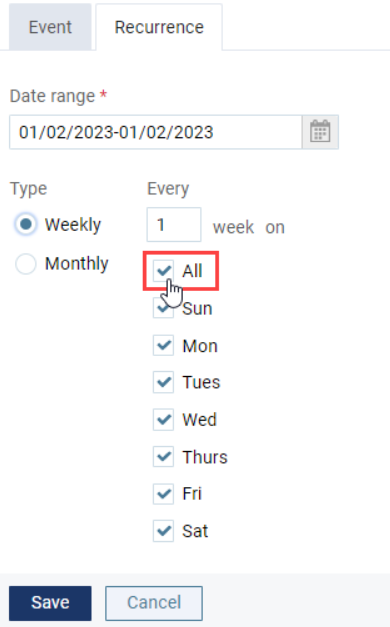
When scheduling a weekly reoccurring event in the Calendar (Schedule > Calendar), a (new) All check box is now available on the Recurrence tab. When selected, all the days of the week are selected.
Clinical
Improvements to Clinical Note Tasks report
We have made several improvements to the Clinical Note Task report (Home > Reports > Clinical Note Tasks):
-
New Generate Clinical Note Tasks report notification
When generating the report, if users select dates spanning more than 30 days, or select multiple locations, a (new) notification displays and warns that the report may take more time to generate. Users can click Generate to generate the report or click Cancel to generate the report later when they have more time.
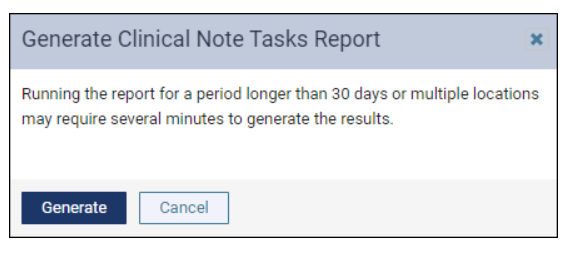
When users click Generate, a Please wait, the report is loading… message displays while the report generates.
-
New Clinical Note Tasks window
After generating the report, users can now click a provider name to display a (new) Clinical Note Tasks window and view the clinical notes for that provider.
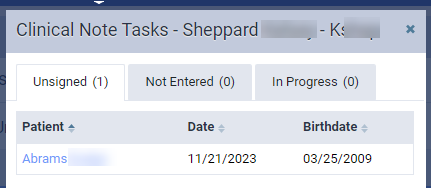
The clinical notes are grouped by status (Unsigned, Not Entered, and In Progress) and separated into tabs. Users can see the number of clinical notes and click each tab to see a list of the provider’s patients who have notes with that status. This includes the patient’s name, date of the clinical note, and patient’s birth date. When necessary, users can sort the list by any column.
Note: By default, the list is sorted by patient last name.
Users can click a patient’s name to open the patient’s Progress Notes page in a new tab, allowing them to review the progress notes and sign, enter, or complete the clinical note.
-
Improved locations filter on Clinical Note Tasks report
When generating the report, staff can now use a (new) Search field with the Locations filter to quickly enter and select location names.

-
Ability to print the Clinical Note Tasks report
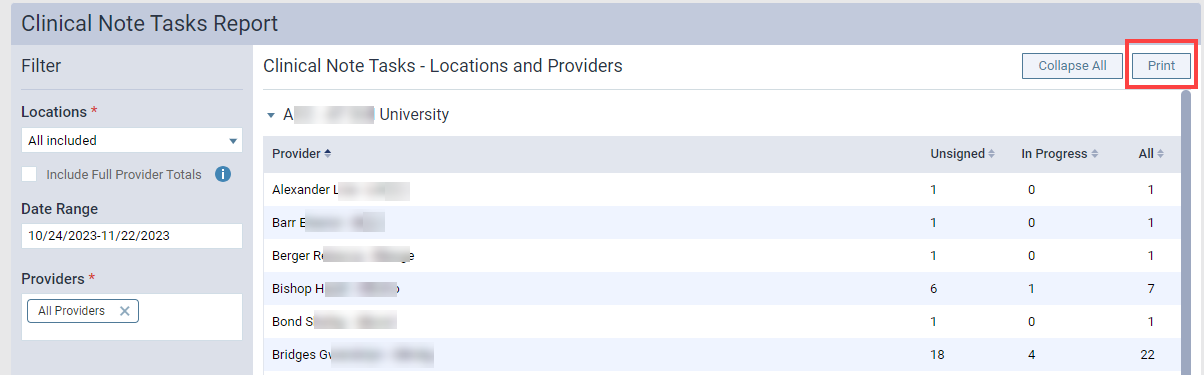
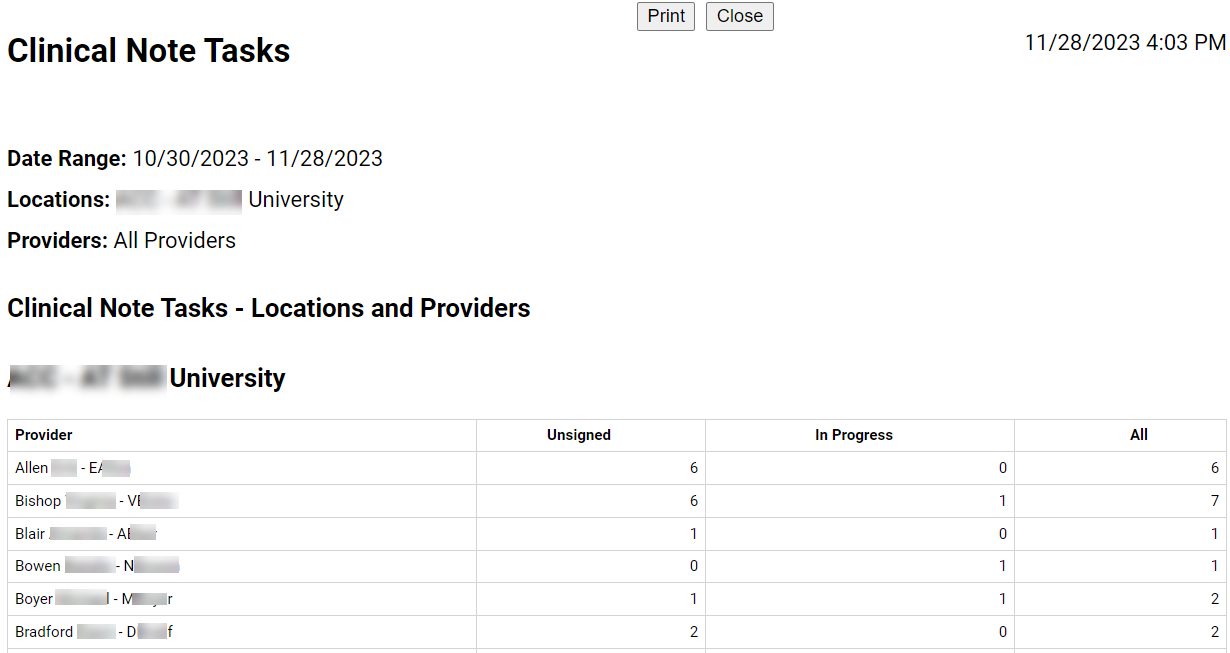
Users can now click a (new) Print button to open a new browser tab and print the report.
Link to patient chart added to Clinical Note Tasks page
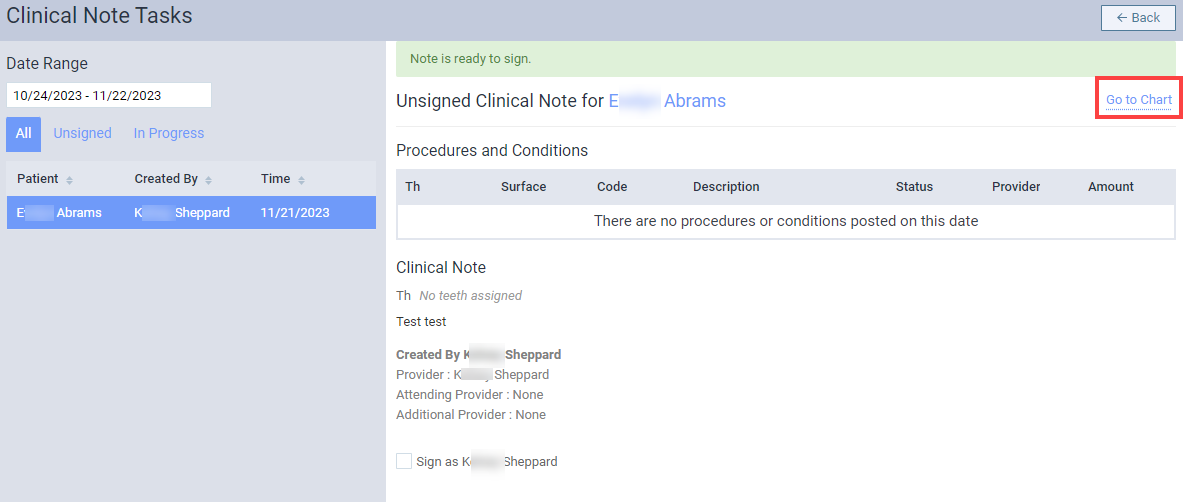
When working on the Clinical Note Tasks page (Home > Location > Overview > click the Unsigned Clinical Notes widget), users can now select a listed note and click a (new) Go to Chart link to quickly open the patient’s Chart page in a new browser tab. From there, they can review the patient’s chart and clinical information, and then return to the clinical note tasks page without losing their place.
Tip: Users can choose whether to sign, enter, or complete the clinical note in the patient’s chart on the new browser tab or on the Clinical Note Tasks page on the previous tab.
New sign mode on Clinical Note Tasks page
A (new) sign mode feature has been added that allows users to reuse their signature while signing clinical notes until the session expires. If enabled, users can work their way through any Unsigned, Not Entered, and In Progress clinical notes without having to re-enter their password.
When working on the Clinical Note Tasks page (Home > Location > Overview > click the Unsigned Clinical Notes widget), users can select a note and select the Sign as __ ___ check box. When prompted, they can enter their password in the available field click the Reuse these credentials for all signatures during this session toggle to set it to Yes.
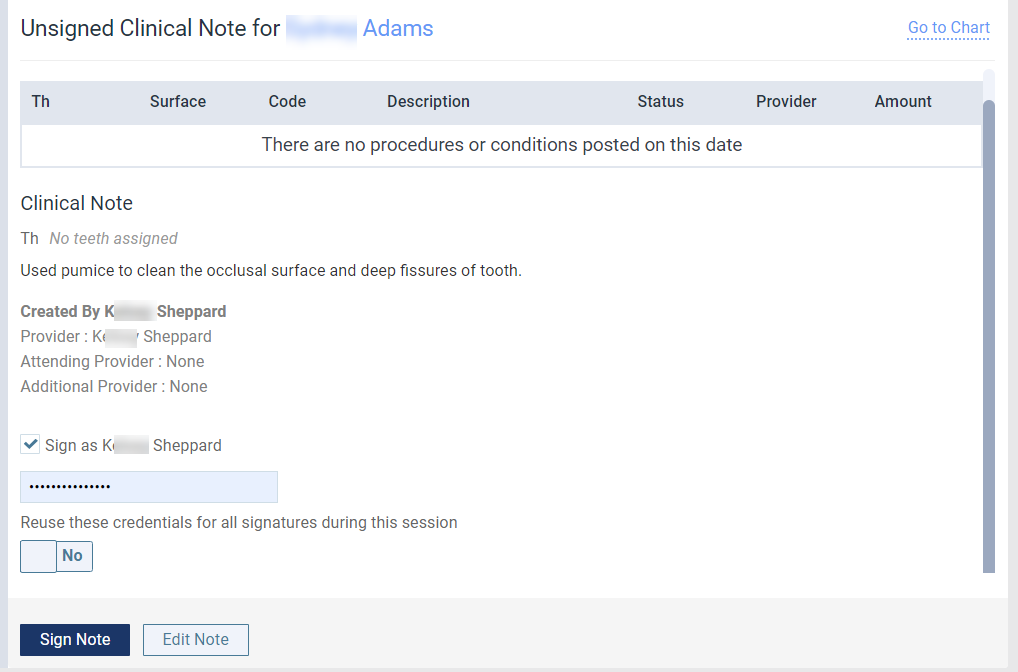
Important: For security purposes, if a user is inactive for five minutes or navigates to another page in Ascend Academic away from the Clinical Note Tasks page, the sign mode will time out and the user must re-renter their password to use the sign mode feature again.
Tip: A blue timer bar displays under the password field and indicates how close the user is to timing out.

Update to clinical note quick-picks
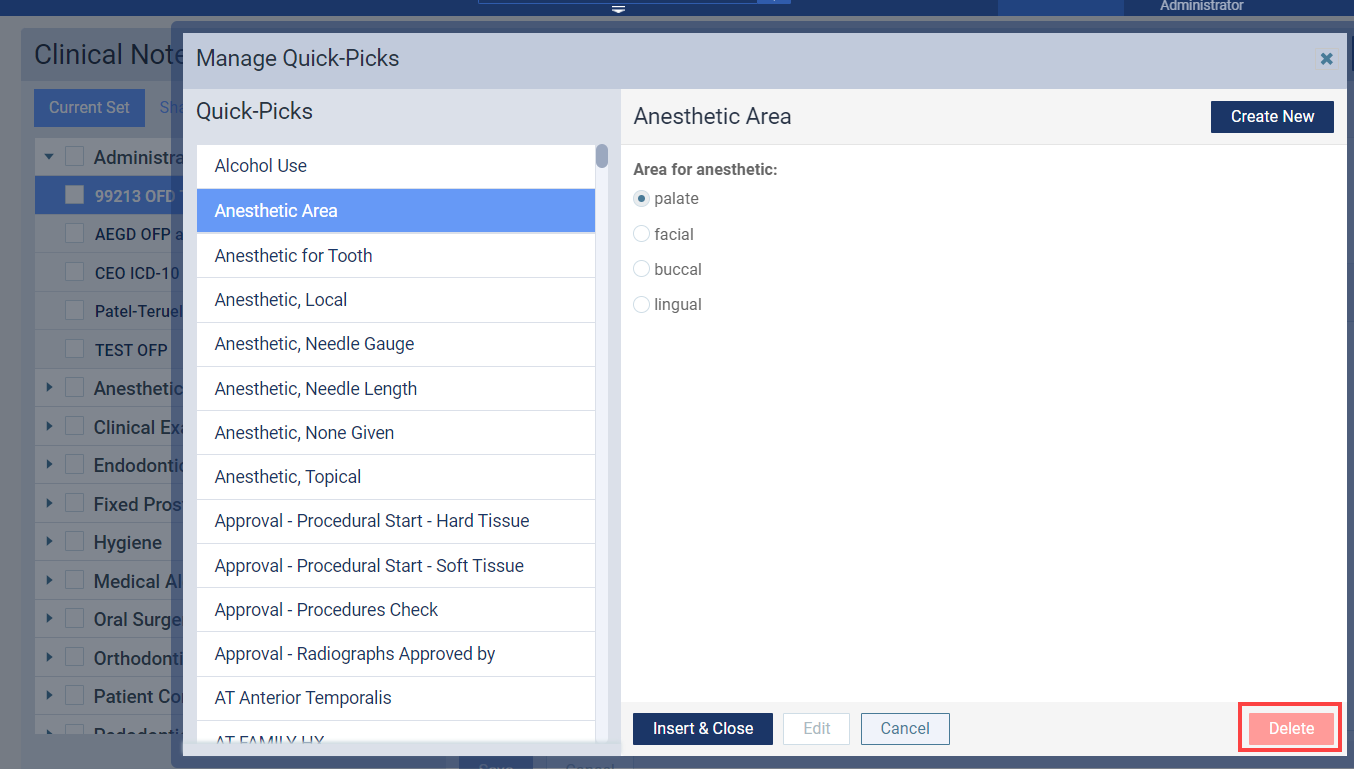
We have removed the ability to delete clinical note quick-picks that are provided by default in Ascend Academic. This helps preserve the original quick-picks for reference purposes and prevent accidental deletion.
When working with quick-picks on the Manage Quick-Picks window (Settings > Patient Care > Clinical Note Templates > Manage Quick-Picks button), the Delete button is now disabled for all quick-picks that are provided by default.
New category for clinical note templates
A (new) Oral Surgery category is now available on the Clinical Note Template Setup page (Settings > Patient Care > Clinical Note Templates).

Note: The category is not prepopulated with any templates.
Users can create new templates in this category or move existing templates into this category. Once added to this category, the templates will be available when entering clinical notes related to oral surgery procedures.
New auto-save feature for clinical notes
A (new) auto-save feature has been added to clinical notes. If users enter or edit clinical notes and get logged out due to inactivity, their work will be preserved automatically.
Important: When the user next logs in to Ascend Academic, they must still access and save the work.
Example: A user is interrupted while entering a clinical note and the session times out. The next time the user logs in and tries to start a new clinical note, an Unsaved content message displays, letting them know they have an unsaved clinical note. They can then access and save the clinical note.
Note: It will appear that no clinical notes are in progress until the user attempts to open a new note.
Saved views for progress notes and chairside dashboard
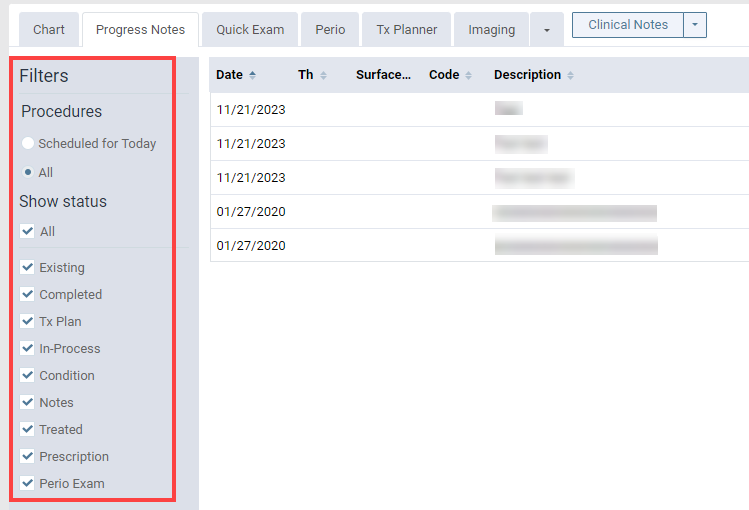
Ascend Academic now tracks view settings based on both the device and the user in order to improve performance in the progress notes and the chairside dashboard areas.
Example: If the dentist and the assistant take turns using the progress notes or the chairside dashboard on the same device, the dentist may use one set of filters for the progress notes and the assistant may use another. Ascend Academic can remember those filters as they take turns logging in and out.
Note: No settings or security rights are associated with this behavior.
Line items in progress notes display with color
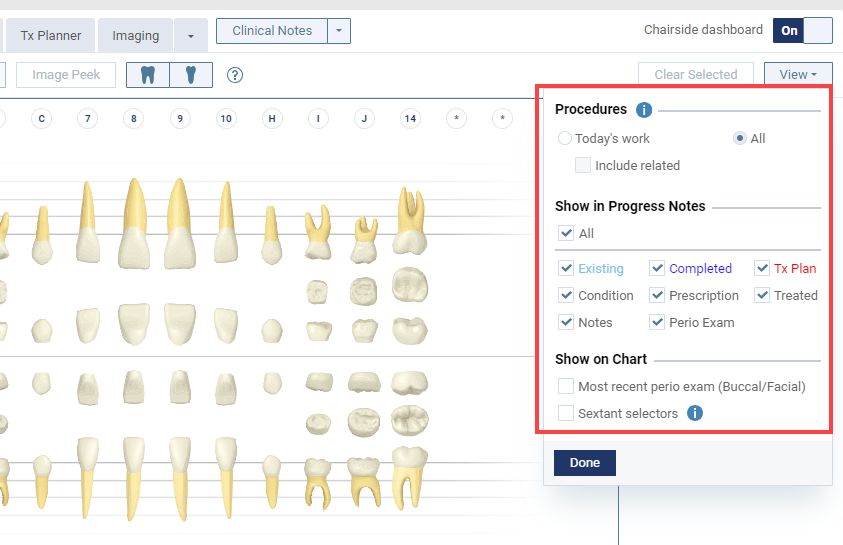
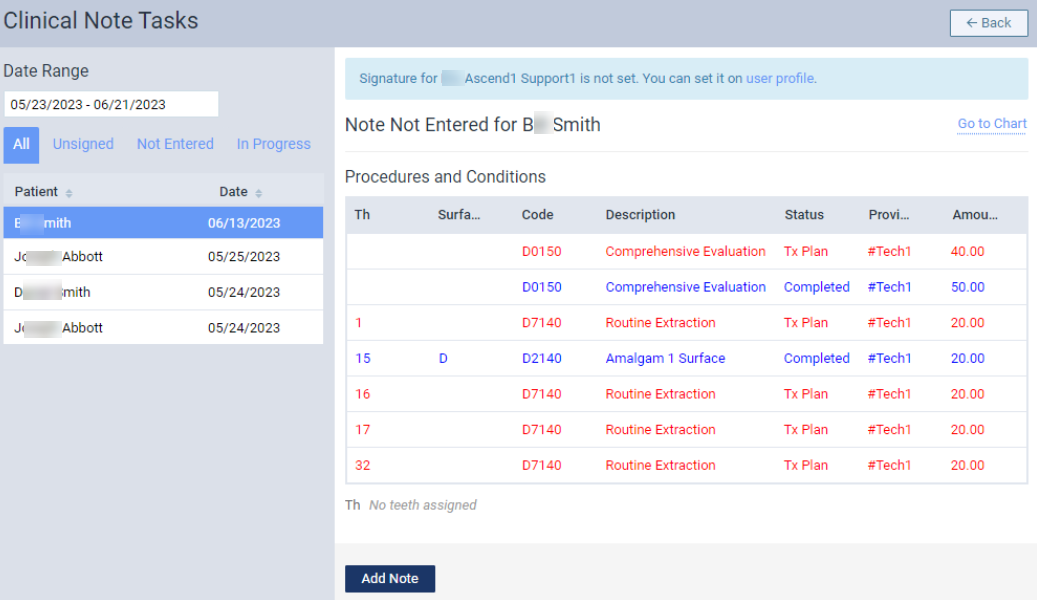
We have colorized the line items and filter descriptions in the progress notes (Patient > Clinical > Progress Notes) to match the corresponding colors of existing, completed, and treatment-planned procedures in the chart. This can help users easily identify the status of each line item at a glance.
The corresponding colors are:
-
Light blue – Existing procedures
-
Dark blue – Completed procedures
-
Red – Treatment-planned procedures
This update can also be seen in the chart’s View menu and the progress notes below the chart in the chairside dashboard view, as well as on the Clinical Notes Tasks page.
Progress Notes tab:
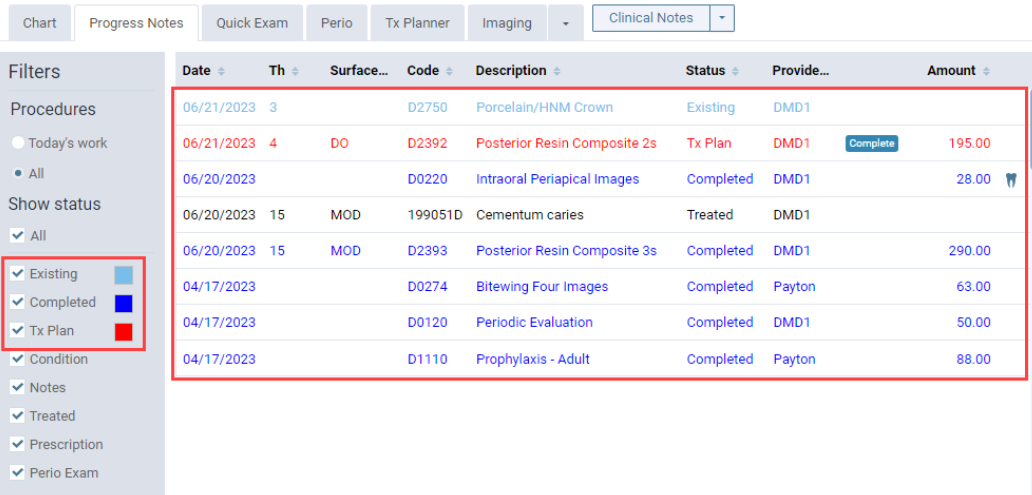
Chart (View menu and progress notes in the chairside dashboard view):

Clinical Note Tasks page:
Update to treatment areas
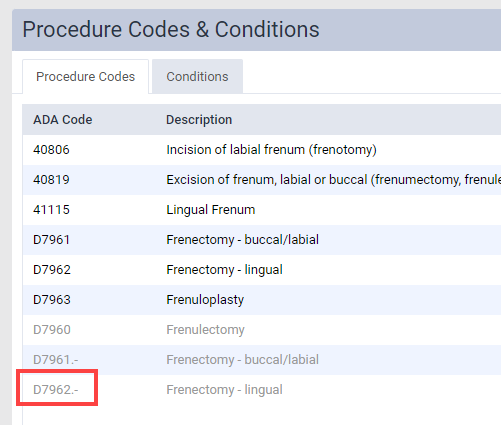
The ADA has updated its recommendation of treatment area definitions for procedure codes D7961 and D7962 from Mouth to Arch and the definitions in Ascend Academic have been updated to match.
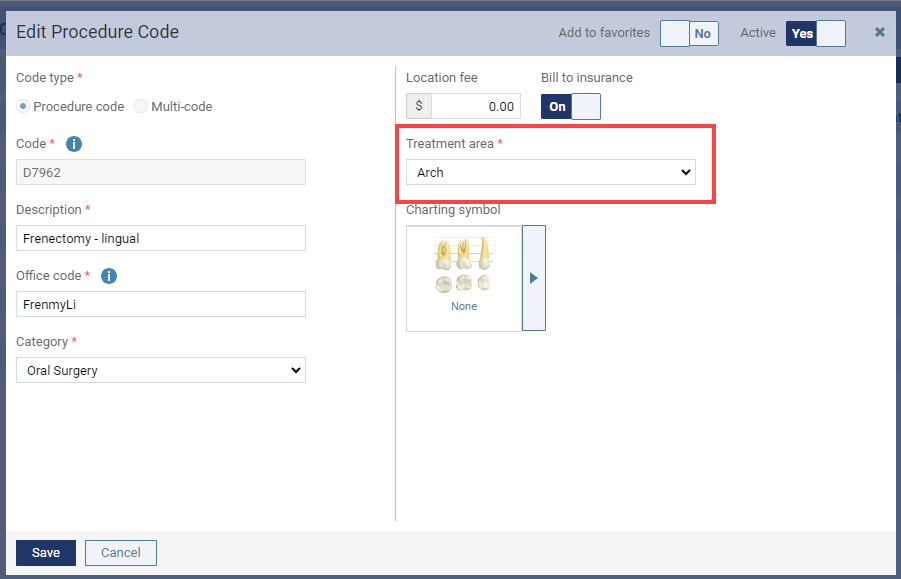
Note: The old version of the procedure codes will display on the Procedure Codes & Conditions page as an alias code with a minus sign (-) as the suffix.
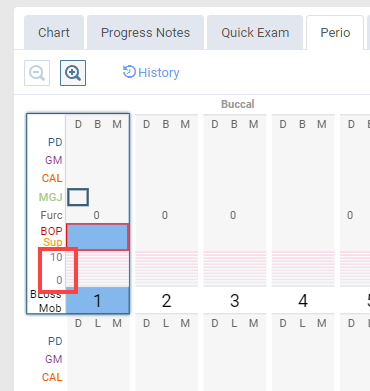
Update to perio chart legend
When working on the perio chart (Patient > Clinical > Perio), the legend has been simplified so that only two measurement points display under Suppuration (Sup).
MGJ functionality added to perio exams
Mucogingival junction functionality is now available in several places on perio exams (Patient > Clinical > Perio).
-
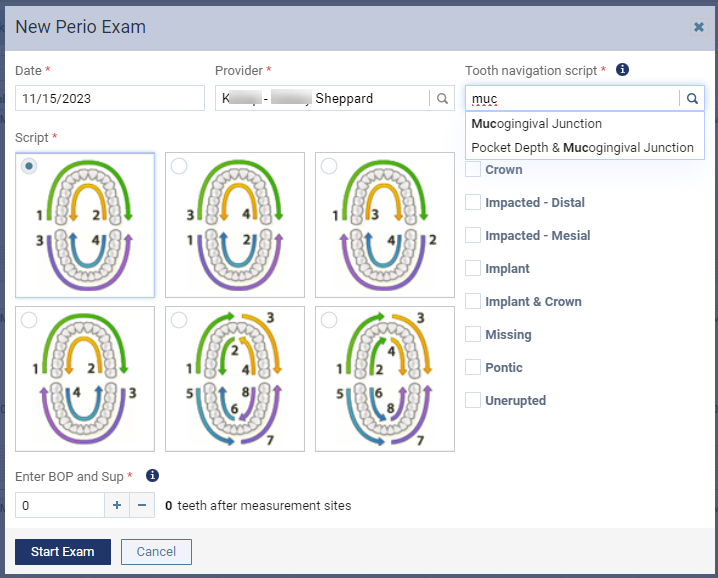
Two (new) options have been added to the Tooth navigation script field.
When setting the options on the New Perio Exam window, (new) Mucogingival Junction and Pocket Depth & Mucogingival Junction options are now available from the Tooth navigation script field. Once selected, users can enter mucogingival junction (MGJ) measurements or pocket depth and MGJ measurements sequentially.
The (new) Mucogingival Junction and Pocket Depth & Mucogingival Junction options have also been added to the Tooth navigation script field on the perio chart so that users can also change the script during an exam, if necessary.
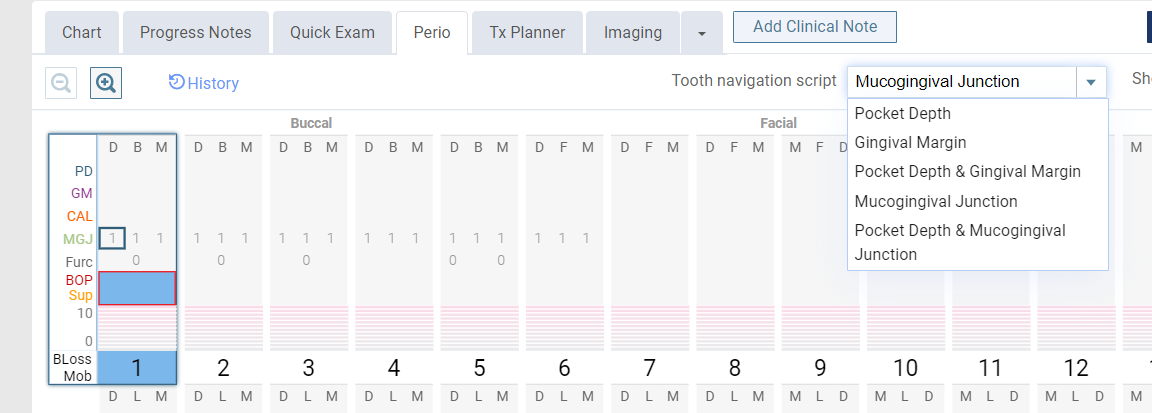
Tip: A (new) keyboard shortcut has also been added that allows users to quickly change the Tooth navigation script to Pocket Depth & Mucogingival Junction from the perio chart. When necessary, press the Shift + 5 keys on the computer keyboard.
-
A (new) Skip Hard Palate for MGJ toggle has been added to the New Perio Exam window.
If a user selects the (new) Mucogingival Junction or Pocket Depth & Mucogingival Junction option from the Tooth navigation script field, a (new) Skip Hard Palate for MGJ toggle displays on the New Perio Exam window. If set to On, the Script radio button options change, allowing users to skip the hard plate or the top lingual sextant for Mucogingival Junction perio exams.
Tip: This helps speed up the workflow by skipping the areas where MGJ measurements cannot be taken.
Note: The (new) Skip Hard Palate for MGJ toggle is set to On by default.

-
A (new) mucogingival junction (MGJ) measurement has been added to the perio exam.
When entering a perio exam, users can now add the mucogingival junction (MGJ) measurement to teeth they are charting. Once charted, the mucogingival junction (MGJ) measurement displays on the perio chart.
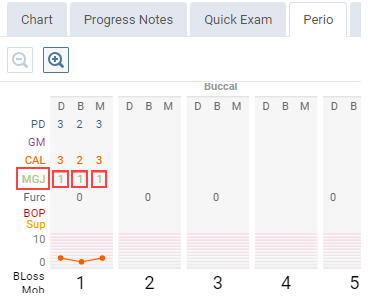
Tip: Critical mucogingival junction (MGJ) measurements are automatically highlighted with a red box around the value.
Note: Critical values are determined using this calculation: MGJ minus the PD is less than or equal to 2 (MGJ – PD <= 2).
-
MGJ measurements now display on perio exam PDFs.
This allows users to see the Mucogingival Junction measurements when they print the perio exam as a PDF and send Mucogingival Junction measurements as a claim attachment.
New smart default provider functionality
We have added a smart default for provider selection on select pages in Ascend that require a provider. If a patient has an appointment today but does not have an assigned primary provider and the logged in user is a non-provider, the provider assigned to the appointment will be considered the temporary primary provider.
Example: When a users opens a clinical page or adds a new clinical note, the appointment provider displays as the default provider selection.
Note: The smart default provider functionality only applies to the schedule, chart and clinical notes areas. It does not include the ledger or imaging.
Tip: Even though a primary provider is auto-selected, users can still change the provider, when necessary.
Evaluations
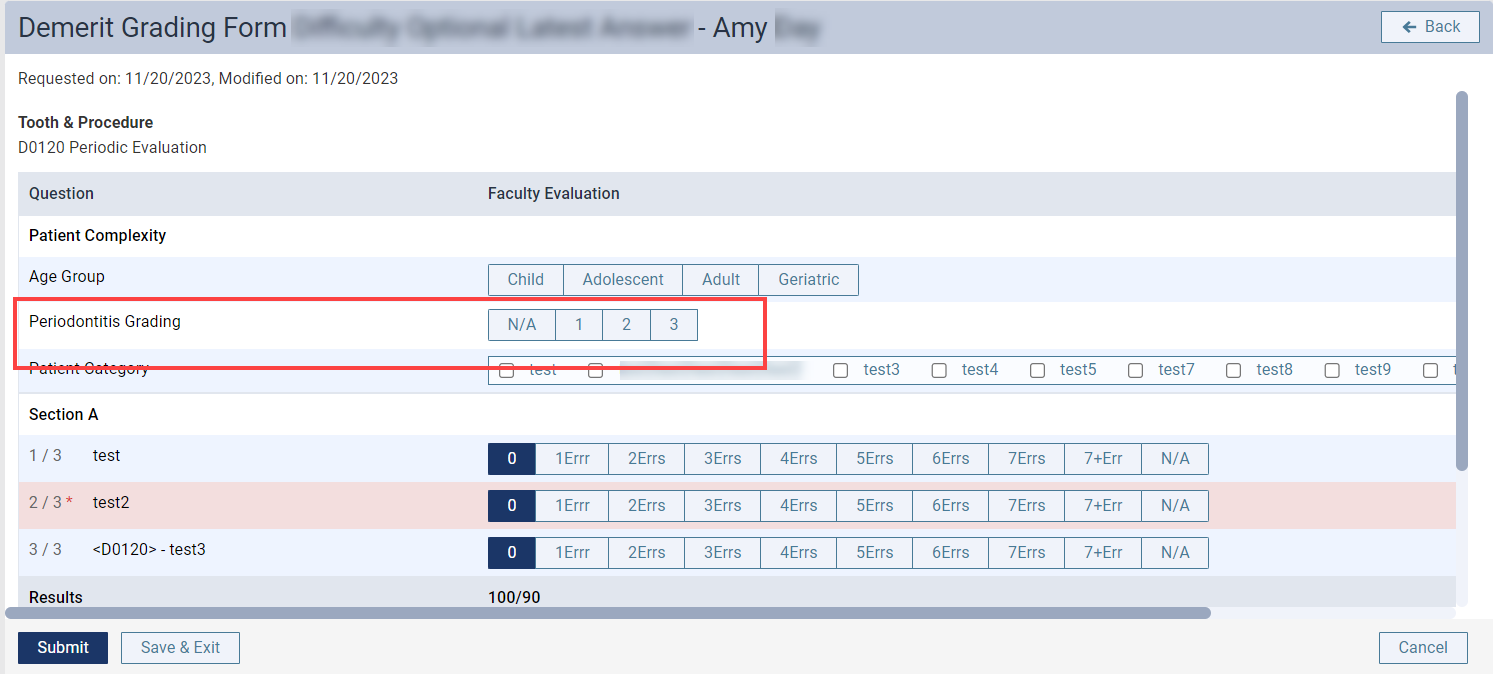
New periodontitis grading condition for patient complexity
When setting up patient complexity schemes from the Evaluation Setup page > Patient Complexity tab (Settings > Academic > Patient Complexity), users can now configure periodontitis grading stages as a condition. This includes the stage name, description, and corresponding points.

Notes:
-
Several grades are predefined by default, but users can modify as necessary.
-
Users can define a maximum of 6 stages.
Once configured, the Periodontitis Grading condition displays as an option under Patient Complexity on any evaluation form that is set to use patient complexity. Users can select a stage or N/A as necessary. If the user selects a stage, the applicable grading points for that stage will be added to the total points of the evaluation.
Usability
Return to page after inactivity logout
When users log back in after being logged out automatically due to inactivity, they will automatically return to the page they were on previously.
Note: If users log out manually and log back in, they will be directed to the home overview, as usual.
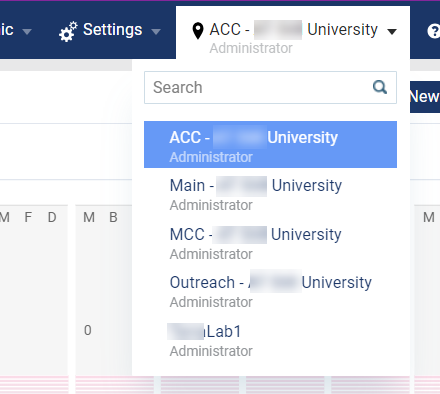
Ability to search on Location menu
We have added a (new) Search field to the Locations menu to allow users to quickly enter and select a location.
Imaging
Ability to restore deleted images
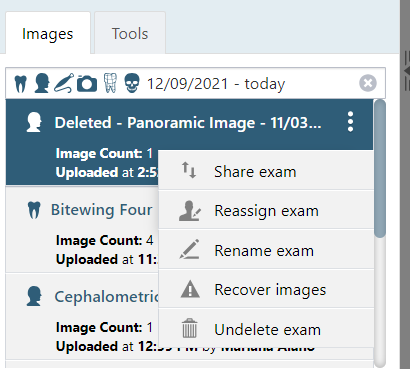
When working with images and imaging exams (Patient > Clinical > Imaging), users can click in the Narrow down the results field to display the Narrowing Down the Results window and select the Show Deleted check box.
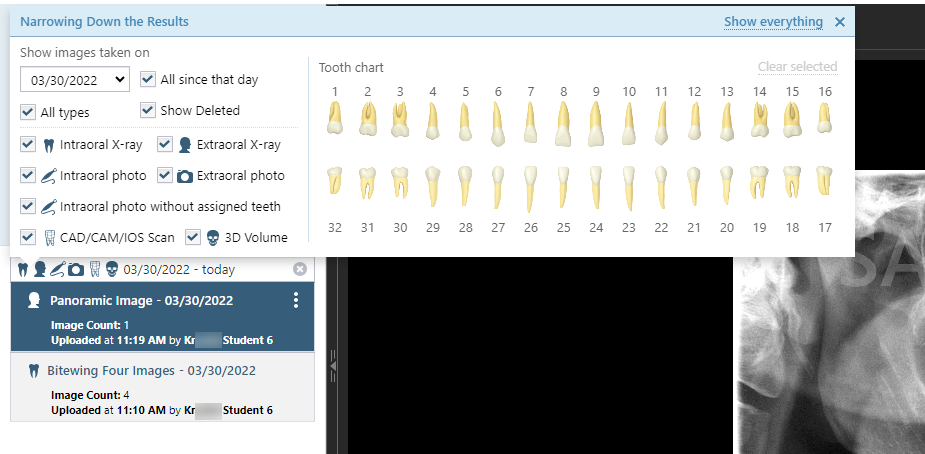
Users can now select a deleted imaging exam, click the ellipsis, and select a (new) Undelete exam option to restore the deleted image.
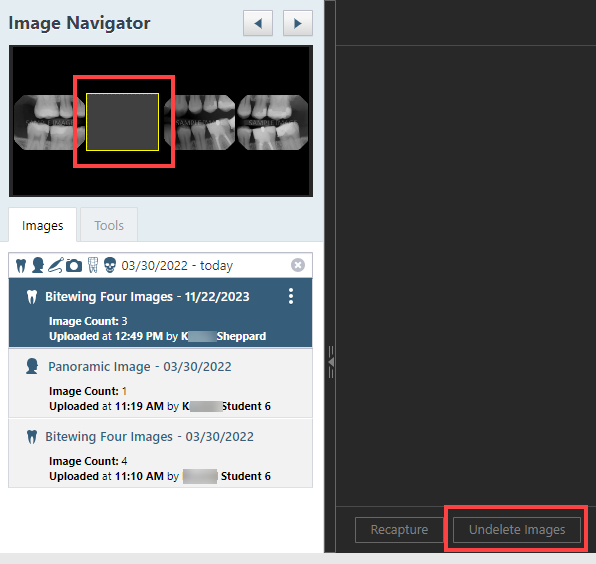
Additionally, if an imaging exam has a deleted image, users can now select empty exam slots in the imaging exam template. If deleted images exist for the selected slot, users can click a (new) Undelete Images button in the image viewer.
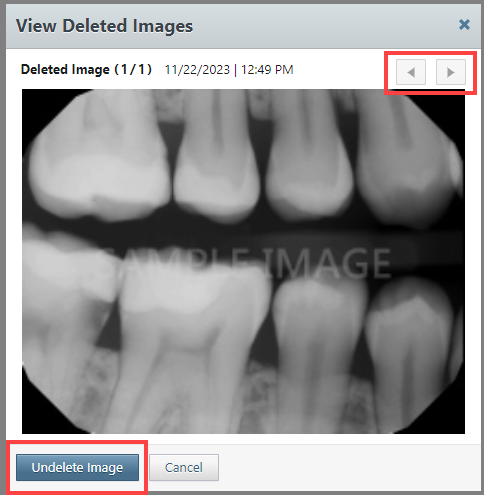
From the View Deleted Images window, users can click the arrows to scroll through the deleted images and click a (new) Undelete Image button to restore that image to the imaging exam.
Allow restart on acquisition device error
If acquisition stops because of a device error, a (new) Start button allows users to restart the acquisition.
New Show/Hide exam list – Imaging exam flyout
When working with images (Patient > Clinical > Imaging), users can now use a (new) Imaging Exam Flyout to hide the imaging exam list so they can view each image from all imaging exams without clicking each imaging exam on the imaging exam list.
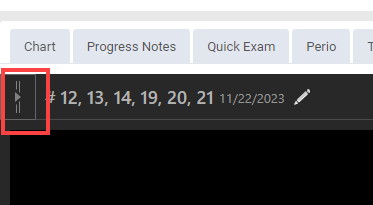
To use the Imaging Exam Flyout, users can click the Hide Exam List arrow to hide the imaging exam listing and click the left/right arrows as necessary to view the images in the imaging exams.
Tip: Users can also use the arrows on their keyboard to scroll through the images.

When ready to close the Imaging Exam Flyout and return to the exam list, users can click the Show Exam List arrow.
Improvement to 3D volume workups
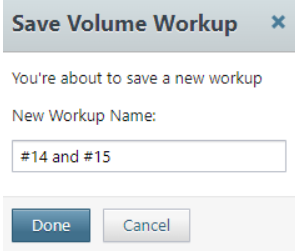
When working with images (Patient > Clinical > Imaging), users can now press Enter on the computer keyboard instead of clicking Done to save a New Workup Name for a 3D CBCT (Cone Beam Computed Tomography) image.
New Resume option for 2D oral/facial photo images
When working with images (Patient > Clinical > Imaging), users can now open an existing 2D oral/facial photo exam and select a (new) Resume Exam option to retake an image.
Tip: The option is also available for ChromeOS and iPad.
Improvements to brightness and contrast tool
When working with images (Patient > Clinical > Imaging), users can click an image and drag the cursor to adjust the brightness or contrast, and now see consistent value changes.
Improved template/mount display mode enhancement tools
When working with images (Patient > Clinical > Imaging), users can click the Display All Images in the Template/Mount icon to load images in the template/mount view. We have made several improvements to the available enhancement tools:
-
Improved loading speed
We have drastically reduced the length of time it takes to load enhanced images in the template/mount view.
-
New enhancement icon
A (new) Turn image enhancement on/off
 icon has been added. This allows users to enhance all the images in the template/mount at the same time.
Note: By default, the new icon is set to On.
Tip: If the Turn image enhancement on/off icon was set to Off in the last imaging session, Ascend Academic remembers the setting for the current session. Users can click the Turn image enhancement on/off icon again to enhance all the images in the template/mount.
-
Brightness/contrast control:
Users can now click an image and drag the cursor to adjust the brightness or contrast of an image when in template/mount view.
Note: The brightness/contrast functionality works on individual images in the template and does not adjust all images in the template at the same time.
-
Improved zoom pan control:
When using the Pan tool in the template/mount view, users can now use their mouse wheel to zoom in/out.
Update to supported imaging acquisition devices
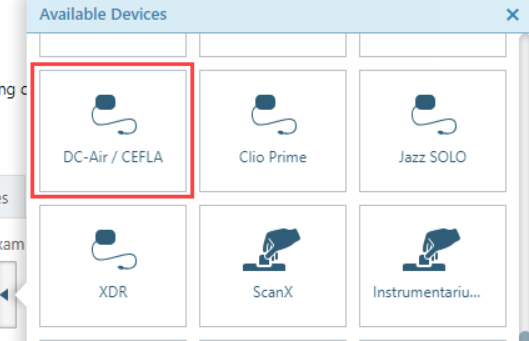
The list of supported imaging acquisition devices has been updated. The DC- Air imaging device has been updated to DC- Air / CEFLA.
Financial
Ability to search for fee schedules
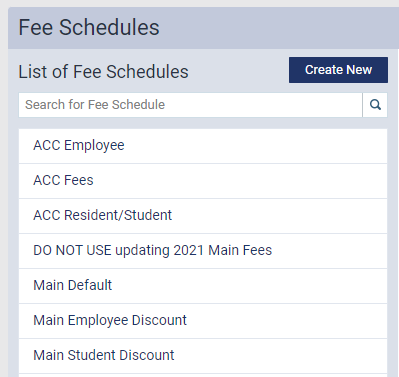
When searching the list of fee schedules on the Fee Schedules page (Settings > Production > Fee Schedules), staff can now use a (new) Search for Fee Schedule field to quickly locate a fee schedule.
Update to eStatement delivery time
Electronic statements can now only be sent from 8:00 am to 9:00 pm. If staff attempt to send eStatements after hours, they will be held and sent out at 8:00 am the next day.
Improved patient visibility on the Ledger
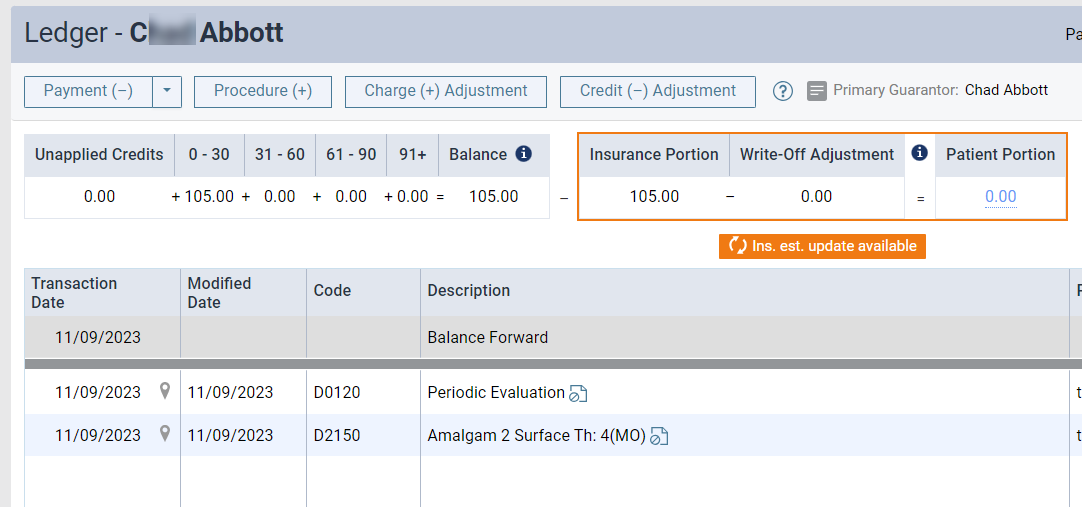
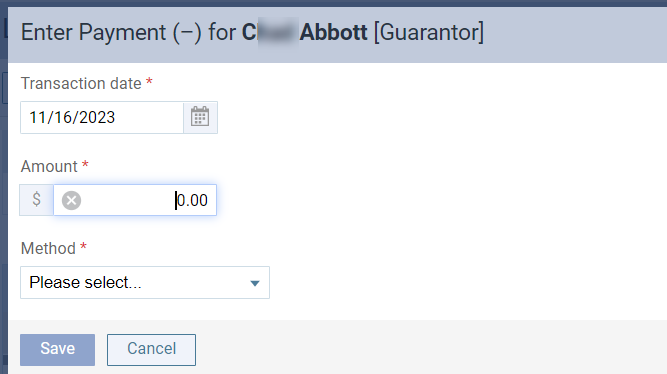
The Ledger page (Patient > Financial > Ledger) and Enter Payment window now clearly display the selected patient’s name to reduce errors when users post payments to patient accounts.
The Ledger page:
The Enter Payment window:
Insurance
Improvement to automated eligibility check
Ascend Academic can now perform automated insurance eligibility checks for appointments scheduled within a specified time window. If an appointment is scheduled for a day/time outside the specified time window, the appointment eligibility will be checked when it reaches the specified time window.
To allow automated insurance eligibility checks to be performed, the Batch Job for Insurance Eligibility toggle must be set to Yes for the location (Settings > Location > Location Information).
By default, Ascend Academic checks for appointments that are scheduled for the next four business days and performs automated eligibility verifications nightly. If necessary, users can set a (new) Business Day Lead for Batch Eligibility Verification field to customize the number of days in the time window for automated eligibility for the location (Settings > Location > Location Information).
Note: Each location can select its own timeframe.
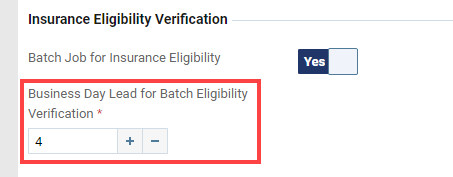
Tip: Users can confirm the eligibility check has been performed from the Insurance Eligibility page (Schedule > Insurance Eligibility) and check if the patient displays.
Important: Appointments with unsupported insurance carriers (e.g., any insurance carrier with the payer ID set to 06126) will display on the Insurance Eligibility page, but users must verify the patient’s insurance manually.
New Plan Migration feature
Ascend Academic now offers a (new) Plan Migration feature to help users move insurance plans from one insurance carrier to another if an error was made during the initial plan setup.
When working on the Insurance Carriers page (Home > Insurance > Carriers), users can select an insurance carrier click a (new) Plan Migration button to begin migrating the insurance plans.
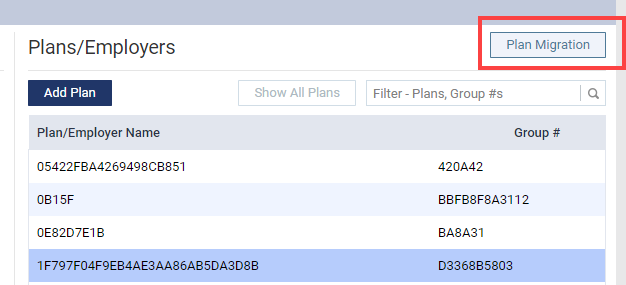
Users can select the plans they want to migrate, then search for and select the carrier they want to migrate the selected plans to.
When prompted with a (new) Migrate Insurance Plans window, users can use the tabs to migrate the insurance plans from one carrier to another carrier.
Example: On the Review Migration tab, the plans that will be migrated display under Selected Plans to Migrate, the current carrier information displays under Migrate Plans From Carrier, and the new carrier information displays under Migrate Plans To Carrier.
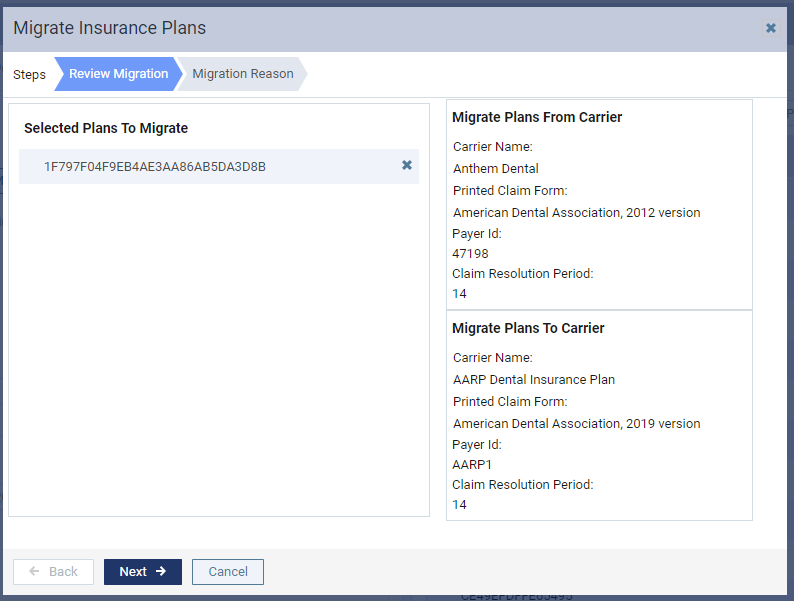
When ready, users can proceed to the Migration Reason tab, add additional information to the default note if needed and complete the migration.
Important: The Merge Carrier security right has been renamed to Merge Carriers/Migrate Plans and modified to include this activity.
New insurance coverage gap warning
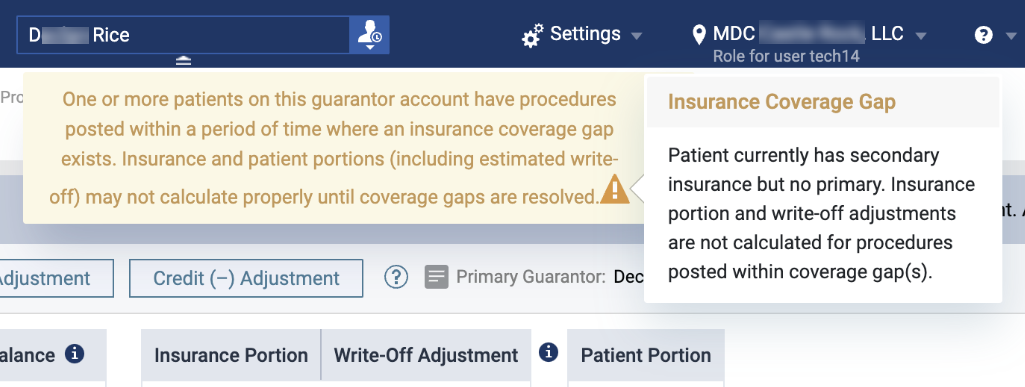
A (new) Insurance Coverage Gap warning now displays on a patient’s Ledger if a procedure is completed during a time where there is an insurance coverage gap between the patient’s expired primary insurance coverage and the patient’s active primary insurance coverage.
Example: An insurance gap may occur because the patient is between jobs. In this case, their primary insurance has expired, but the new insurance has not yet started.
If the warning displays, users can click the warning icon to display an Insurance Coverage Gap message and review the details of the insurance coverage gap.
Example: The patient has secondary insurance but no primary insurance.
Additionally, the Insurance Coverage Gap message lets users know that the insurance portion and write-off adjustments are not calculated for procedures posted with coverage gaps.
Reporting
New filter for Ledger Report
When working with the Ledger Report (Patient > Financial > Ledger Report), users can now set a (new) Include Payments/Adjustments check box to include or exclude all payments and adjustments information from the patient’s Ledger Report.
Note: By default, the Include Payments/Adjustments check box is selected.

When selected, the following items display on the Ledger Report:
-
Completed procedures
-
Payments
-
Adjustments
-
Claims
-
Balance Forward
-
Balance as of [date]
When deselected, only completed procedures display on the Ledger Report.
New filter for Ledger Power Reports
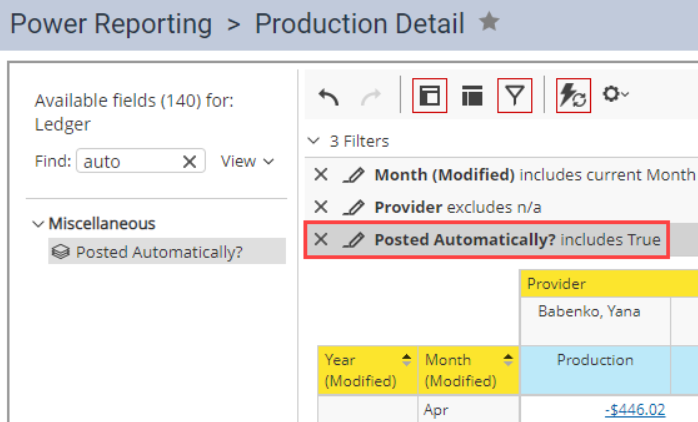
When working with Power Reports (Home > Reports > Power Reporting), users can now filter ledger reports for automatically adjusted PPO write-offs using a (new) Posted Automatically? field. The possible values are true and false.
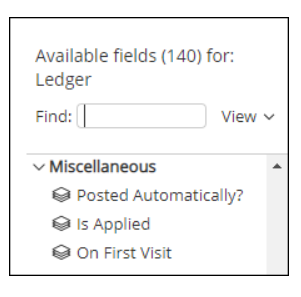
Additionally, other miscellaneous ledger fields are now grouped together with the (new) Posted Automatically? Field.
New filters for Evaluations Power Reports
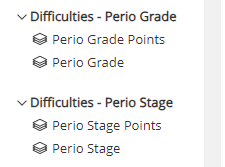
When working with Power Reports (Home > Reports > Power Reporting), users can now filter academic evaluations reports using (new) Perio Grade Points and Perio Grade fields under a (new) Difficulties – Perio Grade section. This allows users to report on evaluation counts for each perio grade value.
Additionally, the Difficulties – Perio section has been renamed to Difficulties – Perio Stage and the fields have been renamed to Perio Stage Points and Perio Stage.
Improvements to the Audit Log
The Audit Log (Home > Reports > Audit Log) now tracks creation, update, and delete events for the following activities:
-
Ortho and prosthesis information in a patient’s existing or treatment-planned procedures.
-
Require treatment info field setting for orthodontic and prosthetic procedure codes.
Bug Fixes
Appointments that need approval cannot be deleted until they are approved
Issue: If a student that needs approval creates an appointment, the appointment cannot be deleted until after it has been approved.
Solution: Fixed so that appointments can be deleted as necessary.
Comments
0 comments
Please sign in to leave a comment.