
Ascend Academic provides an online portal where patients can complete forms prior to or during their visits.
You can send requests for patient forms to be completed using the following methods:
-
Bulk automated request using appointment reminders - Each appointment reminder that Ascend Academic sends out automatically by text or email can include a button (emails) or a link (text messages) that patients can use to open the portal.
-
Individual manual request - You can manually send an email or text message with a link to a patient, which they can use to complete their patient forms. You can also use a mobile device connected to the patient's online portal to have them complete their forms at your office. You can also have a patient complete forms in your office on a mobile device connected to the patient's online portal, if a patient shows up at the office without having completed the necessary forms.
Important: The Web address for a patient's online portal is unique to a given patient. Each patient must open the online portal using the link or button that is specific to their record.
To send automated bulk requests
-
Create an Appt confirmed appointment reminder with the Notification Schedule > Add forms link toggle set to On.
Note: Appt confirmed reminders are based on the Appointment Confirmed Date event.

Appointment reminders now display a button or a link accordingly.

To send manual requests
How to get there
-
From the Patient menu, under General, select Overview.
The patient's Overview page displays.
Note: If the correct patient is not already selected, use the Patient Search field to access the patient's record.
-
Scroll to the Patient Forms widget.
How to get there
-
From the Patient menu, under General, select Overview.
The patient's Overview page displays.
Note: If the correct patient is not already selected, use the Patient Search field to access the patient's record.
-
ClickTap the Patient Forms widget.
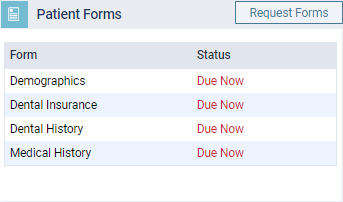
The Patient Forms tab of the patient's record displays.
How to get there
-
From the Schedule menu, select Calendar.
The Calendar page displays.
-
ClickTap an appointment.
The Appointment Information panel displays.
-
ClickTap Forms.
-
From the window that displays the patient forms that have been completed and those that are due, clicktap a form that has a Due Now status or the Request Forms button.

How to get there
-
From the Schedule menu, select Unconfirmed Appointments.
The Unconfirmed Appts page displays.
-
ClickTap Forms.
-
From the window that displays the patient forms that have been completed and those that are due, clicktap a form that has a Due Now status or the Request Forms button.

How to get there
-
From the Patient menu, under Clinical, select Chart.
The patient's clinical record displays with the Chart tab selected.
Note: If the correct patient is not already selected, use the Patient Search field to access the patient's record.
-
ClickTap Forms.
-
From the window that displays the patient forms that have been completed and those that are due, clicktap a form that has a Due Now status or the Request Forms button.

-
On a patient's Overview page > Patient Forms widget or Patient Forms tab, clicktap Request Forms to display the Request Forms window.
Tip: You can also display the Request Forms window from the Calendar page > Appointment Information panel, the Unconfirmed Appointments page or a patient's record > Chart tab.
Patient Forms widget
Patient Information page > Patient Forms tab

The Request Forms window displays.

-
Complete one of the following:
-
Send the portal link to a mobile phone number.
-
Next to the Text Link button, select the correct number from the drop-down list.
Note: You can select the patient's or the primary contact's mobile phone number.

-
ClickTap Text Link.
Note: The button is only available if the patient has a mobile number in their record.
-
-
Send the portal link to an email address.
-
Next to the Email Link button, select the correct email address from the drop-down list.
Note: You can select the patient's or the primary contact's email address.

-
ClickTap Email Link.
Note: The button is only available if the patient has an email address in their record.
-
-
Copy the portal link to the Window Clipboard.
-
ClickTap Copy Link.

-
Paste the link into a document or email message for the patient.
Note: The link expires after two weeks from the generation date (the date you opened the Request Forms window). If the patient does not use the link within two weeks, you must generate a new link for the patient.
Tip: To open the patient's portal on another tab of your Web browser, you can clicktap the Click here to access forms link.
-
-
Push the patient's forms to a registered kiosk device.
-
Under Push to a kiosk, clicktap the button with the name of the kiosk device from which the patient will complete the form.

-
-
Open the patient's portal on a practice-owned mobile device.
Important: Using a mobile device to scan a QR Code to open a patient's portal registers that mobile device with Ascend Academic. You should use a mobile device that is owned by your practice and meets the following specifications: for an Apple device, iOS 11 and the Safari browser; or for an Android device, Android 4 or newer and the Chrome browser.
-
Leave the QR code in the Request Forms window on the screen.
-
On the practice-owned mobile device, use a web browser to navigate to https://patientcare.ascendacademic.com/v1/view/kiosk/dashboard.html.
-
Point the mobile device's camera at the QR code in the Request Forms window and clicktap SCAN to scan the QR code.
-
-
Comments
0 comments
Please sign in to leave a comment.