
Several new feature enhancements are included in the product update released in mid-November 2022. The major enhancements in this release include several improvements to insurance, imaging, and power reports.
Important: Enhancements from this release will be available on PROD on November 18th, 2022.
Several improvements to insurance
Several changes have been made to insurance throughout Ascend Academic:
-
Users can now enter and locate insurance payments made by credit card. To enter credit card payments into the system, you need to enable the payment type first on the Ledger Options page (Settings > Production > Ledger Options). To enable, select the (new) Insurance Payment - Credit Card check box under the Transaction Types tab.

Note: You need the Manage ledger options user role permission set to enable it.
Once set, users can now select and enter it as a payment option. The payment method can be found throughout the system, including bulk insurance payments. When you enter a credit card payment in any of the following windows, a (new) Transaction ID field displays:
Enter Payment window (Patient > Financial > Ledger)

Create New Bulk Payment window (Home > Insurance > Bulk Insurance Payments)

You can use the new field to help distinguish between multiple payments of the same type during the same day.
It's also clearly labeled on patients' Ledger (Patient > Financial > Ledger) like other payment types.

These payments are also included in the following reports:
-
Payment Analysis (Home > Reports > Payment Analysis)
-
Day Sheet (Home > Reports > Day Sheet)
-
Deposit Slip (Home > Reports > Deposit Slip Report)
-
Aged Receivables (Home > Reports > Aged Receivables Report)
-
Provider A/R Totals (Home > Reports > Provider A/R Totals)
-
Activity details on Walkout Statement (Patient > Financial > Ledger)
-
Activity details on Billing Statements (Home > Location > Billing Statements)
Important: Currently, there's no integration with 3rd parties to process credit card payments. Until we do, please follow the workflow established between your practice and your merchant account to get money into your bank account.
-
-
There is a (new) Go to Ledger link that you can use to navigate to a patient's Ledger. You can find the link in the following areas:
-
The Bulk Insurance Payments page (Home > Insurance > Bulk Insurance Payments) > insurance payment of a specific patient

-
The Unsent Claims page (Home > Location > Overview) > insurance payment of a specific patient

Important: The link only displays when you navigate to the Unsent Claims page by using the Unsent Claims widget on the Overview page.
-
-
In release 394-0, we've renamed the status NEA Hold to Attachment Hold, and the status NEA Error to Attachment Error on the Claim Detail window > Attachment tab and the related claim reports. We've made the same changes to the following areas of the system:
-
The Status/Notes tab of the Claim Detail and the Predetermination Detail windows
-
Patient's Ledger
-
Power Reporting (Home > Reports > Power Reporting)
-
-
When users add multiple images to an insurance claim at once, it now displays as a single, composited image attachment.
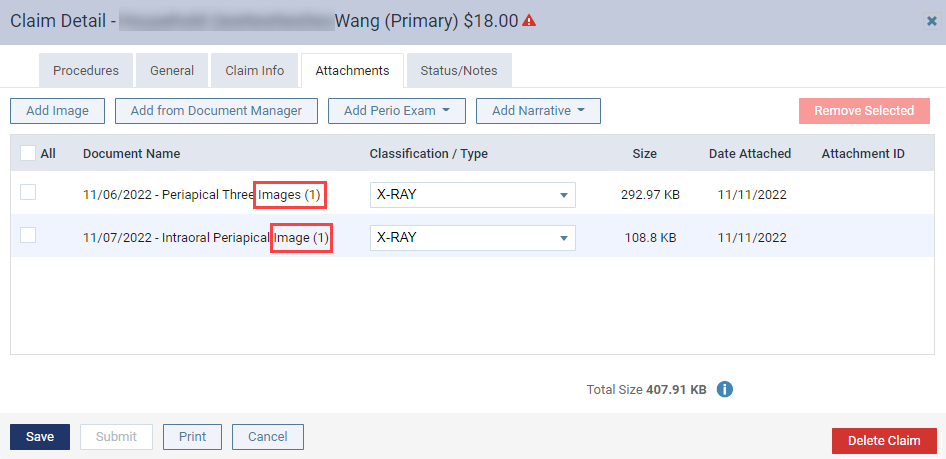
Note: Composite images are formatted to be 1920 x 1080 pixels, so it doesn't exceed the size limit for claim attachments.
Important: When you add multiple images as a single image, the system includes the tooth numbers and the date on each image.
-
To ensure insurance estimates are as accurate as possible, we've updated the workflow to managing exceptions on coverage tables templates (Settings > Production > Coverage Tables) to allow users to apply multiple insurance exceptions to procedures. You can add, manage, and delete them as usual.
Important: When a procedure has multiple exceptions, Ascend Academic first attempts to apply the age limitation exception. If the patient's doesn't meet the criteria, the system moves to the downgrade exception. The system won't combine a not covered exception with other exceptions.
We've also updated the Coverage Exception(s) tooltip that displays on the Detailed View of a guarantor portion on a patient's Ledger and tx planner (Patient > Clinical > Treatment Planner). As procedures can have multiple exceptions, it also includes all exception(s) to calculate a coverage amount.

Note: The tooltip displays the exceptions in the order in which they are considered. You don't have to worry about adding exceptions in specific order, as the system will order the exceptions for you.
-
When you navigate to the Unsent Claims page by using the Unsent Claims widget on the Overview page, the generated Patient List now comes with a sorting ability.
Before After 

Improvements to imaging
Several changes have been made to imaging (Patient > Clinical > Imaging):
-
Users can now use the (new) freehand drawing tool to draw on 2D and 3D images in image viewer, so they can quickly notate a finding. The usage of the tool doesn't affect the original image, as the original image is saved and isn't altered. To use the tool, select the Tools tab > Annotations category on image viewing, and then select the (new)
 option.
ClickTap and drag across the image as desired, and then release the left mouse buttonremove your finger from the screen to stop.
For 3D images, the drawing is added to the specific 3D image slice that you're currently viewing. Each freehand drawing is listed under the Annotation list that includes the name of the view and the slice number.

Just like the other tools, you can choose the color and outline width, and can undo or clear all the work. You can even export the images.
-
If a 3D volume has annotations and/or measurements and you try to rotate a slice, a (new) Clear Image Rotation window displays, asking you to clear the annotations and measurements first.

When you clicktap Clear Annotations/Measurements, all annotations and measurements from the image are cleared.
-
You can add multiple measurements to a 2D or 3D image by using the (new) Add New Measurement under Tools tab > Measurements.

-
We added a (new) Vatech Ez 3D-I software bridge as a choice for acquiring 3D images. We've also added CAD/CAM support to the Carestream Software Bridge, which will allow you to import .stl or .ply file to a patient in Carestream. These files will keep its original name and extension.
To allow you to acquire images through the J.Morita iDizel Software bridge, we've also added volume support to J.Morita iDizel Software Bridge.
-
We increased the zoom feature from 200% to 300% to accommodate large template sizes.
Improvements to power reports
Several changes have been made to power reports (Home > Reports > Power Reporting):
-
Faculty can now generate data on pending evaluations by using the (new) Analysis Pending Evaluation Status Report Builder. They can use it to perform tasks such as analysis of evalutions that have been in pending status for a long period of time. It's an academic report that behaves like the Analysis Evaluations Report Builder, but with fewer fields. It displays data on incomplete evaluations. An evaluation is considered incomplete if not all assigned evaluators completed their copy of the evaluation. For competency evaluations, it's considered incomplete if the entire evaluations aren't complete.
Example: Assigned evaluators only completed the 1st visit.
Evaluations that haven't been started are also considered incomplete if it's attached to an evaluation form, and will be included in the report.
-
To bring more clarity to field names, we've made the following changes to the Date fields:
-
For the Analysis Patient Report Builder, the date of birth Date field now displays as Date (DOB).
-
For the Patient Insurance report, the Coverage Start Date field now displays as Date (Cov. Start). The Coverage End Date field displays as Date (Cov. End).

-
-
There's a (new) Multi-Location Aged Receivables report that users can use to see aged receivables data for multiple locations. You can also use it to see outstanding credits or receivables by guarantor, and display subtotals for each location and grand total for all included locations.

Note: The report only displays information on locations you have access to.
-
We've added (new) Appt Date and Appt Time fields to the Interactive Schedule Report Builder.

Instead of using the Appt Date/Time field, you can use the 2 new fields separately, which will make it easier to sort appointment data.
-
On the Interactive Ledger Report Builder, we've replaced the Date field with the Service Date field. We've also added a (new) Claim Plan Address field to the Insurance Claim module. You can now use the new field to add insurance plan addresses to the report.
Improvements to location hours
Ascend Academic has been updated to allow users to add and manage multiple location hours settings (Settings > Location > Location Hours) for a location. This allows you to plan your location's current and future hours of operations in advance.
To add new location hours settings, clicktap the (new) Create New button on the Location Hours page.

The new location hours settings display.

Enter when the new settings will be in effect in the (new) Effective Date field.
Note: The effective date can't be a past date.
Important: When creating a new settings, you can't set an expiration date. To learn how to set an expiration date, continue reading the release notes.
By default, all weekdays are set as closed. To set a weekday as open, select its toggle switch to set it as Open. In the generated time range, enter when the location is open in 24-hour military time.
Example: 800 for 8AM and 1500 for 3PM.
Once entered, the system will adjust these hours to display in 12-hour format with AM and PM.

If desired, you can enter another time range by clickingtapping the + icon.

You can also delete the additional time range by clickingtapping the  icon.
icon.

Repeat for the other weekdays, and when ready, clicktap Save. Once saved, the new settings will display on the left panel, under Effective Date.

Important: All of your location's location hours settings display on this panel, and are listed in chronological order.
If there's a conflict with the effective dates, the system will automatically adjust the effective date of the existing location hours settings to end a day before the new settings.
Example: You create a new location hour setting for the Christmas season, starting from December 23rd. However, you have an existing setting that started in January and doesn't have an expiration date. With the creation of the new settings, Ascend Academic automatically sets the existing setting to end on December 22nd, so the new settings can start on December 23rd as expected.
If you create a location hours settings that will come in effect now, it'll display on the left panel with the  icon. If you create a settings that has all weekdays set as closed, it displays with a CLOSED label.
If there's an existing setting that's very close to the one you want to create, you can create a new settings by copying the existing setting. To copy a location hour setting, select it from the left panel and clicktap the Edit button. On the generated settings, clicktap the Copy button at the bottom of the page. In the generated copy, edit as desired and then save to create the settings.
Important: You can delete settings as desired, but you can't delete settings that are currently in effect.
Improvements to reports
Several changes have been made to reports:
-
There's a (new) Yesterday date filter option on the Provider A/R Totals report (Home > Reports > Provider A/R Totals).

-
On the Aged Receivables report (Home > Reports > Aged Receivables Report), if your user account has access to 40 or more locations, the Include Summary option will be disabled for you. If you attempt to run the report, a (new) Warning will window display.

However, the window only acts as a warning. After you clicktap OK, the report will generate as expected.
Total given points are now included in the faculty evaluations during and when submitting the evaluation
When a faculty works on their evaluation (Academic > Faculty Evaluations) with a demerit grading form, the Results row now displays with a total points mark.
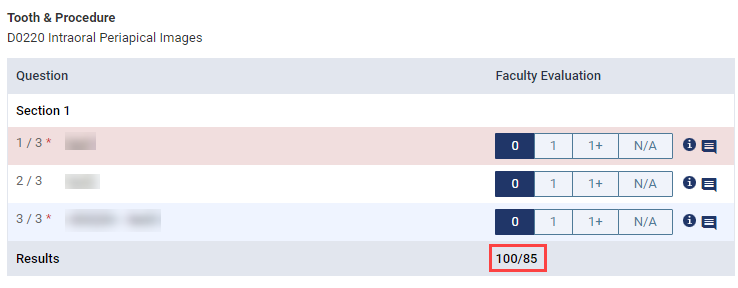
The total mark goes up and down as the faculty works through their evaluation. This allows the faculty to see the student's mark before submitting their evaluation, so they can decide if it requires any adjustments.
Important: Patient difficulty adds points, while demerit removes them.
The score is also displayed on the Pass Confirmation and Fail Confirmation windows when they attempt to submit their evaluation.
| Pass | Fail |
 |
 |
Note: The color of the "pass" on the Pass Confirmation window has been changed from blue to green.
Select Surfaces for [name of condition] window renamed for some conditions
The Select Surfaces for [name of condition] window (Patient > Clinical > Chart) has been renamed to Select Direction for [name of condition].
| Before | After |
 |
 |
The new name is to clarify you're indicating the direction the tooth is drifting. The new name only applies to the following conditions:
-
100787D Diastema of teeth
-
104161D Impacted teeth
-
161301D Impacted tooth (morphological abnormality)
-
148719D Lack of interproximal tooth contact
New keyboard shortcut for the Patient Search field
Instead of clickingtapping the Patient Search field to enter patient data, users can now press the F2 function key to select the field. If your device is a Macintosh, you can use Ctrl + U instead.
Generated numbers on the Analysis Ledger Report Builder doesn't match the patient ledgers
Issue: When users generate a report using the Analysis Ledger Report Builder with the Modified Date fields of Day, Month, and Year with measures of applied and unapplied payments, the generated numbers don’t match the numbers of the patient ledgers.
Solution: Fixed so data displays correctly as expected.
Can't view scanned documents on the View Document window
Issue: When users attempt to view a scanned document in the Document Manager, the generated View Document window may display a blank page.
Solution: Fixed so documents display properly.
Comments
0 comments
Please sign in to leave a comment.