
You can post a procedure or a charge for a product to a patient's ledger.
Tip: The recommended method for posting procedures is to attach procedures to an appointment and complete or post those procedures from the progress notes of the clinical chart.
Important:
-
Completed procedures display in the clinical and the financial record. Posting or editing a completed procedure in either area affects the other area.
-
When possible, you should use the Diagnosis tab to link conditions to a procedure. This can help reduce the number of rejected insurance claims due to missing condition codes.
To post a procedure
How to get there
-
From the Patient menu, under Financial, select Ledger.
The patient's Ledger page displays.
Tip: You can also access the Ledger page from the patient's Overview page > Ledger widget.
Note: If the correct patient is not already selected, use the Patient Search field to access the patient's record.
-
On a patient's Ledger page, clicktap Procedure (+).

The Enter Procedure window displays.

-
Enter the procedure details as necessary.
-
Transaction date - ClickTap in the field to select a different date of service or leave the current date entered.
Note: You cannot backdate a procedure to a date that would cause it to become locked based on your organization's transaction lock setting.
-
Provider - By default, Ascend Academic automatically assigns a provider based on the following scenarios:
-
If you are a provider, you are assigned to the new item as the provider.
-
If you are not a provider, the patient's primary provider is set as the provider.
-
If you and the patient's primary provider are not a provider, the first provider on the list is assigned as the provider.
If necessary, you can assign a different provider as the field is not locked.
-
-
Status - From the drop-down list, select a completed, treatment-planned, or existing procedure.
-
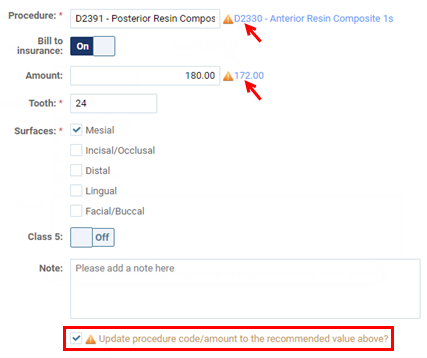
Procedure - ClickTap in the field, enter the code or description of the appropriate procedure, and select the procedure to post. If necessary, enter the supporting treatment information, such as a tooth number and surfaces.
-
Bill to insurance - Set whether the selected procedure should be billed to insurance. If the toggle is set to On, the procedure can appear on a claim. If the toggle is set to Off, the procedure cannot be added to a claim and will not be included in estimated insurance portion calculations.
Note: The default state of this toggle is determined by the setup of the procedure code. Use caution when turning on this option for an alias procedure code or a non-standard code because some carriers may reject this procedure on a claim or may reject the entire claim due to the presence of an unrecognized procedure code.
-
Amount - Set the charge for the selected procedure. The amount displays automatically, but you can change it if necessary.
Note: By default, this amount is determined by the following method: first, if the patient has insurance coverage, there is a fee schedule attached to that insurance plan, the selected procedure exists on that fee schedule, and the provider is contracted with that carrier, the amount comes from the selected procedure on that contracted fee schedule; next, if the selected provider has a fee schedule and the selected procedure exists on that fee schedule, the amount comes from the selected procedure on that provider's fee schedule; then, if none of the previous criteria have been met, the amount comes from the procedure code list. Additionally, if the patient has a discount fee schedule and does not have insurance coverage, the amount shown will be posted to the patient's ledger, but an adjustment will be entered automatically for the difference between the charged amount and the amount for the procedure on the patient's discount fee schedule.
-
Teeth / Surfaces - If applicable for the selected procedure, specify the supporting treatment information, such as a Tooth number and Surfaces.
Tip: To change the tooth number to a supernumerary tooth number, complete the following: for a permanent tooth, add 50 (for example, 16 + 50 = 66); for a primary tooth, add a letter "s" (for example, CS).
-
Note - Enter any relevant notes regarding the procedure. The maximum length allowed for the note is 255 characters.
-
Update procedure code/amount to the recommended value above? - Complete any of the following:
-
If the selected Procedure is not valid for the specified tooth number and/or treatment areas (such as surfaces), the recommended ADA Procedure Code displays next to the field. To use the recommended procedure, either clicktap the recommendation to insert that value into the Procedure field, or select the Update procedure code/amount to the recommended value above? check box to use the recommended value automatically when you save the procedure.To not use the recommended procedure, deselect the Update procedure code/amount to the recommended value above? check box.
-
If the Amount entered is different than the fee for the selected procedure in the patient's discount fee schedule (if applicable) or the provider's fee schedule (or if not applicable, the default fee for the procedure code), the recommended amount displays next to the field. To use the recommended amount, either clicktap the recommendation to insert that value into the Amount field, or select the Update procedure code/amount to the recommended value above? check box to use the recommended value automatically when you save the procedure. To not use the recommended amount, deselect the Update procedure code/amount to the recommended value above? check box.
-
If there are recommendations for both the Procedure and the Amount, but you want to use only one of those recommendations, clicktap the recommendation you want to use, and deselect the Update procedure code/amount to the recommended value above? check box before saving the procedure.
-
-
-
From the Options tab, set the fields as necessary.
-
Require Start/Completion Dates - If the procedure requires a start and completion date, select the Require start/completion dates check box and set the date the procedure was started and will be completed in the Start and Completion fields.
Note: The dates default to today.
-
Orthodontic Treatment - If applicable, select the Orthodontic Treatment check box, set the date that the orthodontic device was placed in the Placement field, and set the number of months that remain until the treatment is complete in the Month Remaining field.
Notes:
-
These options are only available if an orthodontic procedure is selected and has a Completed status.
-
When you create a claim for the procedure, the total number of months will be calculated (based on the placement date and remaining months) and entered on the claim automatically.
-
-
-
From the Insurance Estimates tab, complete the following fields as necessary.
-
Outstanding Insurance Estimates - Ascend Academic automatically calculates the estimated primary and secondary insurance portions, write-off, and guarantor portion for each procedure. If necessary, you can turn off the automatic calculation and modify the the estimated primary and secondary insurance portions and write-off.
-
Insurance Estimate Overrides - Select the Primary and/or Secondary check box and enter an amount that differs from the estimated amount that insurance will pay for primary coverage and/or secondary coverage.
Important: The amount of the primary or secondary estimate, or the sum of both estimates, cannot exceed the amount being charged for the procedure.
-
-
From the Diagnosis tab, attach the necessary diagnosis codes.
-
In the search field, enter part of a condition's ICD-10 code, SNOMED code, or description to search for a condition that has been charted for the patient.
-
Select the correct diagnosis.
Note: You can attach up to 20 diagnostic codes to the procedure.

-
-
ClickTap Save.
Comments
0 comments
Please sign in to leave a comment.