
You can add two types of patients to your practice database:
-
Basic patient - This type of patient and their information is available to all users, regardless of their security rights and user role.
-
Confidential patient - This type of patient and their information is only available to users that have the View confidential patient security right. Users without the security right cannot access a confidential patient's information, or see their appointments on the Calendar page and the Patient Routing panel. To access their information, another user with the security right must enter their credentials.
To add a patient record
-
Confirm that the patient does not exist in your practice database.
-
Search for the patient record.
-
If the patient's record displays, clicktap the patient name and review the record. If necessary, you can update their record.
Note: If the patient's record displays with a New status, it may have been created when a staff scheduled their appointment as a new patient. In this situation, the record contains minimal information and may require updating.
-
If the patient does not have a record, continue to Step 2.
-
-
-
ClickTap + Create New Patient.
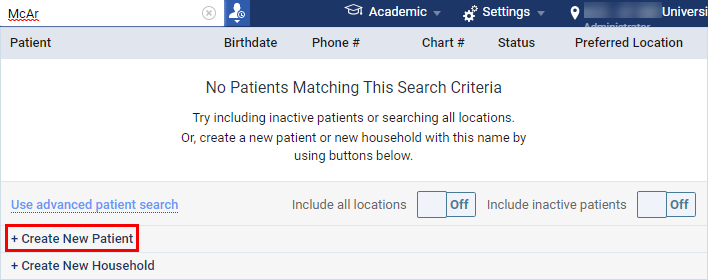
Tip: If you want to add multiple patients with the same primary contact person, clicktap + Create New Household to add multiple patients at once.
The Create Patient page displays.

-
Complete the following fields as necessary.
-
First name, M.I., Last name - Enter the patient's first name, middle initial, and last name.
Note: By default, the First Name field contains your initial search criteria.
-
Preferred name - Enter the patient's preferred name when you address them. It can also be used on correspondence from your office.
-
Title - If applicable, enter a prefix for the patient's name, such as Dr., Mr., Ms., or Mrs.
-
Suffix - If applicable, enter a suffix for the patient's name, such as Jr., Sr., or III.
-
Gender - Select the patient's gender.
-
Birthdate - Enter the patient's date of birth.
If there is an existing patient record with the same first name, last name, and birth date, the record displays on the bottom half of the page.

Review the listed record to ensure it is not the patient's record. If it is, clicktap the listed record to open the record. If the listed record is not the patient's record, continue entering the patient's information.
-
Status - The patient's status is set to New by default, but you can select a different status.
Note: The status changes automatically from New to Active when the status of the patient's first appointment changes to Complete or when a procedure is posted for the patient.
-
Ethnicity - The patient's ethnicity is set to None by default, and is not a required field. Select the patient's ethnicity from the drop-down list.
-
Financial Status - The patient's financial status is set to None by default, and it is not a required field. Select the patient's financial status from the drop-down list.
-
Special Needs - The patient's special needs is set to None by default, and it is not a required field. Select the patient's special needs from the drop-down list, if applicable.
-
Chart # - Enter a unique chart number of up to eight (8) alphanumeric characters or clicktap the Update
 icon to generate a chart number automatically for the patient.
 Note: The Update
icon only generates a chart number if you have entered the patient's first and last name. Tip: You can also save the record without a chart number to auto-generate a chart number.
-
First visit - This disabled field is the date of the patient's first visit. It updates automatically when you post the first completed procedure for the new patient. It is for reference only and cannot be edited.
-
Last visit - This disabled field is the date of the patient's most recent past appointment. It updates automatically when you post a completed procedure for a patient. This date is for reference only and cannot be edited.
-
Social Security # - If necessary, enter the patient's Social Security Number for patient financing and insurance coverage verification purposes and clicktap the
 button.
-
Primary provider - Select the patient's preferred or primary provider.
-
Discount plan - Select a fee schedule for treatment-planned procedures and charges that will be applied if the patient does not have insurance coverage. If applied, the difference between the provider's fee (if there is no provider's fee, the default fee) for a given procedure and the discount fee displays as a credit adjustment on the ledger.
Note: If the patient has insurance coverage, the selected discount fee schedule is ignored.
-
Billing Type - Select the patient's billing type.
-
Fee Schedule - Select a fee schedule to use for the patient level. If set, the patient-level fee schedule overrides all other fee schedules (Provider, Insurance, or Location Fee Schedules) to calculate:
-
Treatment amounts on procedures.
-
What the patient owes.
-
What insurance will cover.
Note: You cannot set up a patient with a discount plan and a patient-level fee schedule. If attempted, a Validation Error window displays.
-
-
This patient is confidential - Select the checkbox to set the new patient as a confidential patient.
Note: You can only save a patient as confidential patient if you have the View confidential patient security right.
-
Use contact information of the household - Enter an existing patient's name and select their record to enter their address and contact information to this new patient record.
-
Address, City, State, ZIP Code - Enter the street address, city, state, and zip code for the patient's residence. All correspondence will be sent to the listed address.
Important: If the patient is not their own guarantor, bills, account statements, and other financial documents will be sent to the guarantor's address.
-
Phone Type, Phone number, Ext - Select a phone type (Home, Mobile, Work, or Other) and enter the correct number and extension (if applicable) for the patient's primary phone number.
Tips:
-
To add another phone number, clicktap Add Phone.
-
To change the priority of the patient's phone numbers, clicktap the Move Up
 icon.
icon. -
To remove a phone number, clicktap the Remove
 icon.
icon.Note: These icons are not available for the primary phone number.

-
If you enter a mobile phone number for the patient and clicktap Save, the text Automated Text Reminders displays below with a status message (Yes or Carrier not Supported) to indicate whether the number is verified as a supported mobile phone number.
-
If the patient already has a mobile phone number entered, the status message next to the Automated Text Reminders text for that number can be No if the patient is the primary contact for themself or another and has opted out of receiving text message reminders.
Note: If the patient already has a mobile number entered, the status message next to the Automated Text Reminders text can be No if the patient is primary contact for themself or others and opted out of receiving reminders (any other patients with the same primary contact are also opted out).
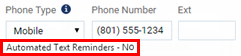
The patient's text message reminder status also displays on the patient's appointments in the upper-right corner and on the Contact Info tab.
-
Once a supported mobile number is entered and saved, the patient is opted in for automated text message reminders, as are any other patients with them as their primary contact or the same mobile number.
Important: If the patient has someone else as their primary contact, the contact must opt in and have a supported mobile number before the patient can receive text message reminders.
-
If you do not have patient consent, or a patient no longer wants to receive text messages, you can set the phone number type to Home to turn off reminders for the patient. Patients can opt-out by texting STOP to 45827 from their mobile phones. Any patients with this patient as their primary contact or with the same mobile number entered in their patient records are also opted out.
-
-
Email - Enter the patient's email address.
Notes:
-
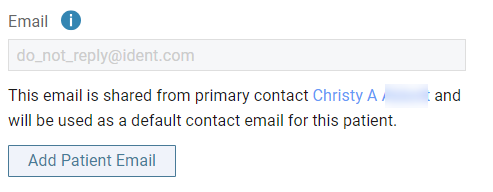
If the patient has someone else as their primary contact, the primary contact's email address displays by default, but you can click Add Patient Email to enter another email address if necessary.
This email address is for reference only and will not be used to reach out to the patient through the automated Patient Communications system.
-
If you add an email address to a patient record for the first time, the patient is their own guarantor, and their Preferred Billing Statement Delivery Method is set to By Mail, an Update Billing Method window displays when you click Save and you are prompted to update the preferred billing statement delivery method to Email.
-
A warning
 icon displays next to the Email field if the email address is a duplicate and already used in Ascend Academic. You can click the icon to whose email has been duplicated and a link to that person.
 There are common cases in which patients may share the same primary contact and therefore will have the same email address.
Example: Family or group situations.

-
-
Emergency Contact - Enter the patient's emergency contact information.
-
First name, Last name - Enter the emergency contact's first and last name.
-
Phone type, Phone number - Enter the emergency contact's phone type and number.
-
Relationship to patient - Enter the emergency contact's relationship to patient.
Note: The Emergency Contact section does not display for simulation patients.
-
-
-
ClickTap Save.
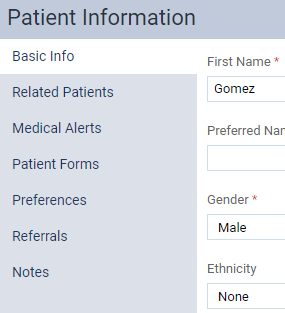
The patient record is created and the other tabs to enter more patient information become available.
-
Enter more patient information on the following tabs as necessary.
-
Related Patients
-
Primary Contact - By default, the patient is set as their own primary contact. If necessary, you can change it to a different person.
-
ClickTap the
 icon.
icon. -
In the search field, enter the contact's name and select from the list.

Note: You can only add a person that has a record in Ascend Academic. If the patient's primary contact is someone who does not have a record, create a patient record for the primary contact and set the status as Non-Patient.
The new primary contact's name and the preferred contact method display on the Patient Information ribbon.
-
-
Add New Member - You can add a household member, such as a family member, as a new patient.
Note: A household is a group of patients with the same primary contact.
To add a new patient record as a household member, complete the following:
-
ClickTap Add New Member.
The Add New patient(s) to Household window displays.
-
Enter the new patient's information in the First Name, (optional) M.I., Last Name, Gender, Birthdate, and the (optional) Preferred Name fields.
-
(Optional) To add more patients, clicktap New Patient and repeat Steps a-b as necessary.
-
ClickTap Save.
Note: The complete list of household members is available when you view the patient record of any member of the household.
-
-
Secondary Contact - You can add a secondary contact person.
-
ClickTap Add Secondary Contact.
-
In the Patient Search field, enter the contact's name and select it from the list or select Switch to "Self" to set the patient as their own secondary contact.
-
-
Primary Guarantor - By default, the patient is set as the primary guarantor, and is financially responsible for their account. If necessary, you can set a different person as the patient's primary guarantor.
-
Click the
icon. -
In the search field, enter the guarantor's name and select from the list.

Note: If the current patient is the guarantor, that patient and all patients for whom that patient is the guarantor display in the list. If the current patient is not the guarantor, only the guarantor and the patient display in the list.
-
-
Secondary Guarantor - You can add a secondary person who is financially responsible for the account.
-
ClickTap Add Secondary Guarantor.
-
In the Patient Search field, enter the secondary guarantor's name and select it from the generated list or select Switch to "Self" to set the patient as their own secondary guarantor.
-
-
-
Medical Alerts
-
ClickTap Add Medical Alert to attach medical alerts to the patient's record.
-
-
Preferences
-
Complete the fields as necessary:
-
Preferred Contact Method - Select a contact method radio button:
-
Call me - Contact by phone. If selected, set the Phone Type field and enter a phone number in the Phone Number field.
-
Text me - Contact by text message. If selected, enter a mobile phone number in the Mobile Number field.
-
Email me - Contact by email message. If selected, enter an email address in the Email field.
Notes:
-
If another person is the patient's primary contact, the preferred contact options are not available. You can clicktap the primary contact's name to open, view, and change their contact information.

-
The selected preferred contact method displays on the Patient Information ribbon, which is available when you are viewing the patient's record.

-
If another person is the patient's primary contact, their name and preferred contact method display on the Patient Information ribbon. Similarly, if the patient is the primary contact for another patient, the patient's name and preferred contact method displays on the other patient's Patient Information ribbon.

-
The preferred contact method does not determine if the patient receives automated reminders as text or email messages.
-
-
Automated Reminders - Select Yes or No to if that the patient (and other patients with the same primary contact) receive automated text message reminders for appointments and recare. These options are available if a supported mobile phone number has been entered on the Basic Info tab and the patient is a primary contact.
Notes:
-
Automated text message reminders for this patient (and other patients with the same primary contact) are sent to the mobile phone number displayed. If multiple mobile phone numbers display, the first one listed on the Basic Infois used.
-
If No is selected, the date that the patient opted out displays. Any patients with the same primary contact or mobile number are also opted out.
-
If Yes is selected, and you select No and clicktap Save, the patient is opted out, the current date displays and a text message is sent to the patient's mobile phone. Any patients with the same primary contact or mobile number are also opted out.
-
The primary contact can resume receiving text messages for the entire household by texting RESUME to 45827.
-
-
Preferred Language - Select the patient's preferred language. If the preferred language is not English, it displays under Language on the Patient Information ribbon.
Note: By default, English is set as the preferred language.
-
Preferred Location - Select the office that handles the patient's treatments.
-
Preferred Billing Statement Delivery Method - Set the patient's preferred billing statement delivery method by selecting one of the following:
-
By Mail - Delivery by mail. If selected, the destination's mailing address displays.
-
By Email - Delivery by email. If selected, the receiving email address displays.
-
Note - If another person is the patient's primary guarantor, the preferred delivery method is based on the primary guarantor's preference. You can clicktap the primary guarantor's name to open, view, and change it.

-
-
Preferred Appointment Day/Time - Set the patient's preferred appointment days and times by selecting the checkboxes that correspond to the preferred days of the week and/or times. The patient's preferred appointment days and times display when you are scheduling appointments for the patient.
Note: The days that are available correspond to the working days set up on your practice's schedule.

-
-
ClickTap Save.
-
-
Referrals
In the Referred By search field, enter all or part of the name of the source, such as a patient, professional, marketing, or other, that referred the patient to your practice, and clicktap the source's name in the generated list.

-
Notes
-
ClickTap Add Note to display the Add Notes window.

-
(Optional) ClickTap the Date field and select a different date.
Note: By default, the date is set to today's date.
-
In the Patient specific note field, enter any important information regarding the patient.
Example: A conversation you have had with the patient in person or electronically.
Note: The note can be up to 5000 characters long.
-
(Optional) ClickTap Insert Date to add today's date at your cursor location in the Patient specific note field.
-
(Optional) To make the note into a notification, under Notification Pages on the right side of the window, complete one of the following:
-
To add the notification to all available areas, select the Add all pages checkbox.
-
To add the notification to only certain areas, select the necessary checkboxes.
Tip: To select all pages within a category (General, Insurance, Financial, Clinical, or Schedule), select the category checkbox. To select an individual page within a category, expand the category and then select the page checkbox.
Note: If necessary, you can deselect the checkboxes to remove the notification from certain areas.
-
-
ClickTap Save.
The note displays on the Patient information page > Notes tab and in the Patient Notes widget of the patient's Overview page.
-
-
Comments
0 comments
Please sign in to leave a comment.