
You can fill openings in your schedule with future appointment that have been marked ASAP and past appointments that have a status of Broken or No Show.
Note: This feature does not include recare appointments.
To fill openings
How to get there
-
From the Schedule menu, select Calendar.
The Calendar page displays.
-
On the Calendar page, customize your view settings to display the time slots.
-
From the Actions menu, select Fill Openings.

The Fill Openings panel displays.

The panel displays a list of future appointments (relative to the day or week currently being viewed) for which the ASAP check box is selected. The panel also displays past appointments (relative to the day or week currently being viewed) that have a status of Broken or No Show.
Note: Recare appointments are not included.
-
On the ASAP and Broken/No Show tabs, as you go down the list of appointments, use the phone number that is displayed on each appointment to contact the corresponding patient.
Tip: To open the Overview page of the patient's record on the Patient tab, clicktap the patient's name at the top of an appointment.
-
If a patient agrees to reschedule their appointment, complete one of the following:
-
ClickTap the appointment.
-
ClickTap the Schedule link.
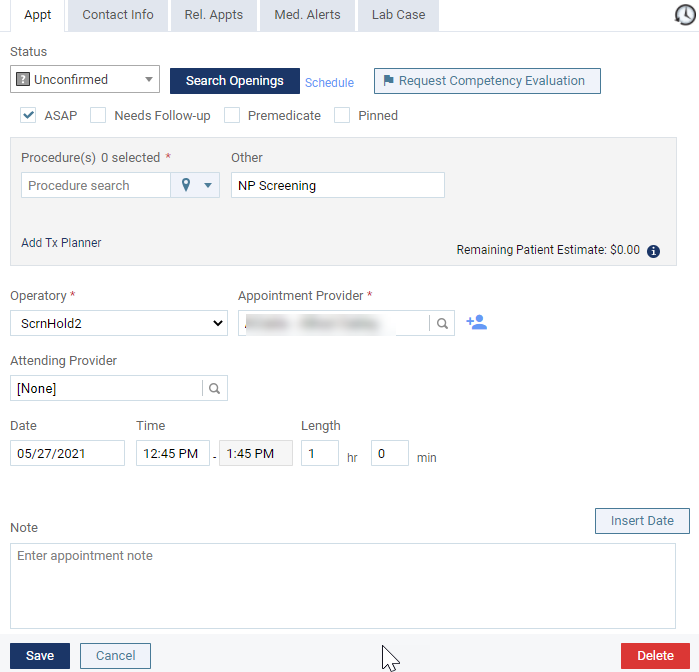
The Appointment Information panel displays.
-
-
Change any of the appointment information, such as the procedure, provider, operatory, date, or time, as necessary.
-
Status - If necessary, select a different status. The corresponding status icon displays on the appointment.
Example: Unconfirmed
 status icon.
Note: By default, all new appointments are set to Unconfirmed.
-
ASAP - Select the check box if the patient wants to be contacted if an earlier date or time becomes available. If selected, the patient displays on the ASAP List and an ASAP
 icon displays on the appointment.
 -
Needs Follow-up - Select the check box if any procedures for this appointment require you to follow up with the patient after their visit. If selected, the patient displays on the Patient Follow-up list after their appointment.
-
Premedicate - Select the check box if the patient prefers to be medicated before procedures are performed or any procedures require premedication.
-
Procedure(s) - ClickTap the field, enter the procedure code, multi-code, or description to narrow the results, and select the appropriate procedure from the results list. To select other procedures, repeat this process.

Tip: To remove a procedure from the appointment, click the corresponding Remove
 icon.
icon. -
Other - Enter a reason other than the selected procedures for the appointment.
-
Add Tx Planner - ClickTap this link to select one or more visits with treatment-planned procedures that you want to attach to the appointment, then clicktap Update appointment.

-
Note: 2
-
Notes:
-
2
-
If your organization has multiple locations, a provider will be available for selection only if that provider has been set up with rights to the current location.
-
-
Attending Provider - Select a faculty member from the list that will supervise and be associated with the appointment.
Note: If your organization has multiple locations, a faculty member is only available for selection if they have rights to the current location.
-
-
Tip: You can enter a time using various formats, including 08:30, 8:30a, or 8:30 AM; 8a or 8am; 13:30, 1:30p, or 1:30 PM; or 1p or 1pm.
-
Length - The length of the appointment is determined by the selected procedures or the specified time range, but you can change the length as needed. The end time of the appointment changes accordingly.
-
If there is an appointment note, an
 icon displays on the appointment.
If you need to add a secondary provider for the appointment, such as a hygienist, you can clicktap the
 icon to display the Additional Provider field and select a secondary provider from the list. A colored box
  (determined by the provider color assigned to this provider) displays on the appointment.
Tip: To remove the Additional Provider field, clicktap the
 icon.
icon. -
-
ClickTap Save.
Comments
0 comments
Please sign in to leave a comment.