
You can review and sign a clinical note in a patient's record. Once signed, the note is locked and can no longer be edited. Depending on the note, the following providers may need to sign the note:
-
Provider: The primary provider.
-
Additional Provider: The secondary provider. If set, the additional provider can sign after the attending or primary provider has signed.
-
Attending Provider: The faculty provider that usually supervises the treatment. This provider is mandatory for students and other users that do not have the Sign clinical notes security right.
Important: You can only sign clinical notes if your digital signature is set up.
Note: If a clinical note has an attending provider set, the primary provider cannot sign.
Tip: You can sign multiple clinical notes from the Clinical Note Tasks page.
To sign a clinical note
How to get there
-
From the Patient menu, under Clinical, select Progress Notes.
The patient's clinical record displays with the Progress Notes tab selected.
Note: If the correct patient is not already selected, use the Patient Search field to access the patient's record.
How to get there
-
From the Patient menu, under Clinical, select Chart.
The patient record displays with the Chart tab selected.
Tip: You can also access clinical notes from the Progress Notes, Quick Exam, Perio, Imaging, or Tx Planner tabs.
Note: If the correct patient is not already selected, use the Patient Search field to access the patient's record.
-
On a patient's clinical record > Progress Notes tab, select a clinical note.

Tip: You can also access clinical notes from other areas such as the Chart tab.
The Clinical Note window displays.

Note: All clinical notes display the creator's name below the Note field.
-
(Optional) Edit and/or add to the note text, and change the other options as necessary.
Note: When you edit a clinical note, the action is recorded in the Audit Log page as a Clinical Note type with 'Update' in Action.
-
Th - Review the assigned teeth. If necessary, you can assign or remove teeth from the note by adding and/or removing the tooth numbers. To add and/or remove tooth numbers, complete the following as necessary:
-
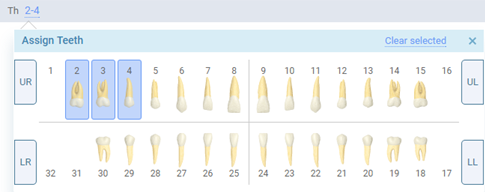
ClickTap the Assign teeth or the assigned tooth number(s) link.

Note: If the note does not have any assigned teeth, the Assign teeth link displays. If the note have assigned teeth, the link displays as the assigned tooth number(s), such as 2,4.
A tooltip displays.
-
To add tooth number(s), select the necessary teeth. To remove tooth numbers, deselect the selected teeth.
-
When ready, clicktap X to close the tooltip.
-
-
Provider - Review the primary provider assigned to the note.
If you need to add a secondary provider to the note, you can clicktap the
 icon to display the Additional Provider field and enter a secondary provider.
 Tip: To remove the Additional Provider field, clicktap the
 icon.
icon. Note: If your organization has multiple locations, a provider is only available for selection if they have rights to the current location. The exception to this is when a provider is associated with the appointment and no longer has access to the current location; that provider is available in the list unless you select a different provider and save the change.
-
Attending Provider - Review the faculty provider assigned to the note.
Note: If your organization has multiple locations, a faculty provider is only available for selection if they have rights to the current location. The exception to this is when a provider is associated with the appointment and no longer has access to the current location; that provider is available in the list unless you select a different provider and save the change.
-
Date and Appointment - Review the set date or linked appointment. If necessary, edit the fields by completing any of the following:
-
To associate with a specific date, set the Date field to the date and set the Appointment field to -.
-
To link to an appointment, set the fields to the appointment's date and time.
Note: If you link to an existing appointment, the Attending provider field automatically updates to the linked appointment's attending provider.
-
-
Note - Review and, if necessary, edit the note. You can also edit the note by inserting one from a template. To insert a note from a template, select a template listed under the Templates tab. If prompted, respond to enter data and then clicktap Done.
-
Ready to sign - If the toggle is set to No, set the toggle to Yes.
-
-
When ready, select Sign as [user name] and enter your password in the Password field.
Tip: If Sign as [user name] is not available, set the Ready to sign toggle to Yes.
-
ClickTap Save.
Comments
0 comments
Please sign in to leave a comment.