
As part of your organization's workflow, you will need to assign a primary provider to patients.
To assign a primary provider to a patient
How to get there
-
From the Settings menu, under Location, clicktap User Accounts.
The User Accounts page displays.
How to get there
-
From the Patient menu, under General, select Patient Information.
The Patient Information page displays.
Note: If the correct patient is not already selected, use the Patient Search field to access the patient's record.
How to get there
-
From the Settings menu, under Patient Care, select Simulation Patients.
The Simulation Patients page displays.
Note: If the correct patient is not already selected, use the Patient Search field to access the patient's record.
-
Ensure the correct user account is enabled as a primary provider.
-
On the User Accounts page, select a user account.

Tip: If necessary, you can use the Search field to locate a user account.
The User Account Information page displays.

-
Under the Basic Info tab, set the Is Provider toggle to Yes to indicate that the user performs dental procedures.
-
ClickTap the User Roles & Locations tab and complete any of the following:
-
To change a user's role at a specific location, select a different role from the User role drop-down list that is aligned with the correct location.
-
To add a role to a location, clicktap Add New Role and set the generated Select Role and the Select Location drop-down lists.
-
To remove access to a specific location, clicktap the X button next to the location that you want to remove. Since each user must have access to at least one location, this button is available only if the user has access to multiple locations.
-
A user can only have one role per location. They cannot have multiple roles at a single location.
-
Any changes on this tab comes into effect the next time the user logs into the system.
Important: Your organization's business owners, doctors, and office managers should be the only ones who have administrative security roles.
Notes:
-
-
ClickTap the Provider Info tab and complete the following:
-
Short Name - An abbreviated name that will be used to identify the user throughout Ascend Academic.
-
Title - The user's title (for example, DMD or DDS).
-
Specialty - The user's specialty.
-
Provider Appointment Color - The appointment's color that will only display when this user is set as the rendering provider. You can clicktap the color swatch to select a different color.
-
Birthdate - Enter the user's birthdate.
-
Is a Primary Provider - Set the toggle to Yes to allow the user to be selected as a patient's primary provider and as a billing and/or rendering provider for claims.
Tip: This option cannot be changed if the user is assigned as the primary provider for at least one patient. To view a list of the patients who have this provider as their primary provider, clicktap the [number of] patient(s) link in the yellow notification message.

-
Signature On File - Set the toggle to Yes so that this user's claims state that there is a signature on file for this user.
-
Address 1, Address 2, City, State, ZIP Code - The user's work address.
-
State ID # - The user's state license number.
-
TIN # - The user's TIN or SSN.
-
NPI # - The user's NPI for electronic claims.
-
Medicaid ID # - The user's Medicaid ID number.
-
Provider # - The user's provider number.
-
BCBS # - The user's Blue Cross/Blue Shield number.
-
DEA # - The user's DEA number for prescriptions.
-
CS # - The user's Controlled Substance number for Washington D.C prescriptions.
-
BlueShield # - The user's Blue Shield number.
-
-
ClickTap the Fees tab and complete the following:
-
Fee Schedules - The fee schedule that is used to bill patients for procedures performed by this user.
-
Contracted With - Insurance carriers the user is contracted with that receive the user's billed procedures. To set, expand a section that has the first letter of the insurance carrier's name, locate it, and then select its checkbox. Repeat if the user is contracted with multiple insurance carriers
-
-
ClickTap the Working Hours tab and complete the following:
-
Review the displayed location's working hours.

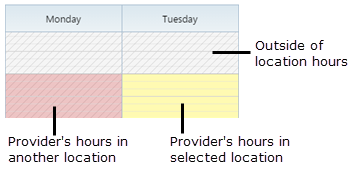
The tab displays the following:
-
Gray time slots with gray hatched lines - A time slot outside of office's working hours; the office is closed.
-
Yellow time slots - The user is available for work during that specific time when the office is open.
-
White time slots - The user is not available for work even though the office is open.
If the user has access to multiple locations, working hours at other locations display in pink with gray hatched lines for your reference.
-
-
-
ClickTap Save.
Once you edit a user account, the user will receive an email message stating that information has been updated.
-
-
Complete any of the following:
-
Assign the provider to a patient or unique sim patient as primary provider.
-
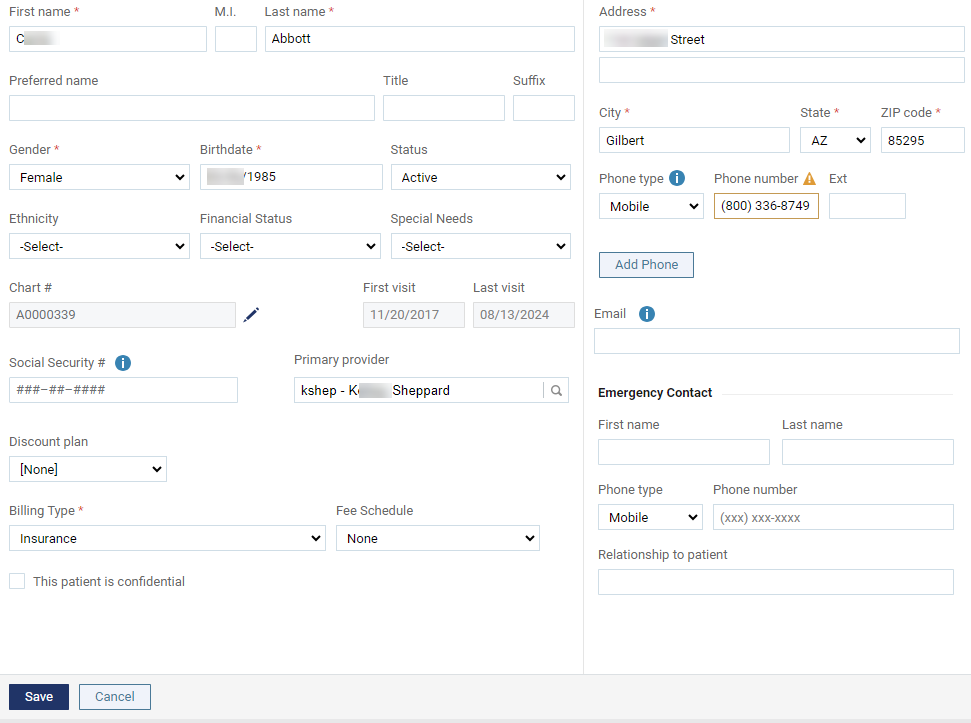
From the Patient Information page, set the Primary provider field to the correct user.
-
ClickTap Save.
-
-
Assign the provider to a sim patient template as primary provider.
Note: The sim patient template will be copied and the provider will be assigned to the copy.
-
From the Simulation Patients page, select a template under Simulation Patients with Templates.

-
ClickTap Copy and Assign to display the Select primary provider window.
Note: The button is disabled if you do not have the Create simulation patient security right.

-
Select the Provider radio button.
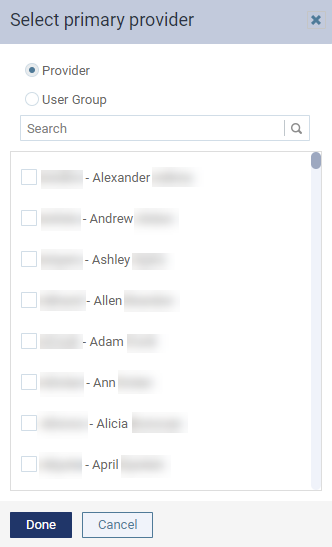
Note: The window displays the list of providers in alphabetical order of their short name.
-
Select the checkboxes of the providers you want to assign a copy of the template.
Tip: You can use the Search field to locate a specific provider by their short name, first name, or last name.
-
When ready, clicktap Done.
The page refreshes to display the template with the new copies.
Tip: You can select a listed copy to edit its patient information.
-
-
Comments
0 comments
Please sign in to leave a comment.