
Procedure codes represent the services that you render and products that you sell. Your Ascend Academic database comes with all the current ADA Procedure Codes, which are updated automatically as needed, but you can add your own custom procedure codes to your organization.
Notes:
-
Adding a procedure code to one location adds the same procedure code to the other locations of your organization. However, the default fee associated with the procedure code will be $0.00 in the other locations, so you must manually specify a default fee for the procedure code in every other location.
-
When you add a procedure code, Ascend Academic automatically adds it to every fee schedule in all locations of your organization. Additionally, the fee for the procedure code in the current location's preferred fee schedule will be the same as the procedure code's default fee. However, all other fee schedules in all locations will have a $0.00 fee for the procedure code, so you must manually specify a fee for the procedure code in every other fee schedule in every location.
To add a procedure code
How to get there
-
If you are not already viewing the correct location, select it on the Location menu.
-
On the Settings menu, under Production, clicktap Procedure Codes & Conditions.
The Procedure Codes & Conditions page opens.
-
On the Procedure Codes tab of a location's Procedure Codes & Conditions page, clicktap Add Procedure Code.

Tip: You can verify that the procedure code that you want to add does not already exist before adding it (you can do this before or after clickingtapping Add Procedure Code). To do it before, with All selected in the View list, enter a code or description in the Search For Specific Procedure field.
The Create Procedure Code window displays.

-
Leave Procedure code selected as the Code type. You cannot change the code type once you save the procedure.
-
Specify the code, description, office code, category, location's fee, and treatment area; and set up the other options as necessary.
Set up the following options:
-
Important:

-
Description - Enter the standard ADA description or a custom description for the procedure.
-
Office Code - Enter the shorthand version of the ADA code description or a custom code for this procedure.
-
Category - Select the ADA Procedure Code category that this procedure belongs to. There is also an option to specify that this procedure is a product that will not be billed to insurance.
Examples: A power toothbrush or a home bleaching kit.
-
Add to favorites - Favorite procedures are the ones that you use most commonly. Set this toggle to On to mark this procedure as a favorite so that you have quick and easy access to the procedure when you are charting procedures. Favorites have a yellow star next to them in the list of procedure codes on the Procedure Codes & Conditions page.
-
Bill to insurance - To flag the procedure as being billable to insurance by default when posting the procedure, set the toggle to On. If the procedure should not be billable to insurance by default, set the toggle to Off. Even though this option is available for an alias procedure code or a non-standard code, some carriers may reject that procedure on a claim or may reject the entire claim due to the presence of an unrecognized procedure code, so turn this option on with care if the procedure code is not standard.
-
Location fee - Enter the default amount that you charge at this location for this procedure.
-
.
-
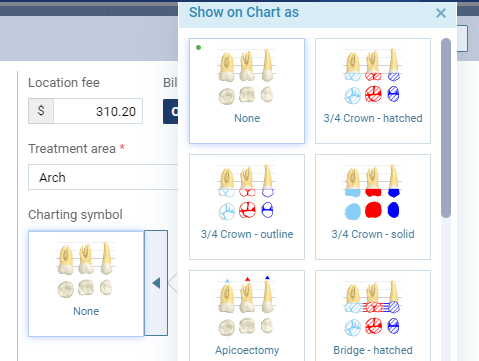
Charting symbol - According to the selected Treatment area, select how you want this procedure to be charted (only the symbols that are applicable for the selected treatment area display in the list):
-
Tooth, Quadrant, Range, Sextant, or Arch - None, 3/4 Crown - hatched, 3/4 Crown - outline, 3/4 Crown solid, Apicoectomy, Bridge - hatched, Bridge - outline, Bridge retainer crown - hatched, Bridge retainer crown - outline, Crown - hatched, Crown - outline, Crown solid, Denture - hatched, Denture - outline, Denture - solid, Extraction, Implant - blade, Implant - cylinder, Pins, Posts, Root canal, Sealant, Bridge - solid, or Bridge retainer crown - solid.
-
Surface - None, Surface restoration - dotted, Surface restoration - hatched, or Surface restoration - solid.

-
Root - None, Apicoectomy, or Root canal.

-
Mouth - Not applicable.
-
Require clinical note - To require a clinical note for this procedure when it is completed, set the toggle to Yes. With the toggle set to Yes, completing this procedure affects the Clinical Note Tasks widget > Not Entered count on a location's Overview page and consequently which patients display on the Clinical Note Tasks page > Not Entered tab. With the toggle set to No, completing this procedure does not affect the count of clinical notes that were not entered but should have been.
Tip: Most procedure codes in the Product category should not require a clinical note.
-
Require treatment info - If the Code corresponds to an orthodontic procedure (D8001-D8999), this toggle displays. To require the placement date and remaining months for this procedure to be entered when the procedure is completed, set the toggle to Yes.
-
With the toggle set to Yes, if the treatment information is missing for this procedure, Ascend Academic does the following to remind you to enter the treatment information:
-
When you attempt to complete the procedure, a pop-up message displays. To proceed, you must enter the treatment information.
-
When you attempt to create a claim for the procedure a warning message displays. To include the procedure on a claim, you must first enter the treatment information.
-
With the toggle set to No, the options to enter the treatment information are not available for this procedure.
Tip: Most procedure codes in the Product category should not require treatment information.
-
-
ClickTap Create.
Comments
2 comments
The article is not complete. The last sentence ends abruptly.
Thank you Melissa, this has been fixed. Sorry for the delay!
Please sign in to leave a comment.