
You can acquire intraoral X-rays with digital sensors, phosphor plates, and third-party programs.
Notes:
-
For the complete list of acquisition devices supported by Ascend Academic Imaging, see Supported imaging acquisition devices.
-
If the acquisition stops at any point because of a device error, you can fix the issue and clicktap Start to proceed with the acquisition.
Important:
-
To verify proper operation prior to use on patients, a non-human object should be X-rayed when installing a new image acquisition device.
-
The acquisition agent must be installed before you can acquire images. If prompted with an Acquisition Activation window, you must clicktap the Click here link to begin downloading the acquisition agent installer.
To acquire intraoral X-rays
How to get there
-
From the Patient menu, under Clinical, select Imaging.
The patient record displays with the Imaging tab selected.
Tip: You can also access imaging from other clinical areas such as Chart, Progress Notes, Quick Exam, Perio, or Tx Planner.
Note: If the correct patient is not already selected, use the Patient Search field to access the patient's record.
-
On the patient's record > Imaging tab, clicktap the Imaging tab menu and select Acquire Images.

The first imaging procedure in your favorites list displays.
Tip: Your favorites list should include your most frequently used imaging procedures. If it does not, we recommend you adjust your favorites.

Note: If prompted with a Diagnostic Use Warning window, select the I accept the above-mentioned policy checkbox and clicktap Accept & Go to Imaging.
-
(Optional) If necessary, select a different imaging procedure that corresponds to the acquisition type for intraoral X-rays (such as Bitewing Single Image or Intraoral Full Mouth Images).
-
Under Imaging Procedures, clicktap one of the following tabs and select the procedure you want to perform.
-
Favorites - Displays a list of imaging procedures that you set as your favorite.
-
Standard - Displays a list of imaging procedures with standard imaging procedure codes from RCI.
-
Custom - Displays a list of imaging procedures with customized imaging procedures codes created by your organization's users.
Note: Each procedure corresponds to an acquisition type: individual intraoral X-ray, intraoral X-ray series, extraoral X-ray, intraoral photo, extraoral photo, CAD/CAM scan, or 3D volume.

-
-
-
Under Billing Options, set the following fields:
-
Apply charges: Select the checkbox if the fee for the selected procedure will be posted or deselect the checkbox a zero amount will be posted.
-
Bill to insurance: Select the checkbox if the patient's insurance carrier will be billed for the procedure.
-
Select Provider: Select the provider you want to associate with the procedure from the drop-down list.
-
-
Set the Acquisition Options for intraoral X-rays.
Individual image
-
From the Tooth chart, select the teeth for the acquisition session.

Tips:
-
For an individual bitewing, at least one tooth of the maxillary arch and at least one tooth of the mandibular arch must be selected.
-
To deselect all teeth, clicktap Clear selected.
-
-
(Optional) To allow for the automatic retaking of the radiograph until you have a satisfactory image, select the Enable auto-repeat checkbox.
Note: If selected, only the last image is saved.
Important: If you are using a phosphor plate to acquire the image, ensure the Enable auto-repeat checkbox is not selected.

-
If acquiring an intraoral X-ray using a standard imaging procedure and no interpretation or analysis of the acquired image will be done in your office, complete one of the following to use an alternative procedure code:
-
For a single periapical image, select the Without interpretation/analysis using code D0707 checkbox.
-
For a single occlusal image, select the Without interpretation/analysis using code D0706 checkbox.
-
For a single bitewing image, select the Without interpretation/analysis using code D0708 checkbox.
-
-
Under Task to Perform, clicktap the Acquire Images tab to review the devices installed and configured on the computer.
-
If necessary, click the arrow button and select the correct device.

Series of images
-
Under Acquisition sequence, complete one of the following:
-
To acquire a full mouth series, select the FMX 18 or FMX 21 radio button.
-
To acquire a 3-periapical series, select the Maxillary or Mandibular option.
-
To acquire a 4-bitewing + 3-periapical series, select the Maxillary or Mandibular option.
-
To acquire a 4-bitewing + 4-periapical series, select the 4BW + 4PA or 4BW + 4PA Alt option.
-
To acquire 7-bitewing + 3-periapical series, select the Maxillary or Mandibular option.
-
To acquire a 2-bitewing series, select Pediatric, Left bitewings, orRight bitewings.
-
To acquire another series (such as 4-bitewing, 7-bitewing, 2-bitewing + 2-occlusal, 2-bitewing + 2-periapical, 4-bitewing + 4-periapical, and 4-bitewing + 6-periapical4-bitewing + 3-periapical series, skip to Step b.
-
-
Select Default sequence or a custom order.
-
(Optional) To change the order of the acquisition sequence, clicktap each numbered box on the graphic in the order that you will acquire the images.

Tips:
-
To undo the previous selection, clicktap Undo.
-
To undo all selections, clicktap Reset.
-
To save the custom sequence for future use, enter a name for the sequence, and select Save as ([sequence name]).

-
To delete a custom sequence, select the sequence, clicktap the Delete
 icon to turn it red, then clicktap the icon again.
-
-
If acquiring a full-mouth, 2-bitewing, or 4-bitewing series using a standard imaging procedure and no interpretation or analysis of the acquired image will be done in your office, complete one of the following to use an alternative procedure code:
-
For a full-mouth series, select the Without interpretation/analysis using code D0709 checkbox.
-
For a 2-bitewing or 4-bitewing series, select the Without interpretation/analysis using code D0708 checkbox.
-
-
Under Task to Perform, clicktap the Acquire Images tab to review the devices installed and configured on the computer.
-
If necessary, click the arrow button and select the correct device.
-
-
If you are using phosphor plates to acquire one or more images, acquire the radiographs as needed before continuing.
-
Position a phosphor plate in the patient's mouth and align your X-ray source cone to point at the phosphor plate, utilizing the paralleling or bisecting angle techniques. Ensure the edge of the phosphor plate with the dot or letter points upward for all vertical placements or points toward the back of the mouth for all horizontal placements.
-
Set the appropriate exposure time on your X-ray source's control panel for the specific imaging device in use and trigger the radiation emission.
Note: For details about settings and usage, refer to documentation provided by the X-ray source manufacturer.
Important: The Ascend Academic Imaging software does not directly control the X-ray source or exposure settings. Radiation from an X-ray source initiates the imaging device (sensor) to capture an image, and this is controlled by someone triggering the X-ray source.
-
Repeat Steps a-b as needed to acquire additional radiographs.
-
-
ClickTap Proceed with Acquisition and complete the acquisition process for one or more intraoral X-rays using your selected device.
Individual image with a sensor
-
Wait for the selected acquisition device to initialize and for the X-ray sensor to arm and become ready for exposure.

-
(Optional) To change the acquisition device, clicktap the Available Devices for Procedure arrow and select an option.
-
Depending on the selected acquisition device, compete one of the following:
-
Schick 33 / Xios XG - From the Apply Device Filter list, select the filter that you want to have applied automatically to the image that will be acquired or select No Filter to not apply any filter.
-
Sirona / Schick USB 3 / AE - From the Apply Device Filter list, select the sharpness filter that you want to have applied automatically to the image that will be acquired or select No Filter to not apply any filter.
-
Other direct, software, or TWAIN device - From the Apply Enhancement list, select the type of enhancement that you want to have applied automatically to the image that will be acquired, select Custom to apply the default custom sharpness level, or select Not Enhanced to not apply any enhancement.
Tip: When viewing an acquired image, you can turn enhancements off and on, but the original, raw image is preserved.
-
-
Position the sensor in the patient's mouth and align your X-ray source cone to point at the sensor, utilizing the paralleling or bisecting angle techniques.
-
Set the appropriate exposure time on your X-ray source's control panel and trigger the radiation emission to initiate the X-ray image capture.
Note: For details about settings and usage, refer to documentation provided by the X-ray source manufacturer.
Important: The Ascend Academic Imaging software does not directly control the X-ray source or exposure settings. Radiation from an X-ray source initiates the imaging device (sensor) to capture an image, and this is controlled by someone triggering the X-ray source.
The image saves to the patient's record and a preview displays.
If you are acquiring in endo mode, the sensor is re-armed automatically and becomes ready for another exposure. If not acquiring in endo mode, ignore the remaining steps.

-
If you are acquiring in endo mode, repeat Steps d-e as needed to retake the radiograph until you have acquired a satisfactory image.
-
When ready to stop the acquisition, clicktap Finish Acquisition.
Individual image with a phosphor plate scanner
-
Wait for the selected acquisition device to initialize and for the scanner to become ready to scan.
-
From the Apply Enhancement list, select the enhancement you want applied to the image.

Tip: When viewing an acquired image, you can turn enhancements off and on, but the original, raw image is preserved.
-
Put the phosphor plate in the scanner with the edge with the dot or letter pointed up, according to the manufacturer's instructions.
The scanner begins scanning the plate.
When the scanner finishes scanning the plate, the image is saved to the patient's record.
Individual image with a third-party program (TWAIN or bridge)
-
Use the options in the third-party TWAIN interface or imaging program that opens to get ready to acquire the image.
-
Position the sensor in the patient's mouth and align your X-ray source cone to point at the sensor, utilizing the paralleling or bisecting angle techniques.
-
Set the appropriate exposure time on your X-ray source's control panel and trigger the radiation emission to initiate the X-ray image capture.
Note: For details about settings and usage, refer to documentation provided by the X-ray source manufacturer.
Important: The Ascend Academic Imaging software does not directly control the X-ray source or exposure settings. Radiation from an X-ray source initiates the imaging device (sensor) to capture an image, and this is controlled by someone triggering the X-ray source.
-
Close the third-party TWAIN interface or imaging program.
The image saves to the patient's record.
Series of images with a sensor
-
Wait for the selected acquisition device to initialize and for the X-ray sensor to arm and become ready for exposure.

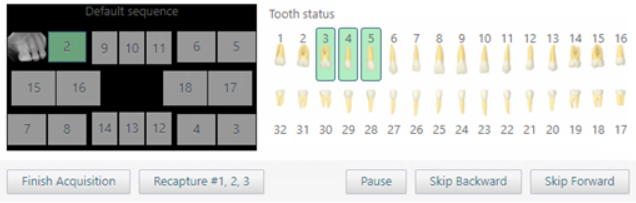
Note: The first step in the acquisition sequence is selected automatically (as indicated by the green, numbered box) on the sequence diagram, and the applicable teeth are selected on the Tooth status chart for your reference.
-
Depending on the selected acquisition device, compete one of the following:
-
Schick 33 / Xios XG - From the Apply Device Filter list, select the filter that you want to have applied automatically to the image that will be acquired or select No Filter to not apply any filter.
-
Sirona / Schick USB 3 / AE - From the Apply Device Filter list, select the sharpness filter that you want to have applied automatically to the image that will be acquired or select No Filter to not apply any filter.
-
Other direct, software, or TWAIN device - From the Apply Enhancement list, select the type of enhancement that you want to have applied automatically to the image that will be acquired, select Custom to apply the default custom sharpness level, or select Not Enhanced to not apply any enhancement.
Tip: When viewing an acquired image, you can turn enhancements off and on, but the original, raw image is preserved.
-
-
Position the sensor in the patient's mouth and align your X-ray source cone to point at the sensor, utilizing the paralleling or bisecting angle techniques.
-
Set the appropriate exposure time on your X-ray source's control panel and trigger the radiation emission to initiate the X-ray image capture.
Note: For details about settings and usage, refer to documentation provided by the X-ray source manufacturer.
Important: The Ascend Academic Imaging software does not directly control the X-ray source or exposure settings. Radiation from an X-ray source initiates the imaging device (sensor) to capture an image, and this is controlled by someone triggering the X-ray source.
The image saves to the patient's record, and a preview of the image displays. If the image that you just acquired was not for the last step in the acquisition sequence, the next step is selected automatically (as indicated by the green, numbered box) on the sequence diagram, the applicable teeth are selected on the Tooth status chart for your reference, and the X-ray sensor becomes ready for exposure again.

-
Repeat Steps c-d until you finish acquiring images for the series.
Tips:
-
If you need to change the acquisition device, clicktap Pause, select a different device on the Available Devices for Procedure menu, and clicktap Capture [teeth] to resume the acquisition.
-
To stop the acquisition session before you finish acquiring the entire series, clicktap Finish Acquisition. You can resume the incomplete exam later if necessary.
-
To replace an image that you have just acquired, clicktap Recapture [teeth] and retake the image. The Select Image window displays. Keep the Delete rejected image checkbox deselected to have the rejected image hidden or select the checkbox to have the rejected image be deleted. Then clicktap Keep New to keep the recaptured image and put it on the top of the image stack for the template slot or Keep Old to keep the existing image and leave it on the top of the image stack for the template slot. You can repeat this process as needed until you have acquired a satisfactory image.

-
To skip ahead in the acquisition sequence one step, clicktap Skip Forward. This button is available only if the current step in the sequence is not the last step.
-
To go backward in the acquisition sequence one step, clicktap Skip Backward. This button is available only if the current step in the sequence is not the first step, and if the previous step in the sequence does not have an image.
-
To go to any step in the acquisition sequence to acquire or replace an image, clicktap the applicable placeholder (numbered box) on the sequence diagram. The applicable teeth on the Tooth status chart are selected automatically for your reference. After acquiring or replacing the image, the program advances to the next step in the acquisition sequence that does not have an image.
-
Series of images with a phosphor plate scanner
-
Wait for the selected acquisition device to initialize and for the scanner to become ready to scan.
-
From the Apply Enhancement list, select the enhancement you want applied to the images.
Tip: When viewing an acquired image, you can turn enhancements off and on, but the original, raw image is preserved.
-
Put the phosphor plate in the scanner with the edge with the dot or letter pointed up, according to the manufacturer's instructions.
The scanner begins scanning the plate.
When the scanner finishes scanning the plate, the image is saved to the patient's record.
As the scanner finishes a plate, the image displays as a thumbnail image on the panel at the bottom of the imaging program.

-
Drag the thumbnail images one at a time to the appropriate template boxes.

Note: If the orientations the phosphor plates were in were correct when the radiographs were taken, the images will have the correct orientation in the series. When you drop a thumbnail image into a box of the template, the image rotates as needed for that position.
-
Complete any of the following as necessary:
-
Stack multiple images in one template slot - Drag a thumbnail image from the panel or an image from a template slot to a template slot with an image assigned. That image is placed on top of the image stack for that template slot by default, but you can choose a different image to be on top.
-
Choose the top image for a template slot with multiple images - ClickTap the Next or Previous button as needed to navigate between the images in the stack. The image that is visible in the stack when you clicktap Begin Uploading will be set as the top image of the stack by default, but you can choose a different image to be on top later.
-
Change the orientation of an image in the template - Navigate to the correct image in the stack for a template slot (if multiple images are assigned to that template slot), select the image to view the toolbar, and clicktap any of the available buttons as needed: Flip Horizontal, Flip Vertical, Rotate Counterclockwise (90 degrees), and/or Rotate Clockwise (90 degrees).
-
Swap two images in the template - Drag one of the images to another image's box.
-
Remove an image from the template - Navigate to the correct image in the stack for a template slot (if multiple images are assigned to that template slot) and drag the image back to the panel at the bottom.
-
-
ClickTap Begin Uploading to save the mounted images to the patient's record.

If not all thumbnail images have been mounted to the template when you clicktap Begin Uploading, a message displays, stating that unassigned images will not be saved to the patient's record.

-
If prompted, clicktap one of the following buttons:
-
Send to Recovery - This saves the unassigned images. You can assign them to the patient later using the existing functionality for recovering images.
-
Discard Images - This deletes the unassigned images permanently.
-
Stay on Page - This allows the user to continue to assign unassigned images or make other changes without leaving the page.
-
If any images fail to upload, a message displays and provides the option for you to recover the images. ClickTap Recover Images to begin the recovery process.
Series of images with a third-party program (TWAIN or bridge)
-
Use the options in the third-party TWAIN interface or imaging program that opens to get ready to acquire images.
-
Position the sensor in the patient's mouth and align your X-ray source cone to point at the sensor, utilizing the paralleling or bisecting angle techniques.
-
Set the appropriate exposure time on your X-ray source's control panel and trigger the radiation emission to initiate the X-ray image capture.
Note: For details about settings and usage, refer to documentation provided by the X-ray source manufacturer.
Important: The Ascend Academic Imaging software does not directly control the X-ray source or exposure settings. Radiation from an X-ray source initiates the imaging device (sensor) to capture an image, and this is controlled by someone triggering the X-ray source.
-
Repeat Steps b-c as needed to acquire other images for the series.
-
Close the third-party TWAIN interface or imaging program.
The images save to the patient's record.
-
Drag the thumbnail images one at a time to the appropriate template boxes.
Note: If the orientations the phosphor plates were in were correct when the radiographs were taken, the images will have the correct orientation in the series. When you drop a thumbnail image into a box of the template, the image rotates as needed for that position.
-
Complete any of the following as necessary:
-
Stack multiple images in one template slot - Drag a thumbnail image from the panel or an image from a template slot to a template slot with an image assigned. That image is placed on top of the image stack for that template slot by default, but you can choose a different image to be on top.
-
Choose the top image for a template slot with multiple images - ClickTap the Next or Previous button as needed to navigate between the images in the stack. The image that is visible in the stack when you clicktap Begin Uploading will be set as the top image of the stack by default, but you can choose a different image to be on top later.
-
Change the orientation of an image in the template - Navigate to the correct image in the stack for a template slot (if multiple images are assigned to that template slot), select the image to view the toolbar, and clicktap any of the available buttons as needed: Flip Horizontal, Flip Vertical, Rotate Counterclockwise (90 degrees), and/or Rotate Clockwise (90 degrees).
-
Swap two images in the template - Drag one of the images to another image's box.
-
Remove an image from the template - Navigate to the correct image in the stack for a template slot (if multiple images are assigned to that template slot) and drag the image back to the panel at the bottom.
-
-
ClickTap Begin Uploading to save the mounted images to the patient's record.
If not all thumbnail images have been mounted to the template when you clicktap Begin Uploading, a message displays, stating that unassigned images will not be saved to the patient's record.
-
If prompted, clicktap one of the following buttons:
-
Send to Recovery - This saves the unassigned images. You can assign them to the patient later using the existing functionality for recovering images.
-
Discard Images - This deletes the unassigned images permanently.
-
Stay on Page - This allows the user to continue to assign unassigned images or make other changes without leaving the page.
-
If any images fail to upload, a message displays and provides the option for you to recover the images. ClickTap Recover Images to begin the recovery process.
-
-
ClickTap Recover Images to begin the recovery process.
Comments
0 comments
Please sign in to leave a comment.