
Ascend Academic Imaging is a web-based application and is available immediately for use once you have purchased it and enabled it by Henry Schein One. However, you must install the following on each computer that you want to use to acquire images:
-
Drivers - Any drivers for the supported intraoral and/or extraoral acquisition devices that you want to use.
-
Acquisition agent - A small application that runs in the background and handles the communication between your acquisition devices and Ascend Academic Imaging.
Tip: You do not need to install the acquisition agent on computers that you will be using to only view images.
Note: During the installation of the acquisition agent, a security certificate is installed automatically to allow for secure communication between the browser running Ascend Academic Imaging and the acquisition agent.
Note: If you do not perform the necessary setup before attempting to acquire images, you will be asked to perform the necessary setup when you attempt to acquire images, and will not be allowed to proceed until setup is complete.
Important:
-
(Windows only) Verify that the Microsoft .NET 4.0 framework is installed before you install the acquisition agent. If .NET 4.0 is not installed, you must install it.
-
Confirm you are logged on to your operating system (Windows or Macintosh) as a local administrator (not as a domain administrator) before you install the acquisition agent.
To install and configure the acquisition agent (Windows)
How to get there
-
From the Patient menu, under Clinical, select Imaging.
The patient record displays with the Imaging tab selected.
Tip: You can also access imaging from other clinical areas such as Chart, Progress Notes, Quick Exam, Perio, or Tx Planner.
Note: If the correct patient is not already selected, use the Patient Search field to access the patient's record.
-
Download the agent installer on your computer.
-
On the patient's record > Imaging tab, clicktap the Imaging tab's menu and select Acquire Images.

Note: If prompted with the Diagnostic Use Warning window, select the I accept the above-mentioned policy check box and clicktap Accept & Go to Imaging.
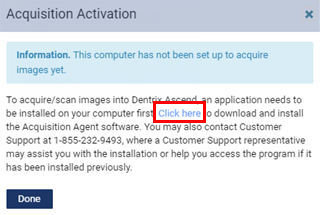
The Acquisition Activation window displays.

-
ClickTap the Click here link to download the agent installer.
-
-
Install the acquisition agent.
-
Run Acquisition Agent Installer.exe.
-
On the welcome screen, clicktap Next.
-
On the Choose Components screen, leave Acquisition Agent selected and clicktap Next.
-
On the Choose Install Location screen, leave the default Destination Folder selected, or clicktap Browse to select a different location, and then clicktap Install.
-
On the completion screen, clicktap Finish.
-
-
Configure the acquisition agent.
-
ClickTap the
 icon in the notification area of the Windows taskbar and select Preferences.
The Preferences window displays.
-
Set up the following tabs as necessary:
-
General

-
Joystick - If you use a "Generic" intraoral camera with a joystick button interface instead of proprietary buttons, select the Use Joystick with Generic Camera check box. The camera button will use a specific joystick number. This is typically 0 if no other joysticks are installed on the computer. Enter a number from 0 - 10 for Joy Number.
Note: If you use a Digital Doc camera, and it has been installed to use a port other than 0, you must specify the appropriate joystick number.
-
Still Pin - If you use a "Generic" intraoral camera with a still pin to initiate captures, you must install still pin support for that camera. Make sure that the camera is plugged in and that all the necessary drivers for that device are installed before you attempt to install still pin support. ClickTap Install Still Pin Support, clicktap OK on the generated message, select the camera that you want to install still pin support for, and press the Enter key when the installation is complete. The Use still pin with Generic Camera check box is selected automatically, but you can deselect the check box if at any time you decide that you do not want to use a still pin camera.
-
Grayscale JPEG Compression - Ascend Academic Imaging can use JPEG lossy compression or PNG lossless compression for grayscale images (intraoral and extraoral X-ray images). To specify the compression method for a device, select that Device, and select or deselect the Use JPEG Compression check box. If selected, Ascend Academic Imaging uses a JPEG lossy compression (which has been optimized for grayscale images and uses a Q factor of 96) to obtain near-perfect-quality images. If deselected, Ascend Academic Imaging uses PNG lossless compression (which may produce larger file sizes and negatively impact the performance of uploading and downloading images). Repeat this process as needed for any other devices.
Note: The check box is selected for every acquisition device by default.
-
Alternate Button Workflow - For the following intraoral cameras, you can specify whether you want to use an alternative functionality for the capture button or use the standard functionality: generic cameras, DEXcam 3 and 4 cameras, Sopro cameras, and Digital Doc Iris and Iris HD cameras. With the alternative button functionality enabled for a camera, after you push the button once to freeze the video stream, you either push once to capture the image or push twice to not capture it. The standard functionality does not support pushing the button twice to not capture the video frame. To specify the button functionality for a camera, select that Device, and select or deselect the Use Pause/Capture Workflow check box. Repeat this as necessary for any other devices.
-
Show Log Files - The acquisition agent logs actions that it performs for debugging, troubleshooting, and performance monitoring. To view the log, clicktap Show Log Files.
-
-
Digital Sensor
-
DEXIS
-
Use Binned Acquisition - In the Dexis imaging software versions 9 and 10), "binned" is the default operating mode for Dexis sensors, so this check box is selected by default for Ascend Academic Imaging.
-
Correction Path - This is the location of the calibration files for Dexis sensors. The default is C:DexisFlashdir.
-
-
Hamamatsu Correction Path - This is the location of the calibration files for Hamamatsu sensors. The default is C:Program Files (x86)Acquisition AgentCorrection Files.
-
e2v Correction Path - This is the location of the calibration files for e2v sensors. The default is C:Program Files (x86)Acquisition AgentCorrection Files.
-
Hamamatsu - The Gamma correction value defines the relationship between a pixel's numerical value and its actual luminance; use it to redistribute the tonal levels of a raw image to be closer to how human eyes perceive them (on a standard monitor). The Integration Time, Incidence Threshold, and Integration End Threshold options determine how Ascend Academic Imaging control the integration timing and triggering of sensors. You may want to change these settings if, for example, you use a low-dose, portable X-ray machine.
-
Planmeca - For Planmeca sensors, "binned" is the default operating mode, so the Use Binned Acquisition check box is selected by default for Ascend Academic Imaging.
-
e2v Settings - ClickTap the button to configure the following settings for e2v sensors:
-
Use Binned Acquisition - Controls whether "binned" operating mode is on or off.
-
Sensor Gain - Controls the output signal strength from sensors.
-
Integration Time - Determines how Ascend Academic Imaging controls the integration timing of sensors. You may want to change this if, for example, you use a low-dose, portable X-ray machine.
-
Triggering Level - Determines how Ascend Academic Imaging controls the triggering of sensors. You may want to change this if, for example, you use a low-dose, portable X-ray machine.
-
Gamma Level - Defines the relationship between a pixel's numerical value and its actual luminance; use it to redistribute the tonal levels of a raw image to be closer to how human eyes perceive them (on a standard monitor).
-
Do Not Use Sensor Calibration Files - Controls whether the sensor calibration files are used or not.
-
Rotate Size 2 Image (XDR) - Controls whether images captured using size 2 sensors are rotated or not.

Important: Configure the settings for size 1 sensors separately from the size 2 sensors.
-
-
Schick Settings - ClickTap the button to configure the following settings for Schick sensors:
-
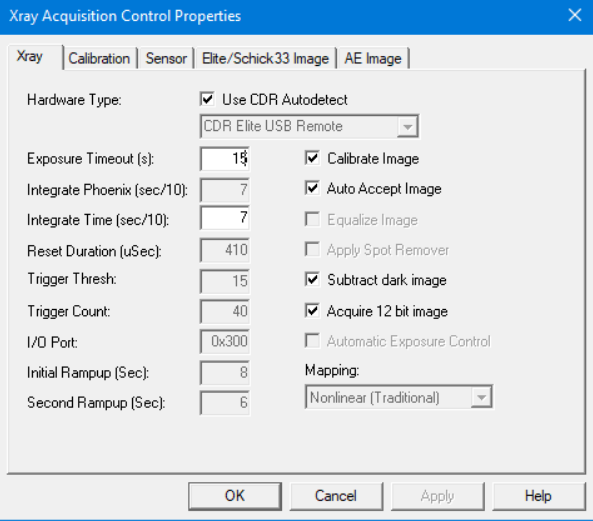
Xray (the availability of these options may vary)
-
Hardware Type - To automatically detect and select either the sensor that is currently connected or the sensor that was most recently connected, select the Use CDR Autodetect check box. To manually select the sensor, deselect the Use CDR Autodetect check box and select the correct device from the list of recognized devices.
-
Exposure Timeout - Controls the amount of time (in seconds) to wait for exposure before timing out. This applies only if the "AutoTake" acquisition mode is off.
-
Integrate Phoenix - Displays the amount of time (in tenths of a second) that an APS sensor will spend in "integrate" mode.
-
Integrate Time - Controls the amount of time (in tenths of a second) that an image is accumulated.
-
Reset Duration - Displays the amount of time (in milliseconds) that an APS sensor will spend between triggering and acquisition.
-
Trigger Thresh - Indicates the threshold when an image has been acquired (also called AUTO_THRESH).
-
Trigger Count - Indicates the count when an image has been acquired (also called AUTO_COUNT).
-
IO Port - Displays the I/O address that was used by the interface board of previous sensors.
-
Initial Rampup - Displays the time (in seconds) that is required by the sensor before the first X-ray exposure.
-
Second Rampup - Displays the time (in seconds) that is required by the sensor after the first X-ray exposure and between subsequent exposures.
-
Use Perfect Shot - (If available) Indicates that a filter to correct slightly under- and over-exposed images and to display changes in tooth density will be applied automatically.
-
Calibrate Image - With this checkbox selected, the calibration file for the connected sensor is used. With this checkbox clear, the calibration file, which is unique to the sensor, is not used, which may result in artifacts that would be otherwise removed on captured images.
-
Auto Accept Image - With this checkbox selected, the Accept / Reject / Retake window does not open, and the acquired image is presented in the Exam or Zoom window, depending on other user options. With this checkbox clear, the Accept / Reject / Retake window does open. This applies only if the "AutoTake" acquisition mode is off.
-
Equalize Image - Indicates that images will be equalized automatically.
-
Apply Spot Remover - Indictaes that a function to eliminate random noise artifacts in images will be applied automatically.
-
Subtract dark image - Controls whether subtraction will be used to eliminate noise caused by the sensor's dark signal or not.
-
Acquire 12 bit image - With this checkbox selected, images will be acquired using the entire 12-bit grayscale range (which is recommended for the DICOM image format). With this checkbox clear, images will be acquired using an 8-bit grayscale.
-
Automatic Exposure Control - Indicates that slightly under- or over-exposed images will be corrected automatically. This applies whenever the Perfect Shot filter is applied.
-
Mapping - Indicates that a particular mapping will be applied to show more image detail: Nonlinear (Traditional), in mid-range pixel values; Arcsine, in upper and lower pixel values; or Linear, when pixel values are mapped exactly to the image values that can be displayed.
-
-
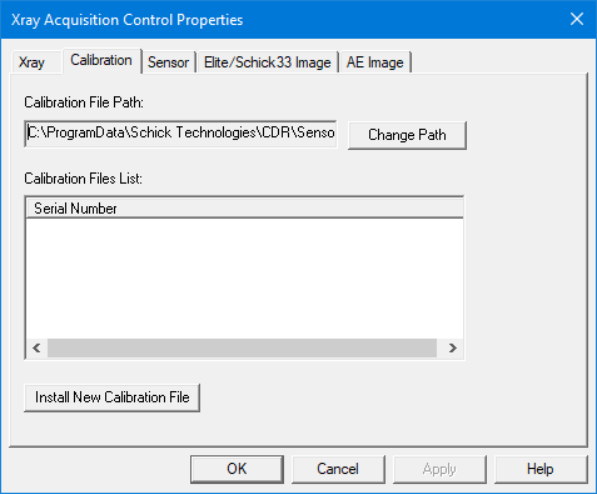
Calibration
-
Calibration File Path - The default path where the calibration files are located. To change the path, clicktap Change Path, select a folder, and clicktap OK.
-
Calibration File List - The calibration files that are available on the computer. To install a new calibration file, clicktap Install New Calibration File, locate and select the correct calibration file (a .cor file), and clicktap Open.
-
-
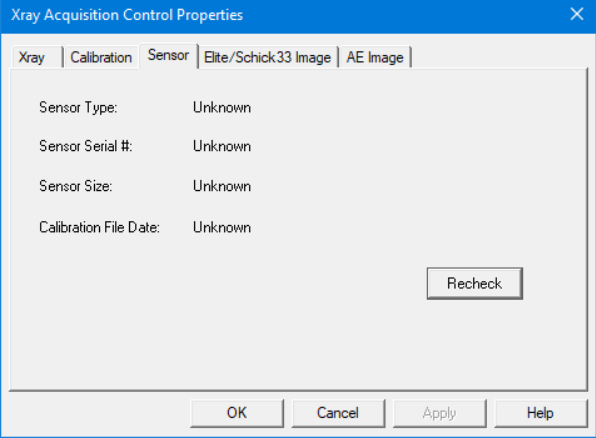
Sensor
-
Sensor Type - The type of sensor that is connected currently.
-
Sensor Serial # - Displays the serial number of the sensor that is connected currently.
-
Sensor Size - Displays the size (0, 1, or 2) of the sensor that is connected currently.
Note: To refresh the sensor type, serial number, and size,clicktap Recheck.
-
-
Elite/Schick 33 Image

-
Schick Elite - Controls whether enhancements will be applied automatically to images that are captured using Schick Elite sensors. To have enhancements be applied, select the Apply Image Enhancement check box and select a level of enhancement from the Level list: Edge High, Edge Low, Edge Pro, or Smooth. To not have enhancements be applied, clear the check box.
-
Schick 33 - Controls the resolution of images that are captured using Schick 33 sensors and whether an enhancement is applied or not. Set the following options:
-
Resolution - From the list select a resolution: High, to acquire images in unbinned mode (15 microns/pixel) with a practical resolution of 28 lp/mm (line pairs per millimeter); or Standard, to acquire images in binned mode (30 microns/pixel) with a practical resolution of approximately 24 lp/mm.
-
Apply Fixed Enhancement - Controls whether the enhancement will be applied or not.
-
-
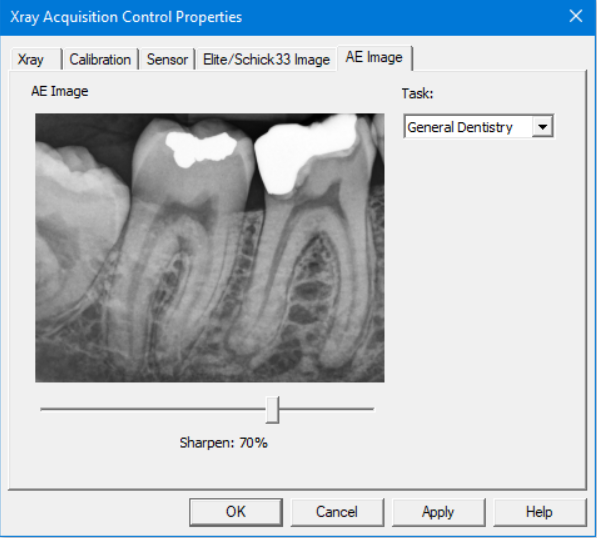
AE Image - To control the level of sharpening that will be applied to images for the various types of filtering, move the slider left/right to decrease/increase the percentage. To see how the specified sharpness level will affect images for the various types of filtering, from the Task list, select each option (General Dentistry, Endodontic, Restorative, and Periodontic) in turn.
-

-
-
Phosphor Plate

-
ScanX - These are filters to use with a ScanX phosphor plate scanner. The Gamma correction value defines the relationship between a pixel's numerical value and its actual luminance; use it to redistribute the tonal levels of a raw image to be closer to how human eyes perceive them (on a standard monitor). The Intraoral Mode, Panoramic Mode, and Cephalometric Mode values indicate the scanning modes being used for intraoral, panoramic, and cephalometric images, respectively. The mode affects image resolution.
-
Optime Settings - ClickTap the button to configure the IAM settings for an Optime scanner.
-
OP30 Settings - ClickTap the button to configure the IAM settings for an OP30 scanner.
-
VistaScan - The Device Type (the default is IMDA) and the Registered Device of a VistaScan scanner. You can leave the Registered Device field blank to use the first device found that matches the specified type. Also, depending on the scanner model and how plates are inserted, you may need to allow Ascend Academic Imaging to rotate, mirror, or flip images as they are placed into templates. To allow this functionality, select the Mirror VistaEasy Image check box.
-
-
TWAIN

-
TWAIN - The Use Buffered TWAIN Transfer option is selected by default as the transfer method for images from acquisition devices that use a TWAIN driver. If there are issues with TWAIN sources delivering images properly to the acquisition agent, deselect this check box to use the native transfer mode, which some TWAIN sources require or recommend.
-
TWAIN Categories - For each TWAIN source, you can specify the applicable acquisition types. Select a TWAIN source from the Device list, and then select the applicable acquisition types (Digital Sensor or Phosphor Plate, Panoramic, Cephalometric, and/or Intraoral Camera). The selected TWAIN source will only be available for selection in the device list when someone is acquiring images for one of the selected acquisition types. Repeat this as needed for any other TWAIN sources.
-
TWAIN Rotation - For each TWAIN source, you can specify the default orientation (rotation and/or flip) to apply to images by acquisition type prior to those images being delivered to Ascend Academic Imaging. Select a TWAIN source from the Device list, select an acquisition type (Digital Sensor, Phosphor Plate, Panoramic, Cephalometric, or Intraoral Camera) from the second list, and select an orientation option (No Rotation, Rotate 90, Rotate 180, Rotate 270, Mirror, Rotate 90 + Mirror, Flip, or Rotate 90 + Flip) from the third list. Repeat this as necessary for any other TWAIN sources.
-
Pixel Size - For each TWAIN source, you can specify the known pixel size (in microns). Select a TWAIN source from the Device list, select an acquisition type from the second list, and enter the correct size in the Pixel Size field.
-
-
Software Bridge

-
DEXIS - If someone selects the Dexis software bridge from the device list when acquiring an image, the Application Path (where the Dexis software is installed; the default is C:DEXIS) and the Images Path (where the Dexis software stores images; the default is C:DEXISDATA) must be correct, so Ascend Academic Imaging can open the Dexis software and have bi-directional communication with it. The Dexis software must be installed to use this software bridge.
-
SIDEXIS - If someone selects the Sidexis software bridge from the device list when acquiring an image, the Application Path (where the Sidexis software is installed; the default is C:Program FilesSironaSIDEXIS4), the SLIDA Mailbox Path (the location of the SLIDA mailbox file; the default is C:PDATA), the Ascend Mailbox Path (the location of the Ascend Academic mailbox file; the default is C:ProgramDataAcquisition Agent), the SLIDA Mailbox File name (the default is siomin.sdx), and the system's Ascend Mailbox File name (the default is Ascend.sdx) must be correct, so Ascend Academic Imaging can open the Sidexis software and have bi-directional communication with it. The Sidexis software must be installed to use this software bridge.
-
Romexis - You can specify whether Ascend Academic Imaging imports the STL model file or not if someone selects the Romexis software bridge from the device list when acquiring a 3D model. With the Import STL Models check box selected, Ascend Academic Imaging will import the STL model file. This allows for rotating and zooming of the 3D model in Ascend Academic Imaging. With the Import STL Models check box deselected, Ascend Academic Imaging will import a 2D snapshot image of the 3D model. The Romexis software must be installed to use this software bridge.
Note: As Ascend Academic Imaging cannot do all the things that a CAD/CAM software can do, whether or not you import the STL model file, you must do the ground design and editing of the 3D model in the Romexis software. If you do not care about having the STL model file uploaded to Ascend Academic Imaging for backup, disaster recovery, or sharing purposes, you may want only the minimal viewing capabilities of a 2D image in Ascend Academic Imaging.
-
-
Filters
-
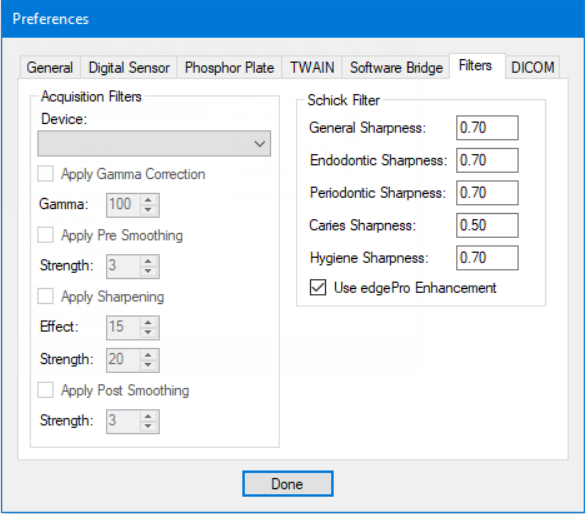
Acquisition Filters - For each acquisition device, you can specify a set of filters to apply to images to fine tune those images more than what Ascend Academic Imaging does by default. Select a Device and set the following filters as necessary:
-
Apply Gamma Correction - To customize this filter, select the check box and enter the amount of Gamma correction. The gamma correction value defines the relationship between a pixel's numerical value and its actual luminance; use it to redistribute the tonal levels of a raw image to be closer to how human eyes perceive them (on a standard monitor).
-
Apply Pre Smoothing - To customize this filter, select the check box and enter the Strength of the smoothing effect.
-
Apply Sharpening - To customize this filter, select the check box and enter the Effect and the Strength of the sharpening effect.
-
Apply Post Smoothing - To customize this filter, select the check box, and then enter the Strength of the smoothing effect after the sharpening filter is applied. The Apply Post Smoothing check box is available only if the Apply Sharpening check box is selected.
Repeat this section as necessary for other devices.
-
-
Schick Filter - You can specify the following types of sharpness adjustments to apply to an image that is acquired with a Schick device, according to the type of image that is acquired: General Sharpness, Endodontic Sharpness, Periodontic Sharpness, Caries Sharpness, and Hygiene Sharpness.
-
-
DICOM

Note: DICOM support allows you to acquire a 3D volume using CBCT (cone-beam computed tomography) through a supported third-party imaging program, view and annotate a 3D volume in Ascend Academic Imaging, and download a 3D volume or export a 3D volume to a supported third-party program.
-
Compress DICOM Volumes - Controls whether 3D volumes are compressed or not.
-
Cache DICOM Volumes - Controls whether 3D volumes will be cached locally or not. With this check box selected, in the Cache folder box, enter the path to the folder where you want to store cached 3D volumes or clicktap Browse to select the correct folder.
-
-
-
ClickTap Done.
-
To install and configure the acquisition agent (Macintosh)
How to get there
-
From the Patient menu, under Clinical, select Imaging.
The patient record displays with the Imaging tab selected.
Tip: You can also access imaging from other clinical areas such as Chart, Progress Notes, Quick Exam, Perio, or Tx Planner.
Note: If the correct patient is not already selected, use the Patient Search field to access the patient's record.
-
Download the agent installer on your computer.
-
On the patient's record > Imaging tab, clicktap the Imaging tab's menu and select Acquire Images.
Note: If prompted with the Diagnostic Use Warning window, select the I accept the above-mentioned policy check box and clicktap Accept & Go to Imaging.
The Acquisition Activation window displays.
-
ClickTap the Click here link to download the agent installer.
-
-
Install the acquisition agent.
-
Open Finder and locate and run the Acquisition Agent Installer.pkg.
Tip: If Control+click cannot open the application file, you can use two fingers to tap the trackpad and bring up the context menu, and select Installer (default).
Important: If an Acquisition Agent Installer.pkg can't be opened because Apple cannot check it for malicious software. error message displays, complete the following steps to troubleshoot the error:
-
With the error message still open, open the System Preferences.

-
Select Security & Privacy.

-
On the General tab, clicktap the lock icon.

-
If prompted, enter your MacOS User Name and Password, and clicktap Unlock.
-
Under Allow apps downloaded from, select App Store and identified developers.
Note: The error message needs to be open to see this option.
-
ClickTap Open Anyway, follow the prompts, and eventually the acquisition agent installer should start.
-
-
On the Introduction screen, clicktap Continue.
-
If the Destination Select screen displays, select the disk where you want to install the program and clicktap Continue.
-
On the Installation screen, clicktap Install.
-
If prompted to allow the installer to install the program, enter your MacOS User Name and Password, and clicktap Install Software.
-
On the Summary screen, clicktap Close.
Note: After installation, the acquisition agent starts automatically and will need 90-120 seconds to finish its initial setup. When acquisition agent icon stops moving, the initial setup is complete.
-
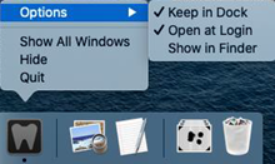
After the initial setup is complete, right-click the Acquisition Agent icon on the dock, hover over Options, and select Open at Login if the option does not already have a check mark next to it.
-
Restart the computer to finish the required setup.
-
-
Configure the acquisition agent.
-
ClickTap the
icon on the dock. -
From the Acquisition Agent menu, select Preferences.

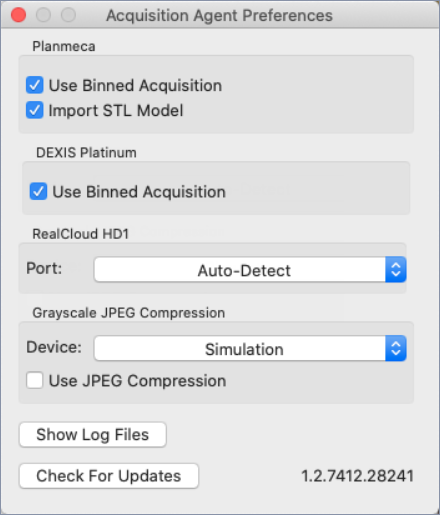
The Acquisition Agent Preferences window displays.
-
Set up the following options as necessary.
-
Planmeca
-
Use Binned Acquisition - For Planmeca sensors, "binned" is the default operating mode, so this checkbox is selected by default for Ascend Academic Imaging.
-
Import STL Model - You can specify whether Ascend Academic Imaging imports the STL model file or not if someone selects the Romexis software bridge from the device list when acquiring a 3D model. With the Import STL Model check box selected, Ascend Academic Imaging will import the STL model file. This allows for rotating and zooming of the 3D model in Ascend Academic Imaging. With the Import STL Model check box deselected, Ascend Academic Imaging will import a 2D snapshot image of the 3D model. The Romexis software must be installed to use this software bridge.
Note: As Ascend Academic Imaging cannot do all the things that a CAD/CAM software can do, whether or not you import the STL model file, you must do the ground design and editing of the 3D model in the Romexis software. If you do not care about having the STL model file uploaded to Ascend Academic Imaging for backup, disaster recovery, or sharing purposes, you may want only the minimal viewing capabilities of a 2D image in Ascend Academic Imaging.
-
-
DEXIS Platinum - For DEXIS Platinum sensors, "binned" is the default operating mode for direct integration, so the Use Binned Acquisition check box is selected by default for Ascend Academic Imaging.
-
RealCloud HD1 - Ascend Academic Imaging can automatically detect the port that the RealCloud HD1 intraoral camera is using so the buttons function properly, or you can specify a port. By default, Auto-Detect is selected as the Port.
-
Grayscale JPEG Compression - By default, Ascend Academic Imaging uses PNG lossless compression for grayscale images (intraoral and extraoral X-ray images). For each acquisition device, you can specify whether Ascend Academic Imaging should use JPEG lossy compression on X-ray images. The JPEG lossy compression that Ascend Academic Imaging uses has been optimized for grayscale images and uses a Q factor of 96 to obtain near-perfect-quality images. To specify the compression method for a device, select that Device, and select or deselect the Use JPEG Compression check box. Repeat this as needed for any other devices.
-
Show Log Files - The acquisition agent logs actions that it performs for debugging, troubleshooting, and performance monitoring. To view the log, clicktap Show Log Files.
-
-
ClickTap Done.
-
Comments
0 comments
Please sign in to leave a comment.