
You can send custom text messages to a patient's primary contact to initiate or continue a conversation through Ascend Academic.
Notes:
-
Ascend Academic only communicates with patients' primary contacts and does not store any messages from anyone that is not set as a primary contact.
-
Each location has its own mobile number for text messages, which can be located on the Patient Information page > Preferences tab > Text Messages section >
 icon.
icon. -
Depending on your security rights, you may have access to all text messages at your location or text messages from only your patients' primary contacts. A patient is considered your patient when they have you set as their primary provider.
-
To send text messages, your user role must have the Manage inbox messages security right, the primary contact must be opted in to receiving text messages from Ascend Academic, and the primary contact must have a valid mobile phone number.
-
To send text messages to a primary contact, the primary contact cannot have an Inactive or Duplicate status, and the primary contact's text message preference must be set to Yes (managed from the patient's Patient Information page > Preferences tab > Text Messages).
-
Text message conversations are linked to phone numbers. If a patient changes their primary contact, any messages before the change remain on the original thread and are associated with the original primary contact, but you must create a new thread with the new primary contact.
To send a text message
How to get there
-
From the User name menu, select Inbox.
Tip: You can also access the Inbox page from the Home menu.

The Inbox page displays.
How to get there
-
From the Patient menu, under General, select Patient Connection.
The Patient Connection page displays.
Note: If the correct patient is not already selected, use the Patient Search field to access the patient's record.
How to get there
-
From the Schedule menu, select Calendar.
The Calendar page displays.
-
Open a message thread from one of the following locations:
-
The Inbox page
-
On the Inbox page, review the list of primary contacts on the left panel.

The panel displays text messages received from primary contacts in chronological order. Each entry displays the primary contact's full name, birth date, and the last message they sent with a time stamp. If a patient has them as their primary contact and has an upcoming appointment, the patient's name, date and time of the appointment, and appointment provider display. Any unread messages display a red circle with the total number of unread messages beside the time stamp.
-
(Optional) Set the filters as necessary to narrow the list of text messages.
-
View - ClickTap the drop-down menu. From the left and right columns, select options and clicktap Done to apply the new setting.
Left column:
-
All - Displays all read and unread messages
-
Read - Displays only read messages
-
Unread - Displays only unread messages. From the right column, select All to display all visible and hidden messages, Visible to only display visible messages, or Hidden to only display hidden messages.
Right column:
-
All - Displays all visible and hidden messages
-
Visible - Displays only display visible messages
-
Hidden - Displays only hidden messages.
-
-
Search field - Enter a primary contact's name, mobile number, or a specific message to locate specific messages.
Note: If a primary contact changes their mobile number, you cannot search messages by the old mobile number. You can only search by their new mobile number.
-
-
Select a listed text message in the left panel to display the complete text message history on the right panel.

Important:
-
The Enter message here field only displays if you have the Manage inbox messages security right, the patient is subscribed to receive text messages, and the patient's primary contact number on the patient's record is valid. If any conditions are not met, a warning message displays instead of the field. You can use the available hyperlink to navigate to the patient's Patient Information page > Basic Info tab and update the contact information and confirm if the mobile number is valid. Valid numbers display a Text messages: Yes status under the Phone number field.
-
If the message thread is no longer a primary contact of a patient, a notification displays, indicating that the thread is no longer useable. To continue communication, you must clicktap their hyperlinked name on the notification and start a new thread with the new primary contact.

-
-
-
The Appointment Information panel
-
On the Calendar page, clicktap an appointment to display its Appointment Information panel.
-
ClickTap the Text messages link.
Note: The link only displays if the patient has a valid phone number.
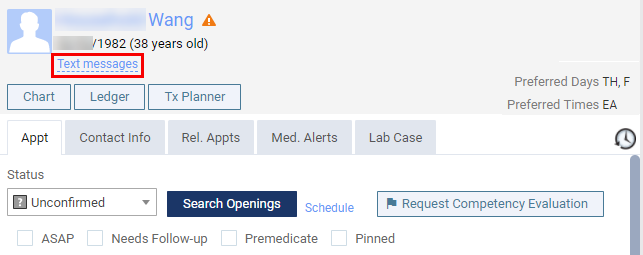
The Messages for [primary contact] window displays.

Important: The Enter message here field only displays if you have the Manage inbox messages security right, the patient is subscribed to receive text messages, and the patient's primary contact number on the patient's record is valid. If any conditions are not met, a warning message displays instead of the field. You can use the available hyperlink to navigate to the patient's Patient Information page > Basic Info tab and update the contact information and confirm if the mobile number is valid. Valid numbers display a Text messages: Yes status under the Phone number field.
-
-
The Patient Routing panel
-
On the Patient Routing panel, clicktap the Text messages link.
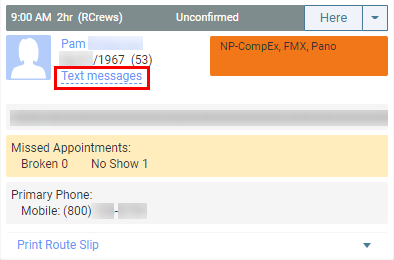
The Messages for [primary contact] window displays.
Important: The Enter message here field only displays if you have the Manage inbox messages security right, the patient is subscribed to receive text messages, and the patient's primary contact number on the patient's record is valid. If any conditions are not met, a warning message displays instead of the field. You can use the available hyperlink to navigate to the patient's Patient Information page > Basic Info tab and update the contact information and confirm if the mobile number is valid. Valid numbers display a Text messages: Yes status under the Phone number field.
-
-
The Patient Information ribbon
-
On the Patient Information ribbon, clicktap the
 icon.
icon. Tip: If the Patient Information ribbon is not visible, clicktap the arrow button below the Patient Search field.

Notes:
-
If the correct patient is not already selected, use the Patient Search field to access the patient's record.
-
The
icon only displays if the primary contact's number is set as a Mobile type and is a valid phone number. If the patient unsubscribes from receiving text messages, the icon no longer displays.
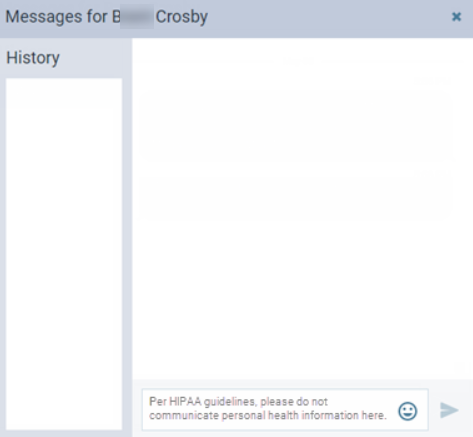
The Messages for [primary contact] window displays.
Important: The Enter message here field only displays if you have the Manage inbox messages security right, the patient is subscribed to receive text messages, and the patient's primary contact number on the patient's record is valid. If any conditions are not met, a warning message displays instead of the field. You can use the available hyperlink to navigate to the patient's Patient Information page > Basic Info tab and update the contact information and confirm if the mobile number is valid. Valid numbers display a Text messages: Yes status under the Phone number field.
-
-
-
-
In the Enter message here field, enter the message and insert any emojis.
-
When ready, clicktap the
 icon or press the Enter key to send the message.
Once sent, a green message displays to inform you the message was sent successfully, and the action is listed in the audit log as a Messaging type. If there was an issue communicating with the primary contact's mobile carrier, a Not delivered icon and message displays with the sent text block.
Comments
0 comments
Please sign in to leave a comment.