
You can view a patient's entire image history chronologically and quickly navigate between images. This view also allows you to view individual images larger than you can in the recent images view, and process an image (such as enhance or annotate).
To view a patient's image history
How to get to there
-
From the Patient menu, under Clinical, select Imaging.
The patient record displays with the Imaging tab selected.
Tip: You can also access imaging from other clinical areas such as Chart, Progress Notes, Quick Exam, Perio, or Tx Planner.
Note: If the correct patient is not already selected, use the Patient Search field to access the patient's record.
-
On the patient's record > Imaging tab, clicktap the Imaging tab menu and select Show Image History.

The patient's imaging page opens to the history view, and the most recent image or series (such as a full mouth series or bitewings) is selected by default on the Images tab.

-
If necessary, filter the list of images on the Images tab to display images that match your search criteria.
-
Click inTap the Narrow down the results field to display the available filters.

-
Configure the filters as necessary:
-
Show images taken on - Complete an option:
-
View images acquired on a specific date: From the drop-down, select a listed date.
Note: Keep the All since that day check box deselected.
-
View all images acquired on and after a specific date: From the drop-down, select a listed date and select the All since that daycheck box.
-
Type - To view images in any category (intraoral X-rays, intraoral photos, intraoral photos without tooth numbers assigned, and extraoral X-rays, and/or extraoral photos), select the All types check box. To view images in only certain categories, make sure the check boxes of only those categories are selected; the other check boxes must be deselected.
-
Teeth - If the Intraoral X-ray and/or Intraoral photo check boxes are selected, to view those types of images for specific teeth, select the teeth in the Tooth Chart. The tooth filter does not apply to intraoral photos that do not have tooth numbers assigned to them and extraoral X-rays (which apply to all teeth), and extraoral photos (which apply to all teeth). To deselect all tooth selections, clicktap the Clear selected link.
-
Show everything - To set the filter options to their default states and display all the patient's images, clicktap the Show everything link.
The image list displays the images that match your filter criteria.
-
-
ClickTap the X in the upper-right corner of or anywhere outside of the Narrowing Down the Results menu to close the menu.
-
-
With an image or image set selected, complete any of the following:
-
Navigate the series - If you have selected a series (such as a full mouth series or bitewings), to navigate between the images of that set, clicktap each image of the set under Image Navigator. A larger version of the current image (highlighted with a yellow box) in the set displays in the viewing area.
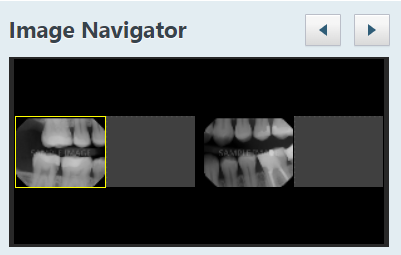
Note: You can also clicktap the Previous and Next buttons
 to navigate between the images in the set.
 -
Zoom in/out - Move the Zoom slider left or right.

Tip: You can also zoom in/out by positioning the pointer over the image and using the wheel on your mouse.
If you zoom in so that the whole image no longer fits in the viewing area, a Pan window displays. You can clicktap and drag the red box to display the area within the red box in the main viewing area.

-
Hide/display enhancements - ClickTap the Turn image enhancement on/off
 icon to switch between viewing all the images of the series with or without applied enhancements.
 -
Adjust the brightness and/or contrast - ClickTap and drag up/down or left/right in the viewing area to modify the brightness or contrast.
-
Quickly resize - By default, Ascend Academic Imaging displays images as large as it can in the viewing area. This can cause the images from some older devices or programs to look fuzzy or grainy. To view the image smaller and sharper, clicktap the Smaller/Larger
 icon. The button becomes orange. To view the image as large as it can be and still all fit in the viewing area, clicktap the button again.
 -
View full screen - To view the image full screen, clicktap the Full Screen
 icon. To return to the normal view mode, clicktap the Normal Mode
  icon.
icon. -
View stacked images - If any of the template slots have multiple images assigned, you can clicktap the Previous or Next button
 above the template slot as needed to view the correct image in the stack.
Notes:
-
The Previous button is not available when viewing the top image or if there is only one image.
-
The Next button is not available when viewing the bottom image or if there is only one image.
-
-
View the entire series - If you have selected a series (such as a full mouth series or bitewings), clicktap the Display All Images in the Template/Mount
 icon to view all the images in the series at once in the viewing area.
Tips:
-
While viewing a series, you can zoom in/out, adjust the brightness and contrast, and hide/display enhancements.
-
By default, the acquisition date and tooth numbers display for each image. You can clicktap the Show image information
 icon to hide or display the details as necessary.
-
If any of the template slots have multiple images assigned, clicktap the Previous or Next button above the template slot as necessary to view the correct image in the stack.
Notes:
-
The Previous button is not available when viewing the top image or if there is only one image.
-
The Next button is not available when viewing the bottom image or if there is only one image.
-
-
When ready to return to viewing a single image, you can complete any of the following:
-
ClickTap an image in the viewing area.
-
ClickTap an image under Image Navigator.
-
ClickTap the Display a single image
 icon.
icon.

-
-
-
Resize a view - To resize one of the views (coronal, sagittal, or axial) of a 3D volume to fill the viewing area, clicktap the corresponding Toggle Displaying Full Panel
 icon. To return to the normal view mode, clicktap the Toggle Displaying Full Panel
  icon.
icon. -
Rotate anatomy - If the anatomy is crooked for a 3D volume, right-click in the Coronal, Sagittal, or Axial view box and drag up or down to rotate the plane for a slice view (to move the slice plane axis). The other two views adjust accordingly to the rotation that you specify. The axis can be rotated from -45 to +45 degrees about the slice center point.
Note: If the 3D volume has any annotations or measurements, the Change Image Rotation message displays, explaining that the annotations and measurements will be cleared if you rotate the volume. To allow the anatomy to rotate, clicktap Clear Annotations/Measurements; otherwise, clicktap Cancel.
-
Navigate through slices - To navigate through the slices of the 3D volume, drag the slider next to the Coronal, Sagittal, or Axial view. As you drag the slider, the slice plane indicators (crosshairs) of the other two views adjust accordingly. Drag the sliders of the other views as needed. Alternatively, you can clicktap anywhere on a view to move the slice plane indicators to that spot.

-
Change the slice thickness - To change the thickness of the slices for a 3D volume, select a different value from the Thickness list: 0.20 mm, 0.40 mm, 0.60 mm, 0.80 mm, or 1.00 mm.

-
Reset the views - After adjusting the slice plane indicators and/or changing the slice thickness for a 3D volume, clicktap the Reset Workup
 icon to return to the default position and thickness.
 -
Hide/show slice plane indicators - To hide the slice plane indicators (crosshairs) while viewing a 3D volume, clicktap the Show/hide slice plane indicators
 icon. To return to viewing the slice plane indicators, clicktap the Show/hide slice plane indicators
  icon again.
 -
View the histogram or a rendered 3D image - By default, a histogram for a 3D volume displays in the lower-right box. To view a rendered 3D image of the volume (all slices of the volume are combined), clicktap the Swap for Volume Render Panel
 icon.
icon.While viewing the rendered 3D image, complete any of the following as necessary:
-
To hide the volume plane indicators, clicktap the Show/hide volume plane indicators
 icon. To return to viewing the volume plane indicators, clicktap the Show/hide volume plane indicators
  icon again.
 -
To rotate the image to view it from the left side, clicktap the Snap to left view
 icon.
icon. -
To rotate the image to view it from the right side, clicktap the Snap to right view
 icon.
icon. -
To rotate the image to view it from the front, clicktap the Snap to front view
 icon. When the image is rendered initially, the front view is displayed by default.
 -
To return to viewing the histogram, clicktap the Swap for Histogram Panel
 icon.
icon.

Note: The ability to render a 3D image and the speed with which it is accomplished depends on the size of the volume and the onboard graphics processor or the discrete graphics card of your computer. If the image does not render, resize the browser window to make the view smaller and perform a hard refresh of the page (the clear cache and hard reload option in a Chrome browser); otherwise, you may need to upgrade your graphics hardware.
-
-
Save a snapshot - To save a copy of the 3D volume as it is currently being viewed as a two-dimensional image (.jpg file) that can be attached to an insurance claim, clicktap Snapshot.
-
Comments
0 comments
Please sign in to leave a comment.