
When you are able to get back online after being offline, you can synchronize offline images (images that were acquired while using the offline mode) with your online database. When you attempt to acquire images with Ascend Academic Imaging online (from Ascend Academic), if any offline images exist on the computer that you are using, a message displays and asks if you want to synchronize the offline images now or to be reminded to synchronize them later.
Note: If any offline images have been acquired for a new patient, before you can synchronize those images with your online database, you must create a patient record in Ascend Academic; there is not an option to create a patient record during the synchronization process.
To synchronize offline images
How to get to there
-
From the Patient menu, under Clinical, select Imaging.
The patient record displays with the Imaging tab selected.
Tip: You can also access imaging from other clinical areas such as Chart, Progress Notes, Quick Exam, Perio, or Tx Planner.
Note: If the correct patient is not already selected, use the Patient Search field to access the patient's record.
-
Close all Chrome browser windows.
Important: You cannot synchronize offline images if the offline mode of Ascend Academic Imaging is open in any Chrome browser window.
-
Open Ascend Academic in a new browser window.
-
On the patient's record > Imaging tab, clicktap the Imaging tab menu and select Acquire Images.

If any offline images exist on the computer that you are using, a Sync Offline Procedures message displays.
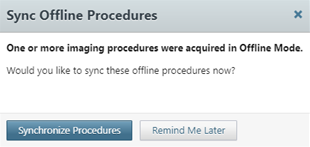
Tip: If you must postpone the synchronization to a later date, clicktap Remind Me Later. Ascend Academic Imaging will not prompt you again today to synchronize offline images from this computer.
-
ClickTap Synchronize Procedures.
The Imaging Data Synchronization window displays and lists the patients who have offline images on this computer.

-
Select a patient and clicktap Next.
Note: You can synchronize only one patient's record at a time.
The Patient Match tab is selected, and one of the following occurs:
-
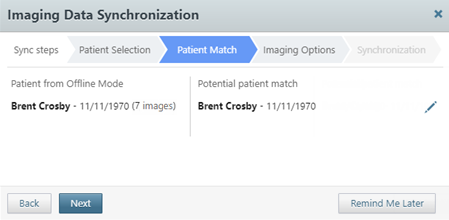
If a matching patient with the same first and last name and date of birth is found in your online database, that patient's name and birth date display.
-
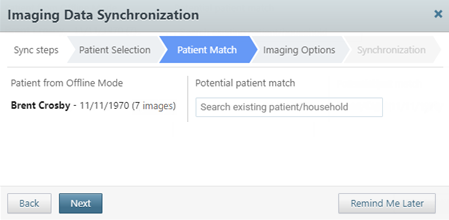
If a matching patient is not found, the Search existing patient/household field is available.
-
-
Complete one of the following:
-
If the Potential patient match is correct, skip to step 8.
-
If the Potential patient match is not correct, clicktap the Edit
 icon and proceed to the next step.
-
If there is no Potential patient match, proceed to the next step.

-
-
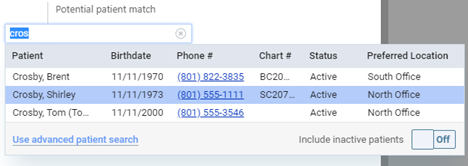
ClickTap in the Search existing patient/household field to search for and select the correct patient.
-
ClickTap Next.
The Imaging Options tab is selected. Under Offline Imaging Procedures, a list of the patient's imaging procedures displays and the first imaging procedure is selected by default.
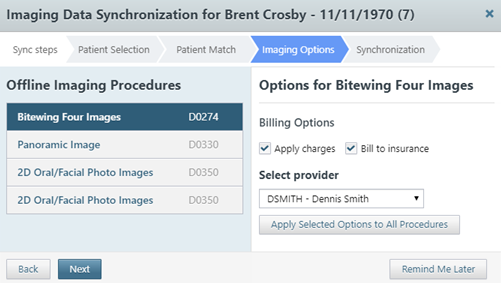
Notes:
-
To postpone the synchronization for later, clicktap Remind Me Later.
-
To go back and change the patient, clicktap Back.
-
-
For the selected imaging procedure, set up the following options:
-
Apply charges - To post the fee for the selected procedure, select the check box. To post a zero amount for the procedure, deselect the check box.
-
Bill to insurance - To bill the patient's insurance carrier for the procedure, select the check box. To not bill the patient's insurance carrier, deselect the check box.
-
Select provider - Select the provider who you want to associate with the procedure. Only providers who have access to the current location are available.
-
-
If there are multiple imaging procedures, complete one of the following:
-
To assign the selected billing options and provider to all the procedures that are listed, click Apply Selected Options to All Procedures.
-
To assign billing options and a provider for each procedure separately, select the next procedure, and then repeat step 9. Repeat this process until you have selected billing options and a provider for all the procedures that are listed.
-
-
ClickTap Next to begin synchronizing images.
If the synchronization is successful, a green check mark symbol displays next to each imaging procedure.
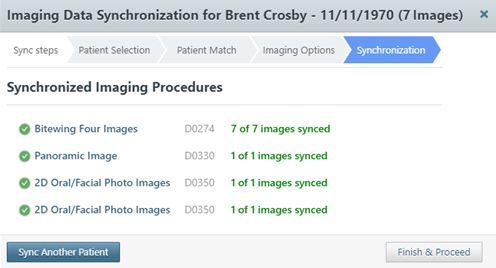
Notes:
-
If an imaging procedure fails to be synchronized, a red error symbol and message appear. ClickTap Sync the Procedure Again next to that procedure to try synchronizing again.

-
If an imaging procedure fails to be synchronized a second time,clicktap Sync the Procedure Again to try synchronizing again or clicktap Hide Procedure to move the corresponding images to a recovery folder on this computer (you will not be prompted to synchronize the hidden procedure again, but you can recover the images by attaching them to a patient record later on).

-
-
Complete one of the following:
-
To synchronize another patient's offline images, click Sync Another Patient. You are returned to the list of patients who still have offline images to synchronize. Repeat Steps 5-11.
-
If you have finished synchronizing all the patients and/or want to begin acquiring images for the selected online patient (from Step 3), clicktap Finish & Proceed to proceed to the acquisition options.
-
Comments
0 comments
Please sign in to leave a comment.