
You can import a fee schedule to update or add a fee schedule. Ascend Academic supports the uploading of .csv files (comma-delimited text files).
Tip: You can create and edit .csv files in a spreadsheet program or a text editor.
To import a fee schedule
How to get there
-
On the Settings menu, under Production, clicktap Fee Schedules.
The Fee Schedules page displays.
-
On the Fee Schedules page, complete one of the following:
-
Create a fee schedule.
-
ClickTap Create New.

The options for creating a fee schedule become available.

-
Enter the name in the Name of fee schedule field.
-
-
Update an existing fee schedule.
-
Select a fee schedule listed under List of Fee Schedules.

The options for editing the fee schedule become available.

-
If the fee schedule has multiple versions, select the version that you want to update from the Fee schedule version drop-down list.
Note: This list is available only if the fee schedule has multiple versions.

-
Modify the fee schedule as necessary:
-
Edit the fee schedule's name in the Name of fee schedule field.
-
To update the end date or to create a new version of the fee schedule that will become effective after a specific date, complete the following:
-
ClickTap Set End Date.
The Set End Date for This Version of the Fee Schedule window displays.

-
If this is not the first version of the fee schedule, specify the Start date.
Note: This field is available only if there is an existing previous version. Changing the start date affects the end date of the previous version.
-
ClickTap the End date field and select an end date. The next version will become effective on the day after the specified end date for this version. If there is an existing next version, changing the end date for this version affects the start date of the next version.
-
ClickTap Set & Save.
-
-
-
-
-
ClickTap the Bulk Edit menu and select Update Fees from File to display the Update Fee Schedule from File window with the File Upload tab selected.

-
Drag a .csv file from an open window to the window or clicktap Browse to select the correct .csv file.
Note: If there are duplicate codes in the Import Fee Schedule, only the first one will be imported.
-
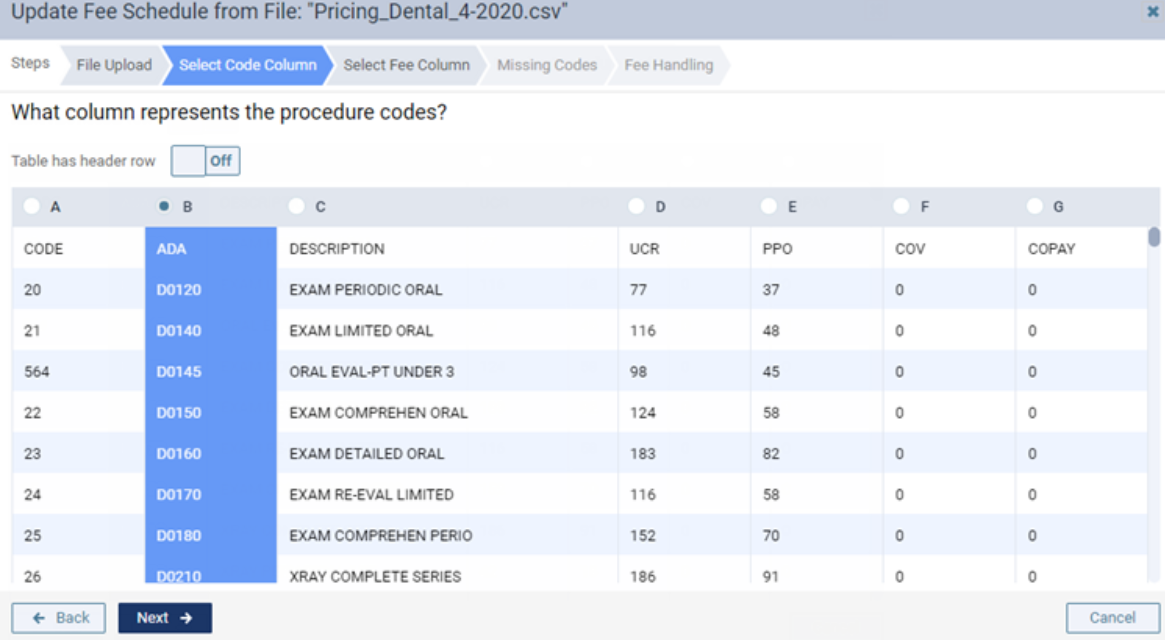
If the first line of the data from the imported file has a description of what each column contains, set the Table has header row toggle to On. Ascend Academic will ignore the first row when importing the fee schedule. You can also turn the toggle On or Off from the Select Fee Column tab.

-
Select the column that contains ADA Procedure Codes.
Note: Procedure codes in the Import Fee Schedule that do not exist in the Basis Fee Schedule will not be imported.
-
ClickTap Next or the Select Fee Column tab.

-
Select the column that contains the fees to be imported. This column should contain positive numbers (whole or decimal) only.
Note: Empty fees or fees with invalid characters will be imported as zero amounts (0.00).
-
ClickTap Next or the Missing Codes tab.

-
Specify how you want to handle any Missing Procedure Codes that might exist in the Import Fee Schedule:
-
Use current fees in this fee schedule (Do not change) - Select this option to populate the fees from the Basis Fee Schedule.
-
Use existing fees from - Select this option to populate the fees from a specified fee schedule. In the Fee schedule search field, enter a fee schedule name and select a fee schedule. The selected fee schedule becomes the Basis Fee Schedule for only the Missing Procedure Codes.
-
Fill missing fees with - Select this option to populate the fees with a specific amount. In the field, enter the fee or leave 0.00 entered.
Note: With this option selected and 0.00 entered, the handling of that zero amount is determined by the selected option on the Fee Handling tab.
-
-
ClickTap Next or the Fee Handling tab.

-
Specify how you want to handle any procedure codes with a zero dollar fee that might exist in the Import Fee Schedule:
-
Marked as "No write-off" - Select this option only if a write-off should not be posted. The patient will be billed the fee from the Basis Fee Schedule. This is the recommended option for most fee schedules.
-
Allow write-off - Select this option only if a zero dollar ($0.00) charge should be posted because you are contracted not to charge the patient or insurance. If this fee schedule is a contracted fee schedule, a write-off for 100% of the fee from the Basis Fee Schedule may be posted.
-
-
Specify how you want to handle any procedure codes with an empty fee that might exist in the Import Fee Schedule:
-
Use current fees in this fee schedule (Do not change) - Select this option to populate the fee from the Basis Fee Schedule.
-
Set to $0.00 mark as "No write-off" - Select this option to populate the fee with a zero dollar ($0.00) amount. A write-off will not be posted, and the patient will be billed the fee from the Basis Fee Schedule.
-
-
ClickTap Import.
The results display.

Note: If there are Skipped Procedure Codes from the Import Fee Schedule, a yellow warning message displays with the list of procedure codes that were not imported.
-
In the New Fee column, review the changed fees (highlighted in light blue).
-
(Optional) To increase or decrease all the fees in the fee schedule by the same amount or percentage, complete the following:
-
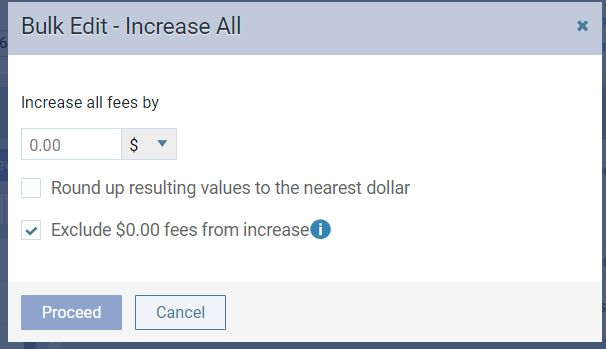
ClickTap the Bulk Edit menu and select Increase all by to display the Bulk Edit - Increase All window.
-
Under Increase all fees by, enter a positive or negative number (e.g., 20 or -20), and select $ or %.
-
Select the Round up resulting values to the nearest dollar checkbox if you want to round up the new fees.
-
If you are increasing fees, to ignore any current fees with a $0.00 amount (they will stay at $0.00; only non-zero fees will be increased), select the Exclude $0.00 fees from increase checkbox.
-
ClickTap Proceed. The resulting fees display in the New Fee column.
-
-
For each procedure, complete any of the following as necessary:
-
Under New Fee, enter or modify the fee that you charge as needed.
-
If you do not want to allow an automatic write-off to be posted, select the checkbox in the No Write-off column.
Tips:
-
To select or clear every procedure's checkbox at the same time, select or clear the checkbox at the top of the No Write-off column.
-
To select the checkboxes of a range of adjacent procedures at once, select the first checkbox of the range, hold the Shift key, and select the last checkbox of the range.
-
The Hide inactive procedures checkbox is selected by default, so only active procedures display. To temporarily display inactive procedures too, clear the checkbox.
-
To search for a procedure, enter a code or description in the Search by code/description field.
-
-
ClickTap Save.
Comments
0 comments
Please sign in to leave a comment.