
You can update the fee schedules you use to bill patients and insurance for services and products. Changing a fee schedule does not affect procedures that have already been posted or submitted to insurance. However, if you change the fee in a given fee schedule while logged on to any location, not only is the change accessible across the organization, but the procedure code will be updated for the locations that have that fee schedule as their preferred fee schedule.
To update a fee schedule
How to get there
-
From the Settings menu, under Production, select Fee Schedules.
The Fee Schedules page displays.
-
On the Fee Schedules page, select a fee schedule.

Tip: If necessary, you can use the Search for Fee Schedule field to quickly locate a fee schedule.
The options for editing the fee schedule become available.

-
If the fee schedule has multiple versions, select the version that you want to update from the Fee Schedule Version drop-down list.
Note: This list is available only if the fee schedule has multiple versions.

-
Modify the fee schedule as necessary:
-
Edit the fee schedule's name in the Name of fee schedule field.
-
To update the end date or to create a new version of the fee schedule that will become effective after a specific date, complete the following:
-
ClickTap Set End Date.
The Set End Date for This Version of the Fee Schedule window displays.

-
If this is not the first version of the fee schedule, specify the Start date.
Note: This field is available only if there is an existing previous version. Changing the start date affects the end date of the previous version.
-
ClickTap the End date field and select an end date. The next version will become effective on the day after the specified end date for this version. If there is an existing next version, changing the end date for this version affects the start date of the next version.
-
ClickTap Set & Save.
Notes regarding multiple versions:
-
A procedure with an Other status uses the version of a fee schedule that is effective on the date of the appointment. This affects scheduled production.
-
A procedure with a Tx Plan status uses the version of a fee schedule that is effective on the date of the procedure. This affects scheduled production if the procedure is attached to an appointment.
-
An insurance estimate is determined from the version of a fee schedule that is effective on the service date of the procedure for which the calculation is being made.
-
A write-off is determined from the version of a fee schedule that is effective on the service date of the procedure for which the calculation is being made.
-
The day sheet, aged receivables, and outstanding claims reports determine production from the versions of fee schedules that are effective on the service dates of the procedures being reported on.
-
-
-
To import fees from a .csv file, clicktap the Bulk Edit menu and select Import fees from file.
-
To increase or decrease all the fees in the fee schedule by the same amount or percentage, complete the following:
-
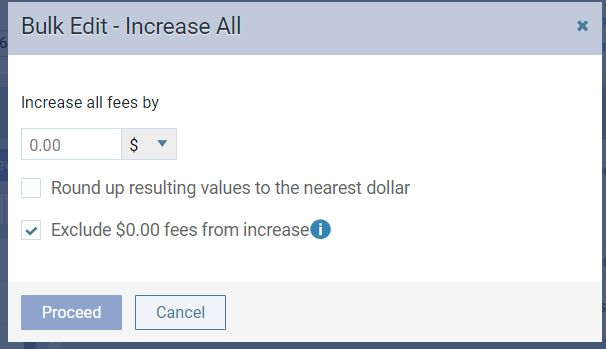
ClickTap the Bulk Edit menu and select Increase all by to display the Bulk Edit - Increase All window.
-
Under Increase all fees by, enter a positive or negative number (e.g., 20 or -20), and select $ or %.
-
Select the Round up resulting values to the nearest dollar checkbox if you want to round up the new fees.
-
If you are increasing fees, to ignore any current fees with a $0.00 amount (they will stay at $0.00; only non-zero fees will be increased), select the Exclude $0.00 fees from increase checkbox.
-
ClickTap Proceed. The resulting fees display in the New Fee column.
-
-
For each procedure, under New Fee, modify the fee that you charge as necessary.
Important: If this fee schedule is the location's default fee schedule (the fee schedule that was created by the system automatically for the location), changing the fee of a procedure code here affects the fee for the same procedure code on the location's Procedure Codes page and vice versa.
-
For each procedure, if you do not want to allow an automatic write-off to be posted, select the checkbox in the No Write-off column.
Tips:
-
To select or clear every procedure's checkbox at the same time, select or clear the checkbox at the top of the No Write-off column.
-
To select the checkboxes of a range of adjacent procedures at once, select the first checkbox of the range, hold the Shift key, and select the last checkbox of the range.
-
The Hide inactive procedures checkbox is selected by default, so only active procedures display. To temporarily display inactive procedures too, clear the checkbox.
-
To search for a procedure, enter a code or description in the Search by code/description field.
-
-
ClickTap Save.
Comments
0 comments
Please sign in to leave a comment.