
If necessary, you can edit custom imaging procedures.
Note: Changes to a custom imaging procedure do not apply to existing images associated with the imaging procedure.
To edit a custom imaging procedure
How to get to there
-
If you are not already viewing the correct location, select it from the Location menu.
-
From the Patient menu, under Clinical, select Imaging.
The patient record displays with the Imaging tab selected.
Tip: You can also access imaging from other clinical areas such as Chart, Progress Notes, Quick Exam, Perio, or Tx Planner.
Note: If the correct patient is not already selected, use the Patient Search field to access the patient's record.
-
On the patient's record > Imaging tab, clicktap the Imaging tab menu and select Acquire Images.

The options for acquiring images is available.

-
Under Imaging Procedures, clicktap the Custom tab.
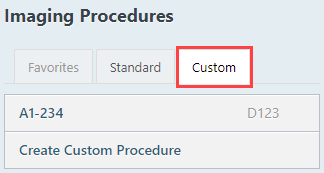
All existing custom imaging procedures display.
Note: Custom and favorite imaging procedures are location-specific.
-
Select an imaging procedure.
The options for the selected procedure become available.

-
ClickTap the
 icon next to Acquisition Options for [Procedure Name].
The options to edit the imaging procedure become available.

-
Edit the following as necessary:
-
The name of the imaging procedure.
-
Enter the new name of the imaging procedure in the field located on the upper-left corner.

Note: The name can be up to seven characters long.
-
-
The imaging procedure's code or multi-code.
-
Enter a procedure code or a multi-code in the field located beside the checkboxes.

If the new code is valid, it will be posted to a patient's record when the imaging procedure is being used to acquire images. If the code is invalid, an error message will display during acquisition and the code will not be posted on the patient's record.
-
-
The default state for the checkboxes associated with the Code field.
Note: The checkboxes are only enabled if the Code field contains a code or multi-code. Also, these codes can be changed during acquisition.
-
Select the Apply charges checkbox to have the code's fee or a zero amount post by default. Deselect the checkbox to not post by default.
-
Select the Bill to insurance checkbox to bill the patient's insurance carrier for the code by default. Deselect the checkbox to not bill the insurance carrier by default.
-
-
The image placeholders.
-
Complete any of the following:
-
To relocate a placeholder, drag the placeholder to the correct spot on the template.
-
To switch the orientation of a placeholder, clicktap the
 icon.
icon. -
To proportionally resize the placeholder, drag the lower-right corner of the placeholder diagonally up or down.
-
To align a placeholder horizontally, clicktap the Align horizontally to selection
 icon of the placeholder you want to align and clicktap the placeholder you want to align it with.
 -
To align a placeholder vertically, clicktap the Align vertically to selection
icon of the placeholder you want to align and clicktap the placeholder you want to align it with. -
To resize a placeholder, clicktap the Resize to selection
 icon of the placeholder you want to resize and clicktap the placeholder you want to resize it to.
 -
To assign tooth numbers to a placeholder, clicktap the
 icon to display the Assign Tooth Numbers window, select the applicable teeth, and clicktap Assign Teeth.

-
-
Repeat as necessary to edit other placeholders.
Note: You cannot add or remove placeholders.
-
-
The state for the Mirrored Exam checkbox.
-
If the template is for a mirrored exam (images should be displayed as if you are looking out from the patient's mouth), select the Mirrored Exam checkbox to have the images flipped on the horizontal axis.
-
-
The default acquisition order.
-
ClickTap Set Order on the bottom-right corner to display the default acquisition order.
Numbers display on the placeholders to indicate the acquisition order.
-
ClickTap Reset to remove the order number from the placeholders.
-
Select the placeholders in the order that you want to acquire the images.
Tip: To undo order assignments, clicktap Undo.
-
When ready, clicktap Finish.
The imaging procedure is ready to be saved.
-
-
-
When ready, clicktap Save.
Comments
0 comments
Please sign in to leave a comment.