
In some cases, the Check For Updates option may not display for the Acquisition Agent. You can enable the Check For Updates option by adding a URL to the configuration file.
Important: You must close the Acquisition Agent prior to making changes. If not closed, the configuration file may be reset and your changes may be lost.
Tip: If you are unable to modify the configuration file, you can right-click the Acquisition Agent.exe and select Run as Administrator.
To enable Check for Updates
Browse to C:\Program Files (x86)\Acquisition Agent.
Double-click the Acquisition Agent.ini file and open with Notepad, if prompted.

Locate the [Auto Update] line.
Next to AutoUpdateUrl =, add the following URL: https://ascend-academic-rci-agent.s3.us-west-2.amazonaws.com

Save the file and reopen the Acquisition Agent.
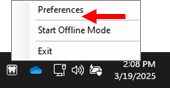
When accessed from the system tray, the Check For Updates option is now available.

To Hide Check For Updates
Open the Acquisition Agent.ini file (the default installation location is C:\Program Files (x86)\Acquisition Agent).
In the [Debug] section, add a new line for the HideCheckForUpdatesLink parameter, and set it equal to True.

Save the change.
With the HideCheckForUpdatesLink parameter in the .ini file set to True, the Check for Updates option does not appear on the right-click menu that appears when you right-click the Acquisition Agent icon in the system tray.
HideCheckForUpdatesLink = False

HideCheckForUpdatesLink = True
Comments
0 comments
Please sign in to leave a comment.