
You can customize the schedule and content of a recare communication (an email message and a text message that get sent to active patients automatically regarding their prophy recare using procedure codes D1110 and D1120).
Notes:
-
Patient communications are location-specific (each location of your organization has its own communication settings).
-
When a patient confirms an appointment from an email or a text message, axiUm Ascend adds an entry for it in the audit log.
To customize a recare communication
How to get there
-
If you are not already viewing the correct location, select it from the Location menu.
-
From the Settings menu, under Patient Care, clicktap Patient Communications.
The Patient Communications page opens.
-
On the Recare tab of a location's Patient Communications page, clicktap a communication.
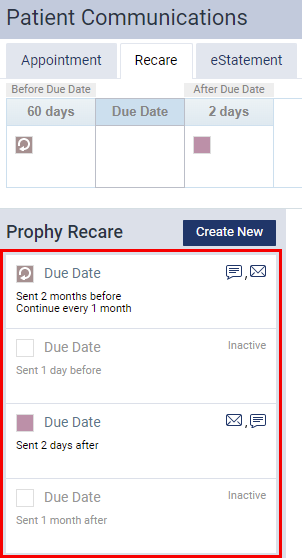
Samples of the corresponding email message and text message appear, and the options for the communication become available.
Due Date (before)

When a patient receives an email message, according to the recare communications setup, that has a Book Now button, he or she can click that button to schedule an appointment online.

Due Date (after)

-
ClickTap Edit.
The wizard for editing the recare communication appears.
-
Set up the appointment communication options on the following tabs as needed:
-
Notification Schedule
Notification Schedule tab

-
Set up the following options:
-
Send Reminder - Specify the number of hours, days, months, or years before or after the due date of a patient's prophy recare.
-
Exclude automated message - Turn this setting Off to use the default, automated message and any custom message that you specify later on in the wizard. Turn this setting On to use only a custom message that you enter later on in the wizard.
-
Continue sending - Turn this setting On to keep sending a patient this message at a specified interval (Repeat every ...) after this notice is sent out initially until the specified number of notices (up to 10) have been sent (Discontinue after ... notices). Turn this setting Off to send this message only once.
-
-
Click Next to proceed to the next tab of the wizard, or clicktap any tab.
-
-
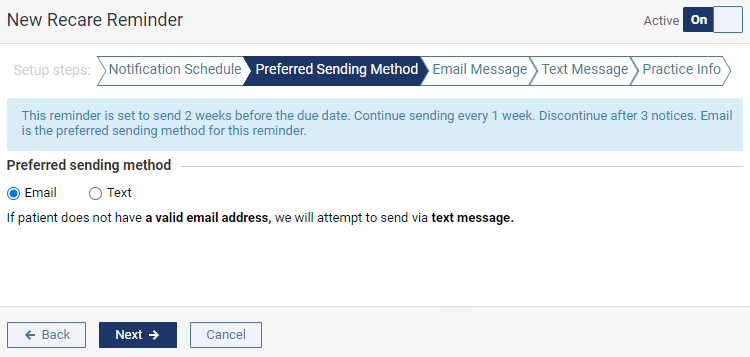
Preferred Sending Method
Preferred Sending Method tab
-
Select the format that you prefer to use for the message:
-
Email - Send this message by email. If a patient receiving the message does not have an email address, axiUm Ascend will attempt to send the patient a text message.
-
Text - Send this message by text. If a patient receiving the message does not have a valid mobile phone number, axiUm Ascend will attempt to send the patient an email message.
-
-
Click Next to proceed to the next tab of the wizard, or clicktap any tab.
-
-
Email Message
Email Message tab

-
Customize the email message as needed:
-
Subject - Type the subject of the email message as you want it to appear for patients.
-
Automated message - You cannot change the content, layout, or formatting of the default message. The correct patient names and appointment times will be inserted accordingly into the message. There is no automated message if the Exclude automated message setting is On on the Notification Schedule tab of the wizard.
-
Custom message - Type and format any custom text that you want to include in the message.
-
-
Click Next to proceed to the next tab of the wizard, or clicktap any tab.
-
-
Text Message
Text Message tab

-
Customize the text message as needed:
-
Automated message - You cannot change the content, layout, or formatting of the default message. The correct patient names and appointment times will be inserted accordingly into the message. There is no automated message if the Exclude automated message setting is On on the Notification Schedule tab of the wizard.
-
Custom message - Type any custom text that you want to include in the message.
-
-
Click Next to proceed to the next tab of the wizard, or clicktap any tab.
-
-
Practice Info
Practice Info tab
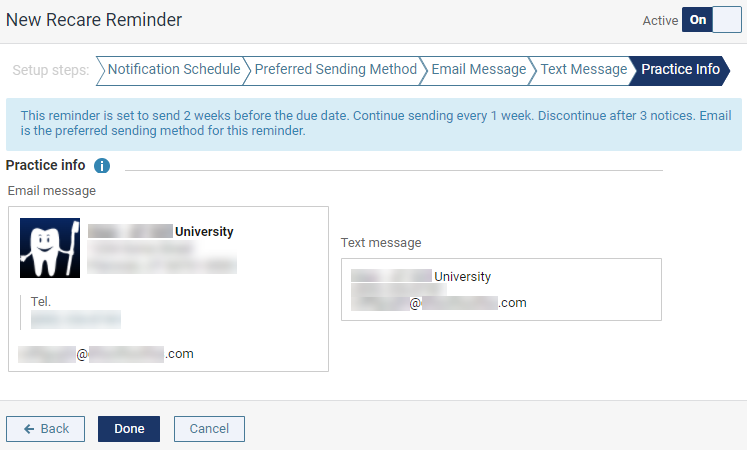
The logo, name, address, and phone number of the selected location as they will be displayed on an email message appear. The name and phone number of the selected location as they will be displayed on a text message appear. To change the location information, clicktap the Edit Practice Information link. From the Web Profile page, you can upload a logo and/or click the link to update the location's information.
-
-
On the Practice Info tab, clicktap Done to save the settings on all the tabs of the wizard.
Comments
0 comments
Please sign in to leave a comment.