


You can enter a payment, generate a walkout statement, and create claims at the same time for a patient when that patient is ready to check out after a visit.
To check out a patient
How to get there
-
From the Patient menu, under Financial, select Ledger.
The patient's Ledger page displays.
Tip: You can also access the Ledger page from the patient's Overview page > Ledger widget.
Note: If the correct patient is not already selected, use the Patient Search field to access the patient's record.
-
Complete one of the following:
-
, locate clicktap

-
On a patient's Ledger page, clicktap Patient Walkout.

The Patient Walkout window displays.
Note: Simulation (sim) patients display with a SIM label.

-
-
Perform the necessary tasks on the following tabs for checking the patient out after their visit:
-
Discount tab
The Discount tab is available only if the patient does not have insurance coverage, has a sliding fee assigned to their patient record, and has a poverty level with a per visit charge.

-
For each patient, complete the following:
-
From the Visit charge provider list, select the provider who you want to associate with the visit charge.
-
Select the check boxes of the procedures that are part of the visit.
-
-
ClickTap Post Discount.
Note: For each patient's visit, Ascend Academic posts a discount (credit adjustment) that is equal to the sum of the selected procedures and applies that credit to those procedures. Then, for each patient, the system posts the procedure that has been assigned as a visit charge.

-
-
Create Claims tab

-
Select the check boxes of any completed procedures posted to the patient's ledger that are not attached to claims.
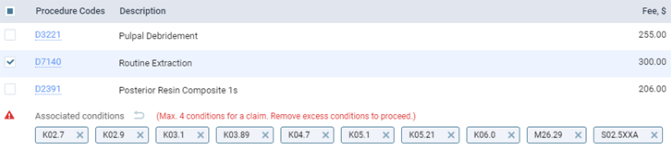
For the selected procedures, the associated diagnoses display.
Note: You can have up to four ICD-10 codes per claim.
-
If you have more than four associated diagnoses, you must complete one of the following:
-
To remove ICD-10 codes from the claim, clicktap the X for the corresponding codes.
-
To split the procedures between separate claims, deselect the check boxes for each procedure you do not want on this claim, so you can create the additional claim(s) for those procedures.
Note: Removing ICD-10 codes from a claim does not affect the corresponding procedures. All diagnoses remain attached to their corresponding procedures as currently posted in the patient's ledger and progress notes.
-
-
If there are two, three, or four ICD-10 codes, select the one that you want to be the primary diagnosis.
Tip: Hover your cursor over the ICD-10 code to display the diagnosed condition name.
-
ClickTap Create Claims.
Procedures are grouped by Service Date so you can create separate claims for each unique date of service.
-
-
Send Claims tab
-
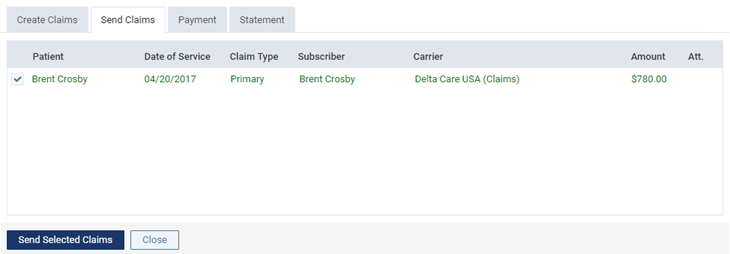
Select the check boxes of the claims that you want to send.
-
ClickTap Send Selected Claims.
-
-
Payment tab

-
Enter the Amount of the payment.
-
Select a payment Method.
The other payment options become available.
-
Set the payment details as necessary.
-
Apply to charges for - The payment goes towards charges for the patient whose record you are viewing or another member of their household. If you select [Guarantor], you can apply the payment to charges for any household members.
-
Paid at patient visit - The payment was made at the office when services were rendered.
-
Cashbox: Select the cash register you are using.
Tip: After you save a payment with a selected cashbox, that cashbox entry is auto-selected when you enter another payment.
-
Check # - The check number. This option is available only if the payment type is a check payment.
-
Bank/branch # - The bank account number on the check. This option is available only if the payment type is a check payment.
-
Reference # - The reference number of the electronic funds transfer. This option is available only if the payment type is an electronic payment.
-
Partial payment - The check or electronic payment amount is less than the allowed amount or the amount billed to the insurance carrier.
-
Claim - The claim that the payment applies to. The selection cannot be changed after you save the payment.
-
Incl. All Outstanding Txs. - If selected, treatments that have a guarantor estimate of $0, but are not fully paid off display below.
Note: Statistics regarding payments collected during visits display on the Payment Analysis Report.
-
-
The payment amount is applied automatically to the procedure with the oldest date of service and then to subsequent procedures based on the date until the payment amount is used up. If necessary, you can modify the Applied amount for any procedure in the procedure list as needed.

Important: If you attempt to apply a payment to a procedure that was performed in a different location from your current location, an icon and warning display next to the entry in the Applied column.

For your reference, the following amounts display:
-
The Amount Not Applied is the payment Amount minus the sum of the amounts in the Applied column. This amount will display as a credit on the patient's account, another household member, or guarantor, according to the Apply to charges for list.
-
The Amount Applied is the sum of the amounts in the Applied column.
Notes:
-
If you enter a payment for procedures on the same date as the service date or prior to the current date that are attached to a claim, Ascend Academic automatically calculates the estimated guarantor portion of the charges (if the patient has insurance coverage). However, if you enter a payment for procedures prior to the current date that are not attached to a claim, the system automatically calculates the estimated guarantor portion to be 100% of the charges.
-
If the patient has insurance coverage, and the estimated insurance portion for a given procedure is 100%, that procedure does not appear in the Enter Payment window.
-
-
ClickTap Save Payment.
-
Repeat Steps a - d for any other payments that you need to post.
-
-
Statement tab

Important: If a guarantor's address, email, or mobile number is incomplete or missing, a warning message displays on the window until the guarantor's information is updated on the patient's Patient Information page.
-
Set the following walkout statement options as necessary:
-
Statement View
-
Guarantor View - Select the radio button to include transactions for the current patient and all patients who have the same guarantor as the current patient.
-
Patient View - Select the radio button to include transactions for the current patient.
-
-
Statement message - Enter the message you want to display at the bottom of the walkout. This message will be saved for the current patient and display on this patient's individual statements and walkouts from now on when you clicktap Print Walkout Statement. In addition to this patient-specific message, if a default message exists for batch statements, a general message may also display at the bottom of the walkout.
-
Include credit card payment options - Select this check box to have credit card payment options appear on the walkout.
-
Include location abbreviation - Select this check box to display the location abbreviation of the applicable rendering location (if an abbreviation has been set) next to each procedure on the statement.

-
Include due date as - Select this check box to have the specified date entered as the due date on the walkout.
Note: You can choose a date that is 1 to 180 days in the future. However, industry consultants recommend that the due date be 30 days, which is the default.
-
Hide insurance estimates - Select this check box to hide the insurance portion from the statement so that the total treatment balance displays. If selected, the generated and printed walkout will display the Please pay this amount field the same as the Total Balance field and the Estimated Insurance and Patient Portion fields will be removed from the summary.
Note: This check box is selected by default.
-
-
ClickTap Actions and hover over Print.
-
(Optional) If necessary, deselect the Add to Patient Connection check box to prevent a copy of the statement being saved to the patient's Patient Connection page and Document Manager.
Note: If the Guarantor View radio button is selected and the Add to Patient Connection check box is selected, a patient connection is added, a copy of the statement is saved, and the last billed date is also updated for the patient's guarantor and all patients with that guarantor.
-
ClickTap Print.

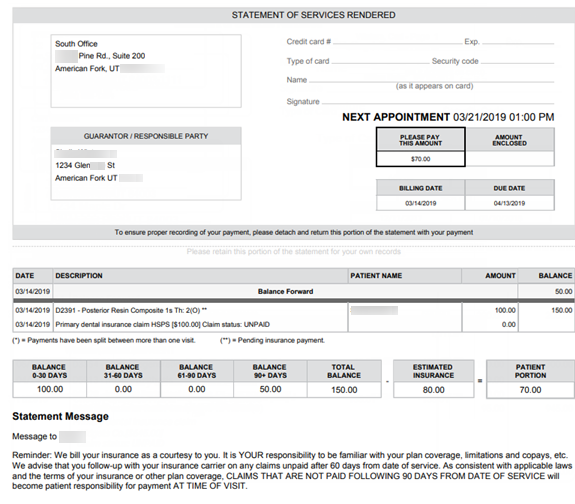
A .pdf version of the walkout displays.
Note: A balance forward amount will display on the walkout for the account's balance up to today's date.
-
-
-
If a reminder notification to complete a self evaluation displays at the bottom of the screen, clicktap the notification to open the Student Evaluations page.
Note: The notification only displays if you are a student that requires evaluation.

Comments
0 comments
Please sign in to leave a comment.