


You can upload documents and images from your computer to a patient's record.
To upload documents
How to get there
-
From the Patient menu, under General, select Document Manager.
The patient's Document Manager page displays.
Note: If the correct patient is not already selected, use the Patient Search field to access the patient's record.
-
On a patient's Document Manager page, clicktap Upload.

The Upload Files window displays.

-
Drag a file from another open window or clicktap Browse to locate the correct file.
The supported file types include .pdf, .jpg (.jpeg), .png, .gif, .doc, .docx, .ppt, .pptx, .xls, .xlsx, .eml, .html, and .msg.
Important: Do not use files with names that have special characters, such as #, $, and %.
Notes:
-
The maximum file size for files that you want to upload to the Document Manager is 20MB.
-
The file passes through an anti-virus scanner upon being uploaded.
-
-
Repeat Step 2 for any other documents that you want to upload. The selected files are listed in the window.
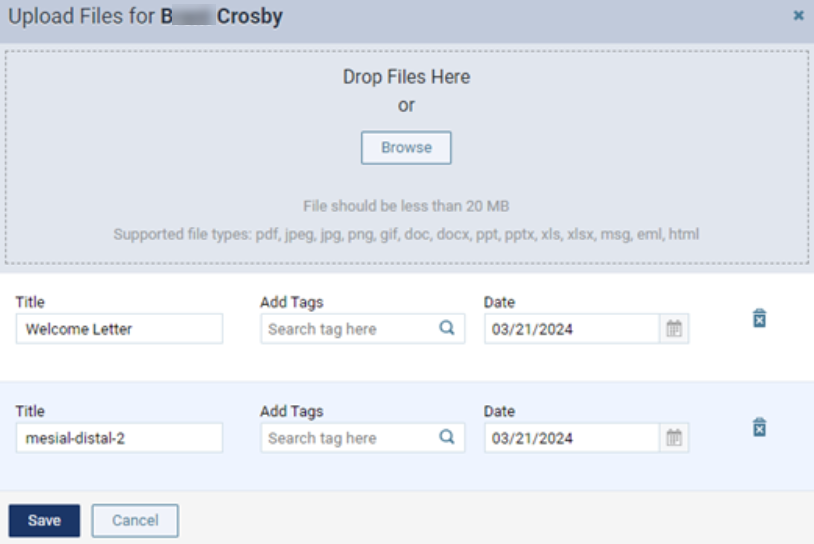
Tips:
-
To change the name of the uploaded item, clicktap in the in the Title field and enter the name as you want it to display in the document manager.
-
To remove an item so it is not added to the patient's record, clicktap the Delete
 icon and clicktap Delete when prompted to confirm.
 -
To add tags that categorize or classify the item being uploaded, clicktap in the Add Tag field, enter text to search for a tag, and select the correct tag. Repeat as necessary to add up to five other tags.
Note: If you do not add a tag right now (e.g., if you cannot find an applicable tag), you can add tags later.
-
-
ClickTap Done.
Comments
0 comments
Please sign in to leave a comment.