
You can attach images that you have acquired using Ascend Academic Imaging to a claim.
How to get to there
-
From the Home menu, under Insurance, select Unsent Claims.
The Unsent Claims page displays.
How to get to there
-
From the Home menu, under Insurance, select Sent Claims.
The Sent Claims page displays.
How to get there
-
From the Patient menu, under Insurance, select Insurance Claims.
The patient's Insurance Claims page displays.
Note: If the correct patient is not already selected, use the Patient Search field to access the patient's record.
How to get there
-
From the Patient menu, under Financial, select Ledger.
The patient's Ledger page displays.
Tip: You can also access the Ledger page from the patient's Overview page > Ledger widget.
Note: If the correct patient is not already selected, use the Patient Search field to access the patient's record.
To attach images to a claim
-
On the Unsent Claims page or Sent Claims page, clicktap a claim to display the Claim Detail window.
Tip: You can also display the Claim Detail window from the patient's Insurance Claims page or the patient's Ledger page.
Unsent Claim

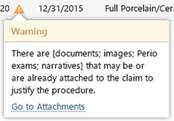
Note: If the patient has images for the same date of service as a procedure on the claim, a warning icon displays. You can click the icon to view the warning message and click the Go to Attachments link.
-
ClickTap the Attachments tab.

-
Add images from the patient's images.
-
ClickTap Add Image to display the Add from Imaging window.

-
ClickTap a procedure with the correct date of service to view the corresponding images. Select the check boxes of the images that you want to attach to the claim. Repeat this process as necessary.
-
ClickTap Add.
-
Comments
0 comments
Please sign in to leave a comment.