
If an individual image or any images in a set did not get uploaded to the server, you can recover those images from the computer where those images were acquired.
To recover images
How to get there
-
From the Patient menu, under Clinical, select Imaging.
The patient record displays with the Imaging tab selected.
Tip: You can also access imaging from other clinical areas such as Chart, Progress Notes, Quick Exam, Perio, or Tx Planner.
Note: If the correct patient is not already selected, use the Patient Search field to access the patient's record.
-
On the patient's record > Imaging tab, clicktap the Imaging tab menu and select Show Image History.

The patient's imaging page opens to the history view, and the most recent image or series (such as a full mouth series or bitewings) is selected by default on the Images tab.

-
Select an image or series (such as a full mouth series or bitewings).
-
On the corresponding options menu, select Recover images.

The options for recovering images display.

-
Under Recover Images From, set up the following filters:
-
Timeframe - Select The past Two Days or All Time.
-
Category - Select Current Image Category or All Image Categories.
-
Patients - Select Current Patient or All Patients.
-
-
ClickTap Start Recovery.
The images that can be recovered display in the panel at the bottom of the page.

-
One at a time, drag the correct thumbnail images from the panel to the appropriate boxes of the template.
-
As needed, complete any of the following:
-
To stack multiple images in one template slot, drag a thumbnail image from the panel at the bottom or an image from a template slot to a template slot that already has an image assigned. That image is put on the top of the image stack for that template slot, but you can choose a different image to be on top.
-
To choose the top image for a template slot with multiple images, clicktap the Previous or Next button
 above the template slot as needed to view the correct image in the stack. The image that is visible in the stack when you clicktap Begin Uploading will be set as the top image of the stack, but you can choose a different image to be on top later.
 -
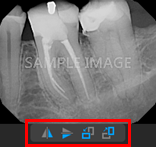
To change the orientation of an image in the template, navigate to the correct image in the stack for a template slot (if multiple images are assigned to that template slot), select the image to view the toolbar and clicktap any of the available buttons as needed: Flip Horizontal, Flip Vertical, Rotate Counterclockwise (90 degrees), and/or Rotate Clockwise (90 degrees).
-
To remove a new image from the template, navigate to the correct image in the stack for a template slot (if multiple images are assigned to that template slot) and drag the image back to the panel at the bottom.
-
-
When ready, clicktap Begin Uploading.
Comments
0 comments
Please sign in to leave a comment.