
You can enter a perio exam on a patient's record.
Important: If you do not finish or save a perio exam as a draft, it will be deleted the next day at 11:59 PM.
Tip: If you cannot complete a perio exam in one visit, you can save the in-progress exam as a draft and return to work on the draft during future visits until the exam is complete.
Note: You must have the Review Perio exams and Create and edit Perio exam security rights to save exams as drafts.
To enter a perio exam
How to get there
-
From the Patient menu, under Clinical, select Perio.
The patient's clinical record displays with the Perio tab selected.
Note: If the correct patient is not already selected, use the Patient Search field to access the patient's record.
-
On a patient's clinical record > Perio tab, clicktap New Perio Exam.

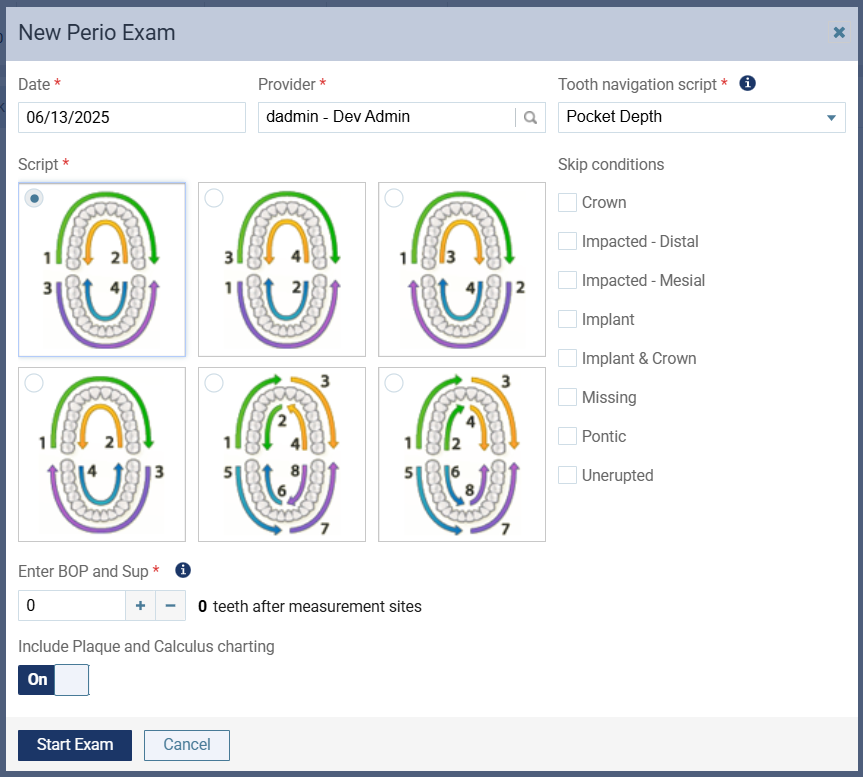
The New Perio Exam window displays.
-
Select the necessary options, such as the arch and tooth sequence and the teeth to be skipped.
Set the following options:
-
Date - Verify that the date is correct. If necessary, you can change it.
-
Provider - Verify that the correct provider is associated with the exam. If necessary, select a different provider.
-
Tooth navigation script - Select a script that allows you to enter primarily pocket depths, primarily gingival margins, pocket depth and gingival margin at each measurement site, primarily mucogingival junctions, the pocket depth and mucogingival junction at each measurement site. A selection frame will display next to the specified measure (PD, GM, or MGJ) during the exam by default, but you can toggle between pocket depth to gingival margin as needed.
-
Skip Hard Palate for MGJ - If the Tooth navigation script field is set to Pocket Depth & Mucogingival Junction or Mucogingival Junction, a Skip Hard Palate for MGJ toggle displays. By default, the toggle is On, so the lingual side of the upper arch will be skipped because MGJ measurements cannot be taken in that area. To include the lingual side of the upper arch in the script, set the toggle to Off.
-
Script - Select the method that you will use to move around the patient's mouth to take perio measurements.
-
Skip conditions - Specify if any teeth will not get examined. Teeth with any of the selected conditions will be skipped automatically.
-
Enter BOP and Sup [#] teeth after measurement sites - Enter the number of teeth that you must measure before you can start entering bleeding and suppuration.
Example: If you enter 4, you must enter measurements for Distal, Center, and Mesial on the Facial side of teeth one through four) unless you clicktap a different area of the exam than where the script starts. Zero (0) indicates that you can start entering bleeding and suppuration immediately upon starting the exam. Also, as you follow the script to continue charting, the selection frame for BOP and Sup trails behind the current position by the specified number of teeth (as with our example of four, if the current position is tooth 10, the selection frame for BOP and Sup is on tooth six).
-
Include Plaque and Calculus charting - This toggle is enabled by default. When turned on, it activates the corresponding Plaque and Calculus scripts, allowing users to chart related data.
Note: When the toggle is turned off, the Plaque and Calculus charting options are disabled and will not appear during the charting process. When modifying an existing Perio exam, users cannot change the Include Plaque and Calculus charting toggle. The setting remains fixed as it was during the original exam creation.
-
-
ClickTap Start Exam.
The options for entering a perio exam become available.

-
(Optional) To hide a previous exam's measurements, clicktap the Show prev. exam values toggle to set it to Off.
Note: If the patient has a previous perio exam entered, the measurements (pocket depth, gingival margin, clinical attachment level, mucogingival junction, furcation grade, bone loss, and mobility) from that exam display in gray by default.

-
Enter probing depths and/or gingival margins, and chart conditions, such as bleeding and furcation, for each tooth.
.
Tip: The order depends on the script selected in Step 2.

-
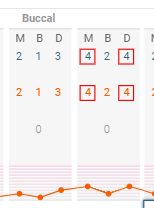
PD - For the Pocket Depth or Pocket Depth & Gingival Margin charting modes, enter the probing depth values (0 to 19). For the Gingival Margin charting mode, enter the pocket depth values in the M, B (or F or L) and/or D columns.
Note: For measurements that are four or greater, a red box displays around the number on the chart.
-
GM - For the Gingival Margin charting mode, enter the gingival margin values (-19 to 19). For the Pocket Depth & Gingival Margin charting mode, enter the gingival margin values after entering the pocket depth value. For the Pocket Depth charting mode, enter the gingival margin values in the M, B (or F or L) and/or D columns.
Note: For measurements that are four or greater, a red box displays around the number on the chart.
-
MGJ - Enter the mucogingival junction values in the M, B (or F or L) and/or D columns.
Note: For measurements that are critical (where MGJ minus PD is two or less), a red box displays around the number on the chart.
-
PLQ - Enter the Plaque values in the M, B (or F or L) and/or D columns.
-
SPGC - Enter the Supragingival Calculus values in the M, B (or F or L) and/or D columns.
-
SBGC - Enter the Subgingival Calculus values in the M, B (or F or L) and/or D columns.
-
BOP - If bleeding is present for any sites, clicktap the applicable circles in the M, B (or F or L) and/or D columns.
Tip: To quickly add bleeding to multiple sites, clicktap the shortcut icon or press the B key to toggle between the bleeding options:
-
The
 icon removes bleeding from all columns.
 -
The
 icon adds bleeding to the outside columns.
 -
The
 icon adds bleeding to all columns.
-
-
SUP - If suppuration is present for any sites, clicktap the applicable circles in the M, B (or F or L) and/or D columns.
Tip: To quickly add suppuration to multiple sites, clicktap the shortcut icon or press the S key to toggle between the suppuration options:
-
The
 icon removes suppuration from all columns.
 -
The
 icon adds suppuration to the outside columns.
 -
The
 icon adds suppuration to all columns.
-
-
Furc - Select a furcation grade (F0 to F4), where applicable to the tooth site.
-
Bloss - Select an amount of bone loss (None to Severe).
-
Mob - Select a level of mobility (None to Class III).
Tips:
-
You can clicktap the left/right arrow buttons to rewind and advance the script for the exam or clicktap an area on the graph to go directly to that part of the script for the exam.

-
You can also use your keyboard's left/right and up/down arrow keys to move the selection frame between the sites.
-
To remove an entered value, select a site and press the Delete key on your keyboard.
-
You can use the number buttons or keyboard keys to enter probing depths and gingival margins.

-
To change the Tooth navigation script to Pocket Depth & Mucogingival Junction from the perio chart, you can press the Shift + 5 keys on the computer keyboard.
-
You can zoom in/out during the exam by holding down the Ctrl key and scrolling or by moving the Zoom slider between Full, Quad, and Tooth.
Note: The Full option is available only if the resolution of your computer'sdevice's display is high enough.

-
To switch between hiding and showing the perio exam controls for entering data, clicktap the Hide and Show
 icons.
 -
To view an explanation of all the abbreviations and symbols that are used for perio exams, clicktap the Legend
 icon.
icon.
-
You can enter bleeding and suppuration separately from the script for the exam. ClickTap the left/right arrow buttons to move between areas in the mouth.
To enter bleeding and suppuration for an entire sextant at once, clicktap Mark Bleeding and Suppuration to display a Mark Bleeding and Suppuration (All Teeth View) window. By default, the tab of the sextant corresponds to the selected tooth, but you can enter bleeding and suppuration on any tab as needed. In a sextant, you can quickly specify bleeding and suppuration for all sites, for the same site on all teeth on the buccal or lingual sides, or on a tooth by tooth basis. When finished, clicktap Save.


Note: As you enter probing depths, the exam advances to each site and tooth automatically.
-
-
When ready, complete one of the following to save your work:
-
If the exam is still in-progress and will be completed another day, clicktap Draft.
-
If the exam is finished, clicktap Finish Exam.
-
-
If prompted with the Finish Perio Exam window because the patient has a previous exam, complete one of the following:
-
To save the current exam with the previous exam's measurements in places where there are no new measurements, clicktap Save Exam with the Previous Values.
-
To save the current exam without any of the previous exam's measurements, clicktap Save Only New Values.
-
Comments
0 comments
Please sign in to leave a comment.