
If necessary, you can edit simulation patient templates.
Note: You need the Create simulation patients security right to edit a simulation patient template.
To edit a simulation patient template
How to get there
-
From the Settings menu, under Patient Care, clicktap Simulation Patients.
The Simulation Patients page displays.
-
On the Simulation Patients page, clicktap the
 icon of a template listed under Simulation Patients with Templates.
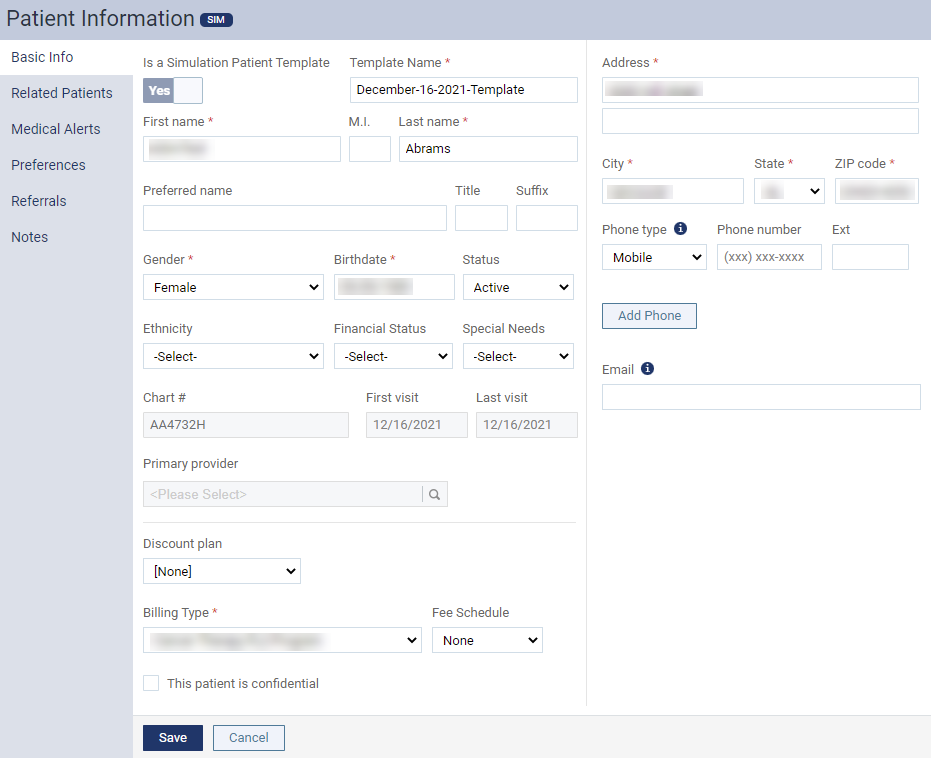
The Patient Information page for the template displays.
-
Edit the following tabs as necessary:
-
Basic Info
-
Set up the following fields as necessary:
-
Template Name - Enter a new template name. If you exceed the 45 character limit, a
 icon displays.
Tip: As simulation patient templates display on the Simulation Patients page by their template names, it's recommended you enter an appropriate name.
-
Name - Enter the patient's first and last name and middle initial.
-
Preferred Name - The name the patient prefers you use when addressing them.
Note: The preferred name can be used on correspondence from your office.
-
Title - Enter a prefix for the patient's name.
Examples: Dr., Mr., Ms., or Mrs.
-
Suffix - Enter a suffix for the patient's name, if applicable.
Examples: Jr., Sr., or III.
-
Gender - Select the patient's gender.
-
Birthdate - Enter the date of the patient's birth.
-
Status - Select Active, Non-Patient, Inactive, or Duplicate as the patient's status.
Note: Changing the patient's status to Duplicate or from Duplicate to another status requires the security right to manage duplicate patients.
-
Chart # - Enter a unique chart number for the patient or clicktap the Update
 icon to generate a chart number automatically for the patient.
Note: It can be a maximum of 10 characters in length. Letters, numbers, periods, and dashes are all permitted.
-
First Visit - This is the date of the patient's first visit. This date is for reference only and cannot be edited. This date updates automatically when you post a completed procedure for a new patient.
-
Last Visit - This is the date of the patient's most recent appointment. This date is for reference only and cannot be edited. This date updates automatically when you post a completed procedure for a patient.
-
Primary Provider - Select the preferred or primary provider for this patient. Only providers who have access to the patient's preferred location are available. If a
 icon displays on the Primary Provider field with the (inactive) label beside the provider's name, it means the set primary provider is no longer active.
You need to assign a new primary provider that is active or remove the inactive provider to save your changes. If you don't and attempt to save, a warning window displays until you do. When you do, the action is audited in the Audit Log with the old and new value of the provider.
Note: If a provider is already associated with the patient but no longer has access to the current location, they are still available in the list unless you select a different provider and save the change.
-
Discount Plan - Select a fee schedule to use for treatment-planned procedures and charges that are billed to this patient if the patient does not have insurance coverage.
The difference between the provider's fee for a given procedure (or if there is no provider fee, the default fee) and the discount fee displays as a credit adjustment on the ledger. However, if the patient has insurance coverage, the selected discount fee schedule is ignored.
-
Billing Type - Select the patient's billing type.
-
Fee Schedule - Select a fee schedule to use for the patient level. If set, the patient-level fee schedule overrides all other fee schedules (Provider, Insurance, or Location Fee Schedules) to calculate:
-
Treatment amounts on procedures.
-
What the patient owes.
-
What insurance will cover.
Note: You cannot set a patient up with both a Discount Plan and a patient-level Fee Schedule. If attempted, a Validation Error window displays.
-
-
This patient is confidential - Select the check box to set the patient as a confidential patient.
Note: You can only save a patient as confidential patient if you have the View confidential patient security right. If you do not have the security right but select this check box, Ascend Academic cannot save.
-
Address - Enter the street address, city, state, and ZIP Code of the patient's residence. All correspondence is sent to this address unless the patient is not the guarantor; in which case, bills, account statements, and other financial documents are sent to the guarantor's address . By default, the address of the patient's primary contact, if that is someone other than the patient whose record you are adding, is entered.
Tip: To copy the address of another household member to this patient's record, click tap the Address, City, State, or ZIP Code field, and clicktap the Copy
 icon next to a household member. Only the address of the primary contact and other household members (if different) are available.
-
Phone number - Select a phone type (Home, Mobile, Work, or Other), and enter the correct Number and Ext (if applicable) for the patient.
Tips:
-
To add another phone number for the patient, clicktap Add Phone.
-
To copy the phone number of another household member, clicktap one of the phone number fields, and clicktap the Copy
icon next to a household member. Only the first (primary) phone number of the primary contact and other household members (if different) are available.
-
To change the priority of the patient's phone numbers, clicktap the Move Up button
 . To remove a phone number, clicktap the Remove button
  .
. Note: These buttons are not available for the first (primary) phone number.

-
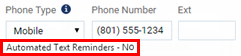
If you enter a mobile number and clicktap Save, the text Automated Text Reminders displays below along with a status message (Yes or Carrier not Supported) to indicate that the number you entered is verified as a supported or unsupported mobile number.
-
If the patient already has a mobile number entered, the status message next to the Automated Text Reminders text can be No if the patient is primary contact for themself or others and opted out of receiving reminders (any other patients with the same primary contact are also opted out).
-
The patient's text message reminder status also displays in the details of any of the patient's appointments that you double-clicktap on the schedule in the upper-right corner and on the Contact Info tab.

-
Once a supported mobile number is entered, and the patient's record is saved, the patient is opted in to receiving automated text message reminders. Any other patients with this patient as their primary contact or the same mobile number are also opted in. However, if the patient has someone else as their primary contact, the patient will receive text messages only if the patient's primary contact has a supported mobile number and that person is opted in.
-
If you do not have patient consent, or a patient informs you that they no longer want to receive text messages, you can set the phone number type to Home to turn off reminders for the patient. Patients who have consented may opt-out by texting STOP to 45827 from their mobile phones. Any patients with this patient as their primary contact or with the same mobile number as this patient entered in their patient records are also opted out.
-
-
Email - Enter the patient's email address. The email address must be unique across your entire organization (for all patients in all locations).

Notes:
-
If the patient has someone else as their primary contact, the primary contact's email address is used by default, but you can enter a different, unique email address for this patient if necessary.
-
If you add an email address to a patient record for the first time, the patient is their own guarantor, and their Preferred Billing Statement Delivery Method is set to By Mail, an Update Billing Method window opens when you click Save and you are prompted to update the preferred billing statement delivery method to Email.
-
An (
 ) indicator displays next to the Email field if the email is inactive. You can click the indicator to display a Warning window. The same indicator displays next to the patient name on the Billing Statements screen and the patient will not be sent their billing statement if the delivery method is set to Email.

-
-
-
ClickTap Save.
-
-
Related Patients

-
Primary Contact - To change the primary contact person for the patient, clicktap the Edit
 icon. In the search field, enter the contact's name to narrow the results, then select the appropriate name from the list or clicktap Switch to "Self" to make the patient you are viewing the primary contact.
Note: If the primary contact is someone other than this patient, the name and Preferred Contact Method of the patient's primary contact display on the Patient Information ribbon.
-
Add New Member - To add a patient record for another member of the same household, clicktap Add New Member.
Note: A household is a group of patients who have the same primary contact person. The complete list of household members is available when you are viewing the patient record of any member of a given household.
-
Secondary Contact - To add a secondary contact person for the patient, clicktap Add Secondary Contact. In the Select Patient field, enter the contact's name to narrow the results, then select the appropriate name from the list.
-
Primary Guarantor - To change the primary person who is financially responsible for the account, click the Edit
icon. In the search field, enter the guarantor's name to narrow the results, then select the appropriate name from the list or clicktap Switch to "Self" to make the patient you are viewing the primary guarantor.
Note: If the current patient is the guarantor, that patient and all patients for whom that patient is the guarantor display in the list. If the current patient is not the guarantor, only the guarantor and the patient display in the list.
-
Secondary Guarantor - To add a secondary person who is financially responsible for the account, clicktap Add Secondary Guarantor. In the Select Patient field, enter the secondary guarantor's name to narrow the results, then select the appropriate name from the list.
-
-
Medical Alerts

ClickTap Add Medical Alert to attach medical alerts to the patient's record.
-
Patient Forms

-
To request forms from the patient, clicktap Request Forms.
-
To view completed forms, expand the section of a form type that has completed forms, and clicktap a form.
-
To change the due date of a form, clicktap the corresponding Edit
 icon.
icon.
-
-
Preferences

-
Set the following options:
-
Preferred Contact Method - Select a radio button to indicate how the patient wants to be contacted.
-
Call me: If selected, the patient wants to be contacted by phone and if a phone number is not already entered for the patient, enter a phone number in the field that displays.
-
Text me: If selected, the patient wants to be contacted by text message and if a mobile phone number is not already entered for the patient, enter a mobile phone number in the field that displays.
-
Email me: If selected, the patient wants to be contacted by email message and if an email address is not already entered for the patient, enter an email address in the field that displays.
Note: These options are available only if the patient is their own primary contact. Currently, this information is for reference only.
Important: If someone else is the patient's primary contact, the preferred contact options are not available. You can click the name of the primary contact person shown to view or change their preferred contact method.

Notes:
-
The selected preferred contact method displays on the Patient Information ribbon, which is available when you are viewing the patient's record.

-
If someone else is the patient's primary contact, the name and contact method of the primary contact display on the Patient Information ribbon.

-
The preferred contact method does not impact whether the patient receives automated reminders as text or email messages.
-
-
Automated Reminders - Select Yes or No to indicate whether this patient and any patients with this patient as their primary contact receive automated text message reminders for appointments and recare.
Notes:
-
This field is available only if a supported mobile phone number has been entered on the Basic Info tab for the patient and the patient is their own primary contact.
-
Automated text message reminders for this patient and any patients with this patient as their primary contact will be sent to the mobile number displayed. If the patient has multiple mobile numbers, the first one listed on the Basic Info tab will be used.
-
If No is already selected, the date that the patient opted out displays. Any other patients with this patient as their primary contact or the same mobile number entered in their patient records are also opted out.
-
If you select No and clicktap Save, the patient is opted out, and the current date displays next to the No option. A text message, stating that the patient has been opted out, is also sent to the patient's mobile phone. Any other patients with this patient as their primary contact or with the same mobile number entered in their patient records are also opted out. The primary contact can resume receiving text messages for the entire household by texting RESUME to 45827.
-
-
Preferred Language - Select the patient's preferred language.
Note: English is the default language. If the preference is a language other than English, the selected language displays on the Patient Information ribbon when you view the patient's record.
-
Preferred Location - Select the office that the patient prefers to receive treatment at.
-
Preferred Appointment Day/Time - Select the check boxes that correspond to the days of the week and/or times that the patient prefers to have their appointments.
Note: The days that are available correspond to the working days set up on your practice's schedule. The preferred days and times display when you are scheduling an appointment for the patient.

-
Preferred Billing Statement Delivery Method - Select the By Mail or By Email radio button to set the patient's billing preference.
Note: If the patient is not their own primary guarantor, the Preferred Billing Statement Delivery Method field displays See [primary contact name] for delivery preferences. You must click primary contact name link to open the primary contact's Patient Information page > Preferences tab.
-
-
ClickTap Save.
-
-
Referrals
Complete one of the following:
-
In the Referred By search field, enter all or part of the source (patient, professional, marketing, or other) that referred this patient to your practice, then clicktap the appropriate source's name in the list.

-
To remove an existing referral source from the patient's record, clicktap the Remove
 icon next to the referral's name.
-
-
Notes

ClickTap Add Note to enter any notes specific to the patient to the patient's record.
Note: These notes will display in the patient's Overview page > Patient Notes widget. This field has a 5000-character limit.
-
-
When ready, clicktap Save.
Comments
0 comments
Please sign in to leave a comment.