
In some cases, individual group members may need to have a custom schedule that differs from the defined group working hours schedule. When necessary, you can manage an individual group member's working hours. This may include adding custom schedules or modifying existing custom schedules for the group member. In certain situations, you can also choose to remove the group working hours schedule from individual group members.
Important: Changes can be made to an individual's working hours from the group working hours or their user account. Once saved, the changes are reflected in both places.
Note: You need the Edit Working Hours security right to access and manage working hours for user groups.
To manage group member working hours
How to get to there
-
From the Settings menu, under Location, select Group Working Hours.
The Group Working hours page displays.
-
On the Group Working Hours page, select a listed user group.
Note: Only groups that have their Group Purpose set to Scheduling display in the user group list.

-
Select a listed provider and review the provider's current work schedule(s) using the Location and Schedule drop-down lists and arrow buttons.

-
Complete any of the following:
-
Add a custom schedule.
-
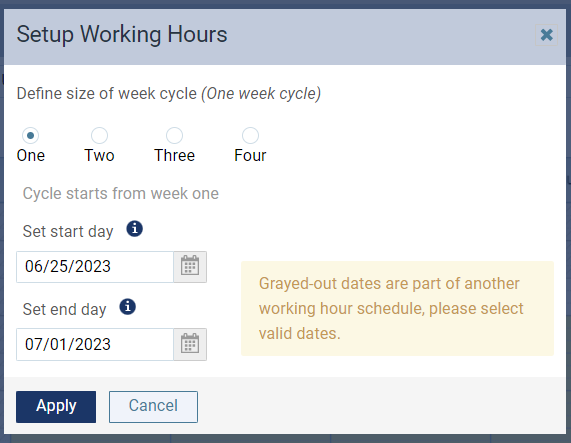
ClickTap the Manage menu and select Setup Working Hours to display the Setup Working Hours window.
-
Select a radio button to indicate the number of weeks for the schedule cycle.
-
ClickTap in the fields provided and select start and end dates for the schedule cycle from the displayed calendars.
Note: The fields default to the Sunday of the first week and the Friday of the last week that are available to be customized. If custom schedules already exist, their dates are unavailable.
-
ClickTap Apply.
-
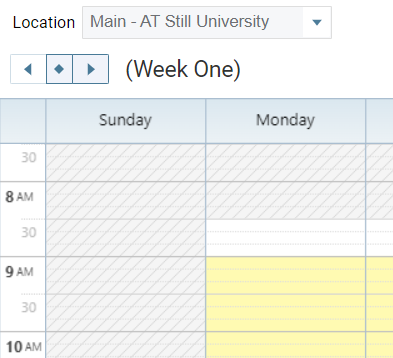
Under Week One, clicktap each applicable cell to select and display in yellow or white as necessary.
Notes:
-
If you selected the one radio button, Week One does not display as there is only one week to configure.
-
Yellow cells indicate working hours. White cells indicate non-working hours.
Tip: You can clicktap and drag to select multiple cells at once.
-
-
If applicable, clicktap the arrow buttons to move through the selected weeks and repeat Step e for each week in the cycle.
-
When ready, clicktap Save.
-
-
Add a custom schedule using the location's default hours.
-
Set the Location and Schedule drop-down lists as necessary.
-
ClickTap the Manage menu and select Use Location Hours.
-
ClickTap Save.
-
-
Modify a custom schedule.
-
Set the Location and Schedule drop-down lists as necessary and clicktap the
 icon display the Edit Working Hours window.
-
Modify the fields as necessary to indicate the number of weeks for the schedule cycle and the start and end dates.
-
ClickTap Apply.
-
Under Week One, clicktap each applicable cell to select and display in yellow or white as necessary.
Notes:
-
If you selected the one radio button, Week One does not display as there is only one week to configure.
-
Yellow cells indicate working hours. White cells indicate non-working hours.
Tip: You can clicktap and drag to select multiple cells at once.
-
-
If applicable, clicktap the arrow buttons to move through the selected weeks and repeat Step d for each week in the cycle.
-
When ready, clicktap Save.
-
-
Remove the group schedule.
-
Set the Location and Schedule drop-down lists as necessary.
-
ClickTap the Manage menu and select Remove Group Schedule.
The provider remains in the group but reverts to the last working hours schedule defined in their user account. The group schedule indicator is also removed from the top-right corner of the page.
Tip: If removed in error, you can select the <xxx> Group Hours option, clicktap the Manage menu, and select Apply to Group to re-apply the group schedule to the provider.
Important: This re-applies the group schedule to all group members.
-
-
Delete a custom schedule.
-
Set the Location and Schedule drop-down lists as necessary.
-
At the bottom of the schedule, clicktap Delete.

-
When prompted, clicktap OK to confirm the deletion.
The custom schedule is removed.
-
-
Comments
0 comments
Please sign in to leave a comment.