
You can generate a billing statement for a specific patient or account. You can then print and send that statement to the patient or guarantor.
To generate a billing statement
How to get there
-
From the Patient menu, under Financial, select Billing Statement.
The patient's Billing Statement window displays.
Note: If the correct patient is not already selected, use the Patient Search field to access the patient's record.
-
On the Billing Statement window, review the default settings.

Important: If a guarantor's address, email, or mobile number is incomplete or missing, a warning message displays on the window until the guarantor's information is updated on the patient's Patient Information page.
-
Set the following fields as necessary.
-
Statement Start Date
-
From last zero balance - Select the radio button to include transactions that were entered on the account's ledger since the account last had a zero balance.
-
Other - Select the radio button to include transactions that were entered on the account's ledger since the date you enter. The current date is entered by default, but you can change the date.
-
Walkout (Today Only) - Select the radio button to include transactions that were entered on the account's ledger today.
Note: On the statement, a balance forward amount will appear for the account's balance up to the specified date.
-
-
Statement View
-
Guarantor View - Select the radio button to include transactions for the current patient and all patients who have the same guarantor as the current patient.
-
By Statement - Select the radio button to list the transactions by statement.
-
By date - Select the radio button to list the transactions by the date entered.
Note: If you select the By date radio button, under Statement start date, the Other radio button is selected and the other radio buttons are disabled.
-
-
Patient view - Select the radio button to include transactions for the current patient.
-
-
Statement message - Enter the message you want to have display at the bottom of the statement. This message will be saved for the current patient (and appear on this patient's individual statements and walkouts from now on) when you clicktap Print. In addition to this patient-specific message, if a default message exists for batch statements, a general message may also display at the bottom of the statement.
-
Include credit card payment options - Select this check box to have credit card payment options appear on the statement.
-
Include location abbreviation - Select this check box to display the location abbreviation of the applicable rendering location (if an abbreviation has been set) next to each procedure on the statement.

-
Include due date as - Select this check box to have the specified date entered as the due date on the statement.
Note: You can choose a date that is 1 to 180 days in the future. However, industry consultants recommend that the due date be 30 days, which is the default.
-
Hide insurance estimates - Select this check box to hide the insurance portion from the statement so that the total treatment balance displays. If selected, the generated and printed walkout will display the Please pay this amount field the same as the Total Balance field and the Estimated Insurance and Patient Portion fields will be removed from the summary.
Note: This check box is selected by default.
-
-
ClickTap Actions and hover over Print.
-
(Optional) If necessary, deselect the Add to Patient Connection check box to prevent a copy of the statement being saved to the patient's Patient Connection page and Document Manager.
Note: If the Guarantor View radio button is selected and the Add to Patient Connection check box is selected, a patient connection is added, a copy of the statement is saved, and the last billed date is also updated for the patient's guarantor and all patients with that guarantor.

-
ClickTap Print.
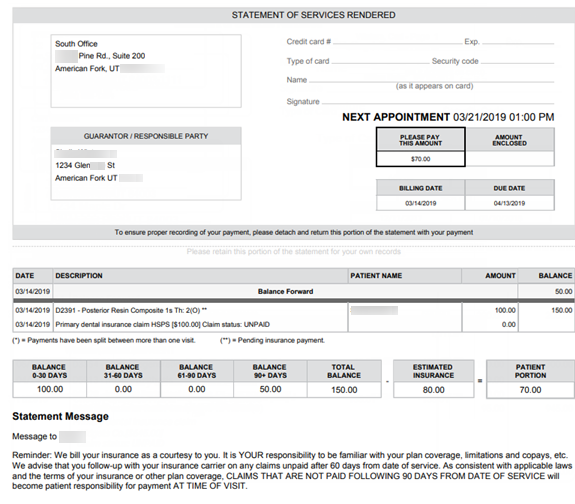
A .pdf version of the statement, which you can print, displays.
Note: If a clinic location has an alternate billing address set up, that address displays instead of the clinic address.
Comments
0 comments
Please sign in to leave a comment.