
You can generate a batch of billing statements, review statements, and print all or specific statements.
To generate billing statements
How to get there
-
From the Home menu, under Location, select Billing Statements.
The Billing Statement page displays with the Generate Billing Statements window open.
-
On the Billing Statement page, the Generate Billing Statements window displays automatically.

-
Complete the following fields as necessary.
-
Minimum guarantor portion to bill - To generate billing statements only for accounts with a guarantor portion that is greater than or equal to a certain amount, type the dollar amount (0.01 or greater). To not filter by a minimum guarantor portion, type 0.00.
-
Skip accounts with claim pending - To generate billing statements for only those accounts that do not have an outstanding claim, select the check box. To generate billing statements for accounts with and/or without an outstanding claim, deselect the check box.
-
Don't generate statements if added to Patient Connection after __ - Select the check box and select the applicable date if you send statements frequently and want to ensure you do not re-send statements within the billing cycle time frame.
-
Guarantor last name - To generate billing statements only for accounts with a guarantor whose last name begins with a letter in a specified range, select a letter for the start of the range and a letter for the end of the range. To use an open-ended range, leave All selected in either of the lists, and select a letter from the other list. To not filter by guarantor last name, leave All selected in both lists.
-
Payment Plans - Select whether to generate billing statements for accounts with and/or without a payment plan.
-
Exclude simulation patients - By default, simulation (sim) patient data is excluded. If necessary, deselect the check box to include sim patient data in the statement.
Note: If the report includes sim patient data, the sim patients will display on the report with a SIM label.
-
Billing Type - Select a billing type.
-
Statement Delivery Filter: Select one of the following delivery options:
-
Email if address exists, Mail to the rest - Delivers the statement electronically via email if an email address has been added or delivers the statement via mail if no email address has been added.
-
Only to patients with a preference of Email - Delivers the statement electronically to patients with their preference set to Email.
-
Only to patients with a preference of Mail - Delivers the statement via mail to patients with their preference set to Mail.
Important: The filters only display if your organization has the billing statement feature turned on. If it is turned off, the filters do not display.
-
-
Include credit card payment options - Select this check box to have credit card payment options appear on statements.
-
Include due date as - Select this check box to have the specified date entered as the due date on statements.
Note: You can choose a date that is 1 to 180 days in the future. However, industry consultants recommend that the due date be 30 days, which is the default.
-
Billing statement start date
-
From last zero balance - Includes transactions that were entered on an account's ledger since the account last had a zero balance.
-
Other - Includes transactions that were entered on an account's ledger since the date you enter. The current date is entered by default, but you can change the date.
Note: On each statement, a balance forward amount will appear for the corresponding account's balance up to the specified date.
-
-
Sort by
-
By Statement - Lists the transactions by statement.
-
By date - Lists the transactions by the date entered.
Note: If you select the By date radio button, under Statement start date, the Other radio button is selected and the From past zero balance radio button is disabled.
-
-
Include location abbreviation - Select this check box to display the location abbreviation of the applicable rendering location (if an abbreviation has been set) next to each procedure on the statement.

-
Hide insurance estimates - Select this check box to hide the insurance portion from the statement so that the total treatment balance displays. If selected, the generated and printed walkout will display the Please pay this amount field the same as the Total Balance field and the Estimated Insurance and Patient Portion fields will be removed from the summary.
Note: This check box is selected by default.
-
Billing statement message - Use the default billing statement disclaimer for the current location as the message that will display at the bottom of all generated billing statements, enter a message that you want to have display at the bottom of all generated statements, or clear the text to not have a message display. To reset the text to the system default, clicktap the Reset to default link. To update the default billing statement disclaimer for the current location to match the text you specify in this field, have the Save message as default statement disclaimer check box selected when you clicktap Generate.
-
-
ClickTap Generate.
Tips:
-
If necessary, you can navigate to other areas of Ascend Academic while the billing statements are being processed. Navigation during the process will not interfere with the generation of the billing statements.
-
While the statements are being processed, no other user can access the Billing Statements page. If attempted, an error message displays with your user name to indicate you are currently generating statements.
A batch of statements is generated.

On the left, the list of generated statements display a list of guarantor names and the balance in their account. If the guarantor's patient has received their statement electronically in the past, the
 icon displays beside the balance. You can clicktap the icon to view the name of the patient, when they last received a statement, and the amount on the statement.
 Important: If a
 icon displays beside a balance, the patient associated with the guarantor does not have a valid email address. You can clicktap the icon to confirm the issue on the generated tooltip. Also, if a guarantor's billing statement could not be created, the guarantor is listed with a icon instead of a check box and without a balance. You can contact Support as suggested on the warning message located on the upper-half of the page to address the issue.
 -
-
Select the name of any guarantor listed to view the corresponding billing statement.
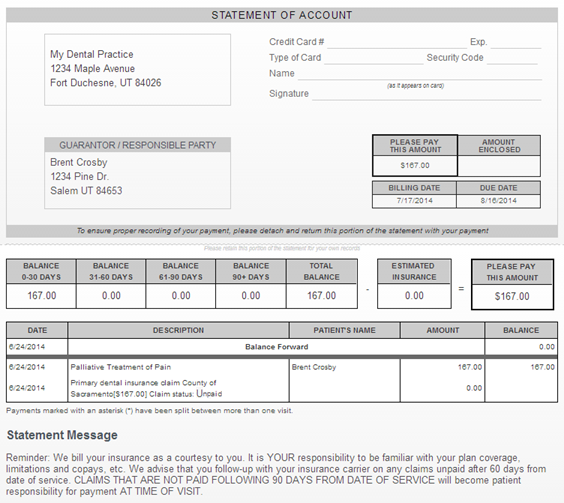
Note: If a clinic location has an alternate billing address set up, that address displays instead of the clinic address.
Tips:
-
If the statement is longer than one page, clicktap the Page Number
 icon that corresponds to the page that you want to view.
 -
To toggle between viewing the statement and viewing the statement with the list of guarantors, clicktap the Zoom
 icon.
icon.
-
-
For guarantors that should not receive a billing statement, deselect the corresponding check box.
Note: As you deselect and select guarantor check boxes, the Total Statements and Total Due figures near the top of the page update automatically to reflect your selections.
Tips:
-
When viewing the Billing Statements page, no other user can access the page. If a user attempts to do so, an error message displays your user name to indicate that you are currently reviewing statements.
-
If you navigate to another part of Ascend Academic during the review, the state of the review (the settings that you have specified, all of the statements in the batch, and which statements are selected for printing) is saved for the next time you return to the Billing Statements page or until you generate a new batch of statements.
-
-
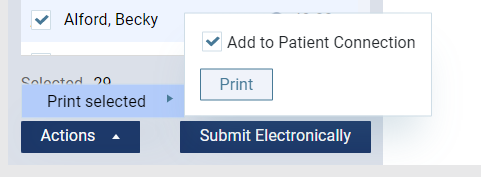
ClickTap Actions and hover over Print selected.
-
(Optional) If necessary, deselect the Add to Patient Connection check box to prevent a copy of the statement being saved in the patient's Patient Connection page and Document Manager.
Note: If you click Submit Electronically, the statement is sent to the Patient Connection page regardless of whether the check box is selected.
-
ClickTap Print.
A .pdf file that contains the selected statements is created and displays in a new browser tab or window so that you can print those statements.
Note: Each statement starts on a new page of the document, and a statement may be longer than one page.
-
ClickTap Submit Electronically to send the statements electronically to the DMA.
Comments
0 comments
Please sign in to leave a comment.