
You can enter and manage information on a patient's recare record as a note. You can use the note to record important information, patient's recare progress, and your thoughts to improve your communication with your patients. You can even record information that will be helpful in a patient's follow-up appointment.
To add a recare note
How to get there
-
Use the Patient Search field to access a patient's record.
Notes:
-
If the last patient record you accessed since you last logged on is the correct patient's record, you do not need to re-enter the patient's name in the Patient Search field.
-
You can include inactive patients in the search results by setting the Include inactive patients toggle switch to On.
Important: If the Access Confidential Patient window displays after selecting the patient from the search results, it means the patient is a confidential patient and you don't have the security rights to access their record. To continue, a user with the security rights must enter their credentials into the window. Once given access, you have access to the patient's information until your session expires.
-
-
From the Patient menu, under General, clicktap Recare.
The patient's Recare page displays.
How to get there
-
Use the Patient Search field to access a patient's record.
Notes:
-
If the last patient record you accessed since you last logged on is the correct patient's record, you do not need to re-enter the patient's name in the Patient Search field.
-
You can include inactive patients in the search results by setting the Include inactive patients toggle switch to On.
Important: If the Access Confidential Patient window displays after selecting the patient from the search results, it means the patient is a confidential patient and you don't have the security rights to access their record. To continue, a user with the security rights must enter their credentials into the window. Once given access, you have access to the patient's information until your session expires.
-
-
From the Patient menu, under General, clicktap Overview.
The patient's Overview page displays.
How to get there
-
From the Home menu, under Reports, clicktap Ongoing Patient Care.
The Ongoing Patient Care page displays.
-
Open a recare note for a patient's recare in any of the following areas of Ascend Academic:
-
A patient's Recare page
-
On a patient's Recare page, select a recare type.

The options for editing the recare type displays on the right panel.

-
-
A patient's Overview page
-
On a patient's Overview page > Recare widget, clicktap a note icon located in the Note column.

Note: Recare types that don't have recare notes display with the
 icon, and recare types that have recare notes display with the
  icon.
icon.The Recare Note window displays.

-
-
The Recare management Report
-
On the Ongoing Patient Care page > Recare Management tab, set the filters as necessary:
-
Locations - Select All to view recare types for all locations, or clicktap Select Locations and select specific location(s) to view recare types for only those locations. The report uses the location in which a given recare type was added to a patient record. It does not use the patient's preferred location, unless the patient does not have a given recare type attached, or the location of his or her recare appointment.
-
Provider - Displays a list of patients that has the set provider as their primary provider. By default, is set to None if you're not a provider, or is set to yourself if you are a provider. To set the filter to a different provider, enter and select them from the generated search results. To display all patients regardless of their primary provider, clear the filter and select None from the generated search results.
-
Patients - Select With Recare if you want to only view patients with attached recare type(s), or select No Recare if you only want to view patients without attached recare type(s).
-
Appointment - Select All if you want to view all recare patients, Scheduled if you only want to view only patients with a scheduled recare appointment, or Unscheduled if you only want to view patients without a scheduled recare appointment.
-
Due Date Range - ClickTap the field and select one of the following options:
-
Last Month - Displays patients with recare that was due last month.
-
Current Month - Displays patients with recare that is due this month.
-
Next Month - Displays patients with recare that is due next month.
-
Custom Range - Displays patients with recare that is due within a set date range. If selected, select two dates from the calendar that displays and clicktap Done.
-
-
Recare Type - Displays a list of recare patients based on the attached recare type(s). By default, the All check box is selected. If you want to view patients with specific recare type(s), clear out the check boxes that correspond to the recare types that you want to exclude from the report, respectively.
-
-
ClickTap Search to generate a report.

-
ClickTap a note icon located in the Note column.
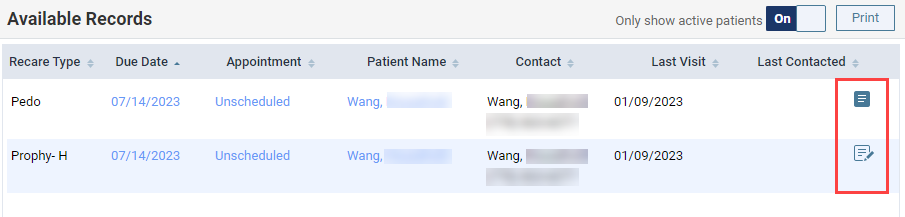
Note: Recare types that don't have recare notes display with the
icon, and recare types that have recare notes display with the icon.The Recare Note window displays.
-
-
-
Enter or edit the desired note in the Note field.
Tip: You can enter the current date to the note by clickingtapping the Insert Date button. This allows you to keep track of when a specific note was entered to the patient's recare record.
Note: If you're working on a recare note and another user updates it, a warning notification displays.
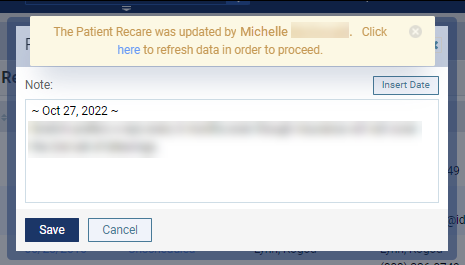
To refresh the note, clicktap the here link on the notification.
-
ClickTap Save.
Comments
0 comments
Please sign in to leave a comment.